Spring Cloud Config可以对微服务配置进行统一的外部管理,并且默认采用Git来管理配置信息。相对于传统的每个微服务对应一份自个儿的配置文件来说,通过Spring Cloud Config统一管理所有微服务配置具有如下优点:1.集中管理微服务配置,当微服务数量众多的时候,使用这种方式会更为方便;2.通过Git管理微服务配置,方便追踪配置修改记录;3.可以在应用运行期间修改配置,微服务能够自动更新配置。
Spring Cloud Config包含了服务端Server和客户端Client。服务端用于从Git仓库中加载配置,并且缓存到本地;客户端用于从服务端获取配置信息。所以为了演示Spring Cloud Config,我们先来搭建一个服务端。
搭建Config-Server
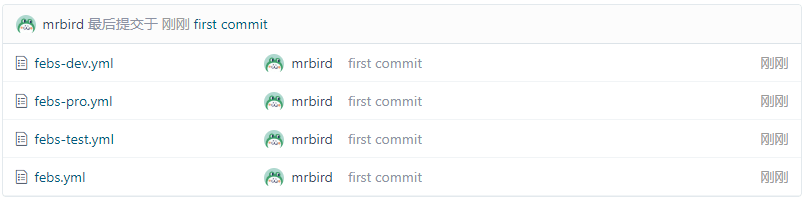
在搭建Config-Server之前,我们需要创建好一个存储配置文件的Git仓库。这里以码云为例子,创建一个名称为Spring-Cloud-Config的参考,然后往仓库的master分支push四个配置文件:
四个配置文件中分别都包含了一个message属性:
febs.yml:
1 | message: 'default properties (master v1.0)' |
febs-dev.yml:
1 | message: 'dev properties (master v1.0)' |
febs-test.yml:
1 | message: 'test properties (master v1.0)' |
febs-pro.yml:
1 | message: 'pro properties (master v1.0)' |
接着创建一个test分支,同样push这四个配置文件,不过配置文件中message属性的内容末尾都改为了(test v1.0)。
创建好配置文件仓库后,我们新建一个Spring Boot项目,artifactId为Config-Server,然后引入如下依赖:
1 | <dependencyManagement> |
在入口类中加入@EnableConfigServer注解,开启Spring Cloud Config服务端功能。
接着配置application.yml:
1 | spring: |
uri的末尾加不加.git都可以。
配置具体含义如下:
spring.cloud.config.server.git.uri:配置了Git仓库的地址,这里用的是码云,当然你也可以使用别的Git代码托管平台;spring.cloud.config.server.git.username:仓库用户名,即Git托管平台的用户名;spring.cloud.config.server.git.password:仓库密码,即Git托管平台的密码。
这里服务端的端口号为12580。
启动应用,我们便可以使用下面这些格式来访问配置信息了:
/{application}/{profile}[/{label}]/{application}-{profile}.yml/{label}/{application}-{profile}.yml/{application}-{profile}.properties/{label}/{application}-{profile}.properties
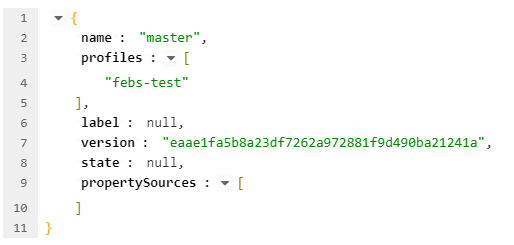
比如当我们访问http://localhost:12580/master/febs-test时,响应信息如下所示:
访问http://localhost:12580/master/febs-test.yml:

访问http://localhost:12580/test/febs-test.yml:

至此服务端搭建成功。
搭建Config-Client
新建一个Spring Boot项目,artifactId为Config-Client,然后引入如下依赖:
1 | <dependencyManagement> |
编写一个Controller,用于测试获取Config-Server中配置文件的message属性值:
1 |
|
要想让上面的代码顺利的获取到message属性值,我们还需要在配置文件中进行一些额外配置:
1 | spring: |
值得注意的是,这里配置文件并不是叫application.yml,而是必须命名为bootstrap.yml。
上面配置含义如下:
spring.application.name: 对应配置文件规则中的{application};spring.cloud.config.profile: 对应配置文件规则中的{profile}部分;spring.cloud.config.label: 对应配置文件规则中的{label}部分;spring.cloud.config.uri: 对应Config-Server的地址。
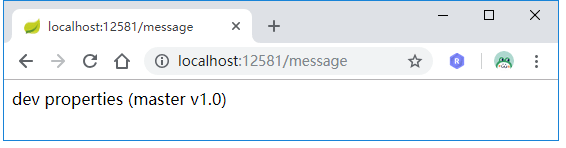
通过上面的配置,message的内容应该是Git仓库中test分支,febs-dev.yml中的message属性值。下面我们来证实一下这个推测。
启动Config-Client(Config-Server没启动的话得先启动Config-Server),访问http://localhost:12581/message:
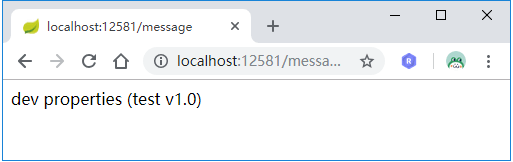
结果证实了我们的推测。
Config-Server额外配置
上面我们简单的地搭建了一个Config-Server,下面我们来进一步了解Config-Server的可用配置。
占位符的使用
在Config-Server中,除了固定配置一个Git仓库地址外,我们也可以使用占位符来灵活的指定Git仓库地址。
将上面Config-Server的Git仓库地址改为:
1 | spring: |
这里使用占位符{application}来代替上面的spring-cloud-config,通过这种配置,我们可以让不同的Config-Client去不同的Git仓库获取配置。比如,当Config-Client的项目名称为febs的时候,对应Git仓库地址为:https://gitee.com/mrbird/febs,当名称为test时,对应Git仓库地址为:https://gitee.com/mrbird/test。这样我们就可以为不同的项目配置不同的Git仓库。
子目录支持
除了使用占位符为每个项目创建单独的Git仓库来存储配置信息外,我们也可以只创建一个Git仓库来存储配置,只不过是将不同的项目配置放置到不同的目录下,只需要像下面这样配置即可:
1 | spring: |
通过上面的配置,我们可以实现在https://gitee.com/mrbird/spring-cloud-config/仓库中,一个Config-Client对应一个配置目录的效果,即当Config-Client的项目名称为febs的时候,其搜索配置的目录为https://gitee.com/mrbird/spring-cloud-config/febs。
这里search-paths的占位符必须加上单引号'',否则没办法正确读取配置,具体可参考:https://blog.csdn.net/weixin_35022258/article/details/79019033
clone-on-start
默认情况下Config-Server在启动的时候并不会马上就去Git参考clone配置文件,只有当Config-Clinet从Config-Server获取相关配置信息的时候,其才会去进行clone操作。我们可以将clone-on-start属性设置为true,其Config-Server在启动的时候就进行clone操作:
1 | spring |
这样做的好处在于,当Git连接信息有误时,可以马上发现。
整合Spring Security
Config-Server中包含了Git连接信息,为了使其更加安全,我们可以通过Spring Security来做用户名密码认证。
在Config-Server中加入Spring Security依赖:
1 | <dependency> |
然后在Config-Server的配置文件application.yml中加入用户名和密码:
1 | security: |
与此同时,我们也需要在Config-Client中配置Config-Server的用户名和密码,否则在获取配置的时候将报401错误:
1 | spring: |
加密解密
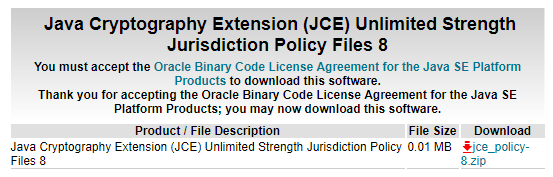
截至目前为止,Config-Server中Git仓库的密码是直接明文配置的,我们可以对这些敏感信息进行加密处理。在此之前,需要先安装JCE(Java Cryptography Extension),本文使用的是JDK 8,与之对应的JCE下载地址为:https://www.oracle.com/technetwork/java/javase/downloads/jce-all-download-5170447.html:
解压后,包含三个文件:
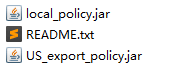
把它们复制到$JAVA HOME/jre/lib/security目录下即可。
对称加密
使用对称加密的方式需要在Config-Server中配置加密用的密钥:
1 | encrypt: |
配置好后重启Config-Server,访问http://localhost:12580/encrypt/status查看密钥是否配置成功:
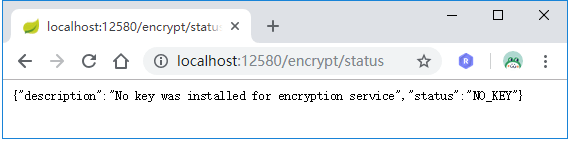
可见配置并未生效,查看Spring-Cloud-Config的Github issue找到了解决办法:https://github.com/spring-cloud/spring-cloud-config/issues/767。
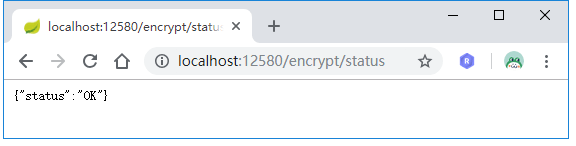
解决办法就是需要将密钥配置在bootstrap.yml中,再次访问http://localhost:12580/encrypt/status:
假如我们Git仓库的密码为mrbird123,要对其加密的话我们可以使用curl命令来获取加密后的密码:

因为Config-Server设置了用户名和密码,所以在使用curl命令时,需要带上-u mrbird:123456。
可看到mrbird123被加密成了f413c4d441a7a00ef82d9aedfab087dae51772276c0201a9d9b13df3e2a9b64c,
因为是对称加密,所以我们也可以将f413c4d441a7a00ef82d9aedfab087dae51772276c0201a9d9b13df3e2a9b64c解密:

我们用加密后的密码替换掉Git连接的明文密码:
1 | spring: |
使用{cipher}开头表明这是一个加密的内容,Config-Server会自动为其解密。当然,你还可以为任何你想加密的属性值进行加密,不限于密码。
非对称加密 非对称加密相比对称加密来说显得更加安全,要生成非对称加密的密码,需要借助keytool命令来生成密钥。keytool是JDK中的一个密钥和证书 管理工具。 位于%JAVA_HOME%\bin\目录下:

我们使用如下命令来生成一个密钥文件:
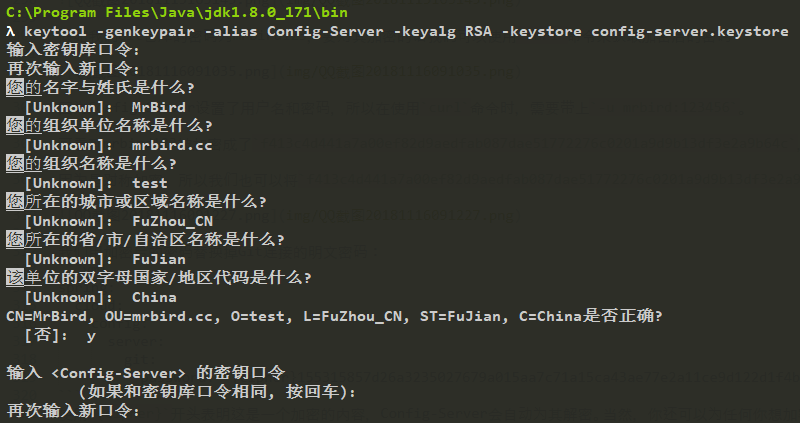
命令执行结束后,会在%JAVA_HOME%\bin\目录下生成一个 config-server.keystore文件。密钥文件的有效期默认为90天,我们可以使用-validity 365来改变其有效天数为365天。
接着将密钥文件拷贝到Config-Server的resources目录下,然后在bootstrap.yml中添加如下配置:
1 | #encrypt: |
其中encrypt.key-store.password为第一次输入的口令,encrypt.key-store.secret为<Config-Server>的密钥口令的密钥口令。
我们将Git连接的密码改回明文,然后重启Config-Server,运行如下命令重新对Git连接密码进行加密:

然后将加密后的密码替换明文密码即可:
1 | spring: |
Config-Client额外配置
刷新配置
在Config-Server和Config-Client都启动后,如果这时候Git仓库存储的配置信息改变了,在不重启Config-Client的情况下,配置信息是不会跟着更新的。那么如何在Git仓库存储的配置得到改变的时候也刷新Config-Client中获取到的配置值呢?很简单,我们只需要对Config-Client进行简单的改造:
在Config-Client中添加spring-boot-starter-actuator依赖:
1 | <dependency> |
该依赖包含了/refresh端点,可以用来刷新配置。
然后在获取配置的Controller上加入@RefreshScope注解:
1 |
|
值得注意的是,我们需要在Config-Client的配置文件中加入如下配置来关闭认证,否则我们无权访问/refresh端点,具体可见https://github.com/spring-guides/gs-centralized-configuration/issues/5:
1 | management: |
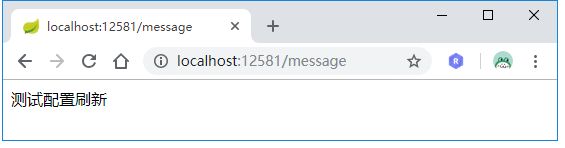
重启Config-Client,访问http://localhost:12581/message:
这时候我们将Git仓库中对应的配置信息改为测试配置刷新,再次访问http://localhost:12581/message会发现值还是dev properties (master v1.0)。
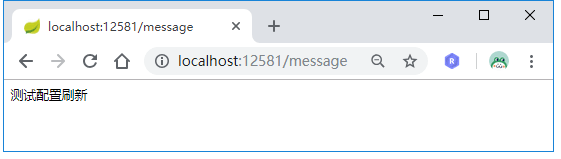
接着我们使用以下命令来刷新配置:

这时候再次访问http://localhost:12581/message:
可看到在不重启Config-Client的前提下配置值已经得到了更新。
集群配置
如果Config-Server只是单机部署的话,当其遇到问题宕机后,所有从Config-Server获取配置信息的微服务都无法正常工作了,这是灾难性的。所以我们很有必要对Config-Server进行集群处理。
集群的方式有很多,这里介绍通过将Config-Server注册到Eureka的方式来搭建集群。
我们使用在Spring Cloud Eureka服务治理一节中的Eureka-Service来构建Eureka-Server服务注册中心,使用以下命令启动Eureka-Server集群:
1 | java -jar Eureka-Service-0.0.1-SNAPSHOT.jar --spring.profiles.active=peer1 |
启动后,访问http://localhost:8080/:

说明Eureka集群启动成功。 接下来开始对Config-Server进行改造,将其注册到Eureka服务注册中心。
在Config-Server中加入Eureka依赖:
1 | <dependency> |
然后在Config-Server的启动类中加入@EnableDiscoveryClient注解,用于将服务注册到Eureka服务注册中心上:
1 |
|
最后在配置类application.yml中指定Eureka服务注册中心的地址:
1 | eureka: |
因为之前Eureka服务注册中心添加了认证,所以需要在url中指定用户名和密码。
改造好后,启动Config-Server,再次访问Eureka服务注册中心地址:http://localhost:8080/:

可看到Config-Server已经成功注册了。
接着开始改造Config-Client,在其pom中同样引入Eureka依赖:
1 | <dependency> |
然后在bootstrap.yml中指定获取Config-Server服务的地址:
1 | spring: |
其中eureka.client.serviceUrl.defaultZone指定了Eureka服务注册中心的地址;spring.cloud.config.discovery.enabled指定为true开启获取服务的功能,spring.cloud.config.discovery.service-id表明需要获取服务的名称为config-server。
最后在Config-Client的启动类中引入@EnableDiscoveryClient注解:
1 |
|
启动Config-Client,访问:http://localhost:12581/message
可看到,配置信息同样获取成功。
参考文章:
源码地址:https://github.com/wuyouzhuguli/SpringAll/tree/master/41.Spring-Cloud-Config

