ArrayList & LinkedList源码解析

本文记录ArrayList & LinkedList源码解析,基于JDK1.8。

ArrayList

ArrayList实现了List接口的所有方法,可以看成是“长度可调节的数组”,可以包含任何类型数据(包括null,可重复)。ArrayList大体和Vector一致,唯一区别是ArrayList非线程安全,Vector线程安全,但Vector线程安全的代价较大,推荐使用CopyOnWriteArrayList,后面文章再做记录。

类结构

ArrayList类层级关系如下图所示:

QQ20210219-143407@2x

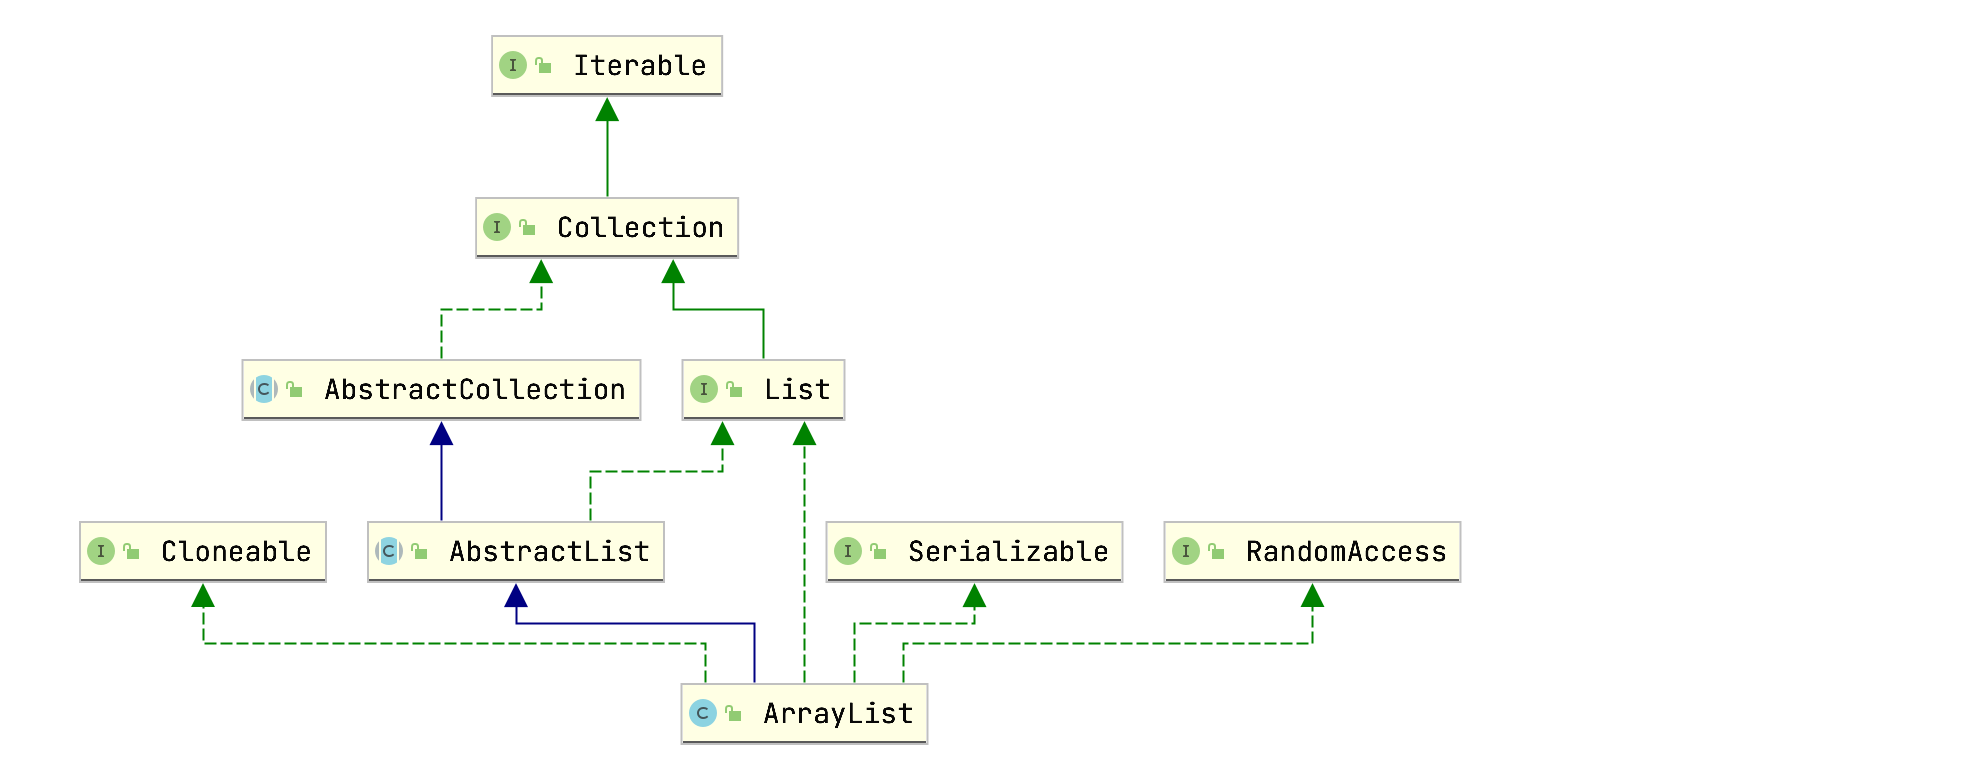
ArrayList额外实现了RandomAccess接口,关于RandomAccess接口的作用下面再做讨论。

ArrayList类主要包含如下两个成员变量:

1
2
3
4
5
6
7
8
public class ArrayList<E> extends AbstractList<E>
implements List<E>, RandomAccess, Cloneable, java.io.Serializable
{

transient Object[] elementData;
private int size;
......
}

elementData为Object类型数组,用于存放ArrayList数据;size表示数组元素个数(并非数组容量)。

ArrayList类还包含了一些常量:

1
2
3
4
5
6
7
8
9
10
public class ArrayList<E> extends AbstractList<E>
implements List<E>, RandomAccess, Cloneable, java.io.Serializable
{
// 数组默认初始化容量为10
private static final int DEFAULT_CAPACITY = 10;
// 表示空数组
private static final Object[] EMPTY_ELEMENTDATA = {};
// 也是空数组,和EMPTY_ELEMENTDATA区分开
private static final Object[] DEFAULTCAPACITY_EMPTY_ELEMENTDATA = {};
}

方法解析

知识储备

Arrays类的copyOf(U[] original, int newLength, Class<? extends T[]> newType)方法用于复制指定数组original到新数组,新数组的长度为newLength,新数组元素类型为newType。

  1. 如果新数组的长度大于旧数组,那么多出的那部分用null填充;
  2. 如果新数组的长度小于旧数组,那么少的那部分直接截取掉。

举两个例子:

1
2
3
4
5
6
Long[] array1 = new Long[]{1L, 2L, 3L};
Object[] array2 = Arrays.copyOf(array1, 5, Object[].class);
System.out.println(Arrays.toString(array2)); // [1, 2, 3, null, null]

Object[] array3 = Arrays.copyOf(array1, 1, Object[].class);
System.out.println(Arrays.toString(array3)); // [1]

重载方法copyOf(T[] original, int newLength)用于复制指定数组original到新数组,新数组的长度为newLength,新数组元素类型和旧数组一致。

copyOf方法内部调用System类的native方法arraycopy(Object src, int srcPos,Object dest, int destPos, int length)

  1. src:需要被拷贝的旧数组;
  2. srcPos:旧数组开始拷贝的起始位置;
  3. dest:拷贝目标数组;
  4. destPos:目标数组的起始拷贝位置;
  5. length:拷贝的长度。

举例:

1
2
3
4
Long[] array1 = new Long[]{1L, 2L, 3L};
Object[] array2 = new Object[5];
System.arraycopy(array1, 0, array2, 0, 3);
System.out.println(Arrays.toString(array2)); // [1, 2, 3, null, null]

指定位置插入元素:

1
2
3
4
5
Long[] array1 = new Long[]{1L, 2L, 3L, null, null, null};
int index = 1;
System.arraycopy(array1, index, array1, index + 1, 3 - index);
array1[index] = 0L;
System.out.println(Arrays.toString(array1)); // [1, 0, 2, 3, null, null]

构造函数

public ArrayList(int initialCapacity)

1
2
3
4
5
6
7
8
9
10
public ArrayList(int initialCapacity) {
if (initialCapacity > 0) {
this.elementData = new Object[initialCapacity];
} else if (initialCapacity == 0) {
this.elementData = EMPTY_ELEMENTDATA;
} else {
throw new IllegalArgumentException("Illegal Capacity: "+
initialCapacity);
}
}

创建容量大小为initialCapacity的ArrayList,如果initialCapacity小于0,则抛出IllegalArgumentException异常;如果initialCapacity为0,则elementData为EMPTY_ELEMENTDATA。

public ArrayList()

1
2
3
public ArrayList() {
this.elementData = DEFAULTCAPACITY_EMPTY_ELEMENTDATA;
}

空参构造函数,elementData为DEFAULTCAPACITY_EMPTY_ELEMENTDATA。

public ArrayList(Collection<? extends E> c)

1
2
3
4
5
6
7
8
9
10
11
public ArrayList(Collection<? extends E> c) {
elementData = c.toArray();
if ((size = elementData.length) != 0) {
// c.toArray might (incorrectly) not return Object[] (see 6260652)
if (elementData.getClass() != Object[].class)
elementData = Arrays.copyOf(elementData, size, Object[].class);
} else {
// replace with empty array.
this.elementData = EMPTY_ELEMENTDATA;
}
}

创建一个包含指定集合c数据的ArrayList。上面为什么要多此一举使用Arrays.copyOf(elementData, size, Object[].class)复制一遍数组呢?这是因为在某些情况下调用集合的toArray()方法返回的类型并不是Object[].class,比如:

1
2
3
4
5
6
7
Long[] array1 = {1L, 2L};
List<Long> list1 = Arrays.asList(array1);
Object[] array2 = list1.toArray();
System.out.println(array2.getClass() == Object[].class); // false

List<Long> list2 = new ArrayList<>();
System.out.println(list2.toArray().getClass() == Object[].class); // true

add(E e)

add(E e)用于尾部添加元素:

1
2
3
4
5
6
public boolean add(E e) {
// 用于确定数组容量
ensureCapacityInternal(size + 1);
elementData[size++] = e;
return true;
}

假如现在我们通过如下代码创建了一个ArrayList实例:

1
2
ArrayList<String> list = new ArrayList<>();
list.add("hello");

内部过程如下:

1
2
3
4
5
6
7
8
9
10
11
12
13
14
15
16
17
18
19
20
21
22
23
24
25
26
27
28
29
30
31
32
33
34
35
36
37
38
39
40
41
42
43
44
45
46
47
48
49
50
51
52
53
public boolean add(E e) {
// 用于确定数组容量,e=hello,size=0
ensureCapacityInternal(size + 1);
// 末尾添加元素,然后size递增1
elementData[size++] = e;
return true;
}


private void ensureCapacityInternal(int minCapacity) { // minCapacity=1,elementData={}
ensureExplicitCapacity(calculateCapacity(elementData, minCapacity));
}

private static int calculateCapacity(Object[] elementData, int minCapacity) {
if (elementData == DEFAULTCAPACITY_EMPTY_ELEMENTDATA) {
// DEFAULT_CAPACITY=10,minCapacity=1,故返回10
return Math.max(DEFAULT_CAPACITY, minCapacity);
}
return minCapacity;
}

private void ensureExplicitCapacity(int minCapacity) { // minCapacity=10
modCount++;

// minCapacity=10,elementData.length=0,所以调用grow方法扩容
if (minCapacity - elementData.length > 0)
grow(minCapacity);
}

private void grow(int minCapacity) { //minCapacity=10
// oldCapacity=0
int oldCapacity = elementData.length;
// newCapacity为oldCapacity的1.5倍,这里为0
int newCapacity = oldCapacity + (oldCapacity >> 1);
// newCapacity=0,minCapacity=10,所以该条件成立
if (newCapacity - minCapacity < 0)
// newCapacity=10
newCapacity = minCapacity;
if (newCapacity - MAX_ARRAY_SIZE > 0)
newCapacity = hugeCapacity(minCapacity);
// 复制到新数组,数组容量为10
elementData = Arrays.copyOf(elementData, newCapacity);
}

private static int hugeCapacity(int minCapacity) {
if (minCapacity < 0) // overflow
throw new OutOfMemoryError();
// MAX_ARRAY_SIZE常量值为Integer.MAX_VALUE - 8,通过
// 这段逻辑我们可以知道,ArrayList最大容量为Integer.MAX_VALUE
return (minCapacity > MAX_ARRAY_SIZE) ?
Integer.MAX_VALUE :
MAX_ARRAY_SIZE;
}

通过上面源码分析我们可以知道:

  1. 任何一个空的ArrayList在添加第一个元素时,内部数组容量将被扩容为10;
  2. 扩容时,newCapacity为oldCapacity的1.5倍;
  3. 数组容量最大为Integer.MAX_VALUE;
  4. 尾部添加元素不用移动任何元素,所以速度快。

add(int index, E element)

add(int index, E element)用于在指定位置添加元素:

1
2
3
4
5
6
7
8
9
10
11
12
13
14
15
16
17
18
19
public void add(int index, E element) {
// 下标检查
rangeCheckForAdd(index);
// 确定数组容量,和上面add(E e)方法介绍的一致
ensureCapacityInternal(size + 1);
// 将原来index后面的所有元素往后面移动一个位置
System.arraycopy(elementData, index, elementData, index + 1,
size - index);
// index处放入新元素
elementData[index] = element;
// size递增
size++;
}

private void rangeCheckForAdd(int index) {
// 下标比size大或者下标小于0,都会抛出下标越界异常
if (index > size || index < 0)
throw new IndexOutOfBoundsException(outOfBoundsMsg(index));
}

这里涉及到元素移动,所以速度较慢。

get(int index)

get(int index)获取指定位置元素:

1
2
3
4
5
6
7
8
9
10
public E get(int index) {
// 下标合法性检查
rangeCheck(index);
// 直接返回数组指定位置元素
return elementData(index);
}

E elementData(int index) {
return (E) elementData[index];
}

get方法直接返回数组指定下标元素,速度非常快。

set(int index, E element)

set(int index, E element)设置指定位置元素为指定值:

1
2
3
4
5
6
7
8
9
10
public E set(int index, E element) {
// 下标合法性检查
rangeCheck(index);
// 根据下标获取旧值
E oldValue = elementData(index);
// 设置新值
elementData[index] = element;
// 返回旧值
return oldValue;
}

set方法不涉及元素移动和遍历,所以速度快。

remove(int index)

remove(int index)删除指定位置元素:

1
2
3
4
5
6
7
8
9
10
11
12
13
14
15
16
public E remove(int index) {
rangeCheck(index);

modCount++;
// 获取指定位置元素(需要被删除的元素)
E oldValue = elementData(index);

int numMoved = size - index - 1;
if (numMoved > 0)
// 直接将index后面的元素往前移动一位,覆盖index处的元素
System.arraycopy(elementData, index+1, elementData, index,
numMoved);
elementData[--size] = null; // clear to let GC do its work
// 返回被删除的元
return oldValue;
}

上述方法涉及到元素移动,所以效率也不高。

remove(Object o)

remove(Object o)删除指定元素:

1
2
3
4
5
6
7
8
9
10
11
12
13
14
15
16
17
18
19
20
21
22
23
24
25
26
// 遍历数组,找到第一个目标元素,然后删除
public boolean remove(Object o) {
if (o == null) {
for (int index = 0; index < size; index++)
if (elementData[index] == null) {
fastRemove(index);
return true;
}
} else {
for (int index = 0; index < size; index++)
if (o.equals(elementData[index])) {
fastRemove(index);
return true;
}
}
return false;
}
// 逻辑和remove一致,都是将index后面的元素往前移动一位,覆盖index处的元素
private void fastRemove(int index) {
modCount++;
int numMoved = size - index - 1;
if (numMoved > 0)
System.arraycopy(elementData, index+1, elementData, index,
numMoved);
elementData[--size] = null; // clear to let GC do its work
}

方法涉及到数组遍历和元素移动,效率也不高。

trimToSize()

trimToSize()源码:

1
2
3
4
5
6
7
8
public void trimToSize() {
modCount++;
if (size < elementData.length) {
elementData = (size == 0)
? EMPTY_ELEMENTDATA
: Arrays.copyOf(elementData, size);
}
}

该方法用于将数组容量调整为实际元素个数大小,当一个ArrayList元素个数不会发生改变时,可以调用该方法减少内存占用。

其他方法可以自己阅读ArrayList源码,此外在涉及增删改的方法里,我们都看到了modCount++操作,和之前介绍HashMap源码时一致,用于快速失败。

LinkedList

类结构

LinkedList底层采用双向链表结构存储数据,允许重复数据和null值,长度没有限制:
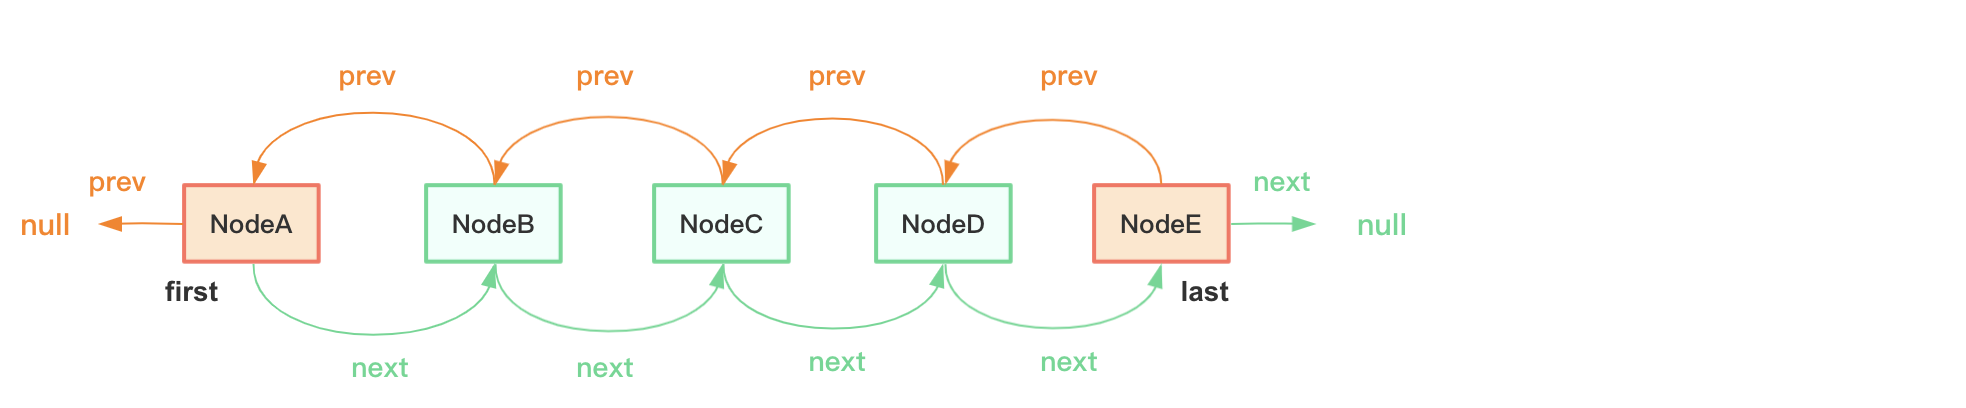
QQ20210220-112151@2x

每个节点用内部类Node表示:

1
2
3
4
5
6
7
8
9
10
11
private static class Node<E> {
E item;
Node<E> next;
Node<E> prev;

Node(Node<E> prev, E element, Node<E> next) {
this.item = element;
this.next = next;
this.prev = prev;
}
}

Node节点包含item(存储数据),next(后继节点)和prev(前继节点)。数组内存地址必须连续,而链表就没有这个限制了,Node可以分布于各个内存地址,它们之间的关系通过prev和next维护。

LinkedList类关系图:

QQ20210220-112546@2x

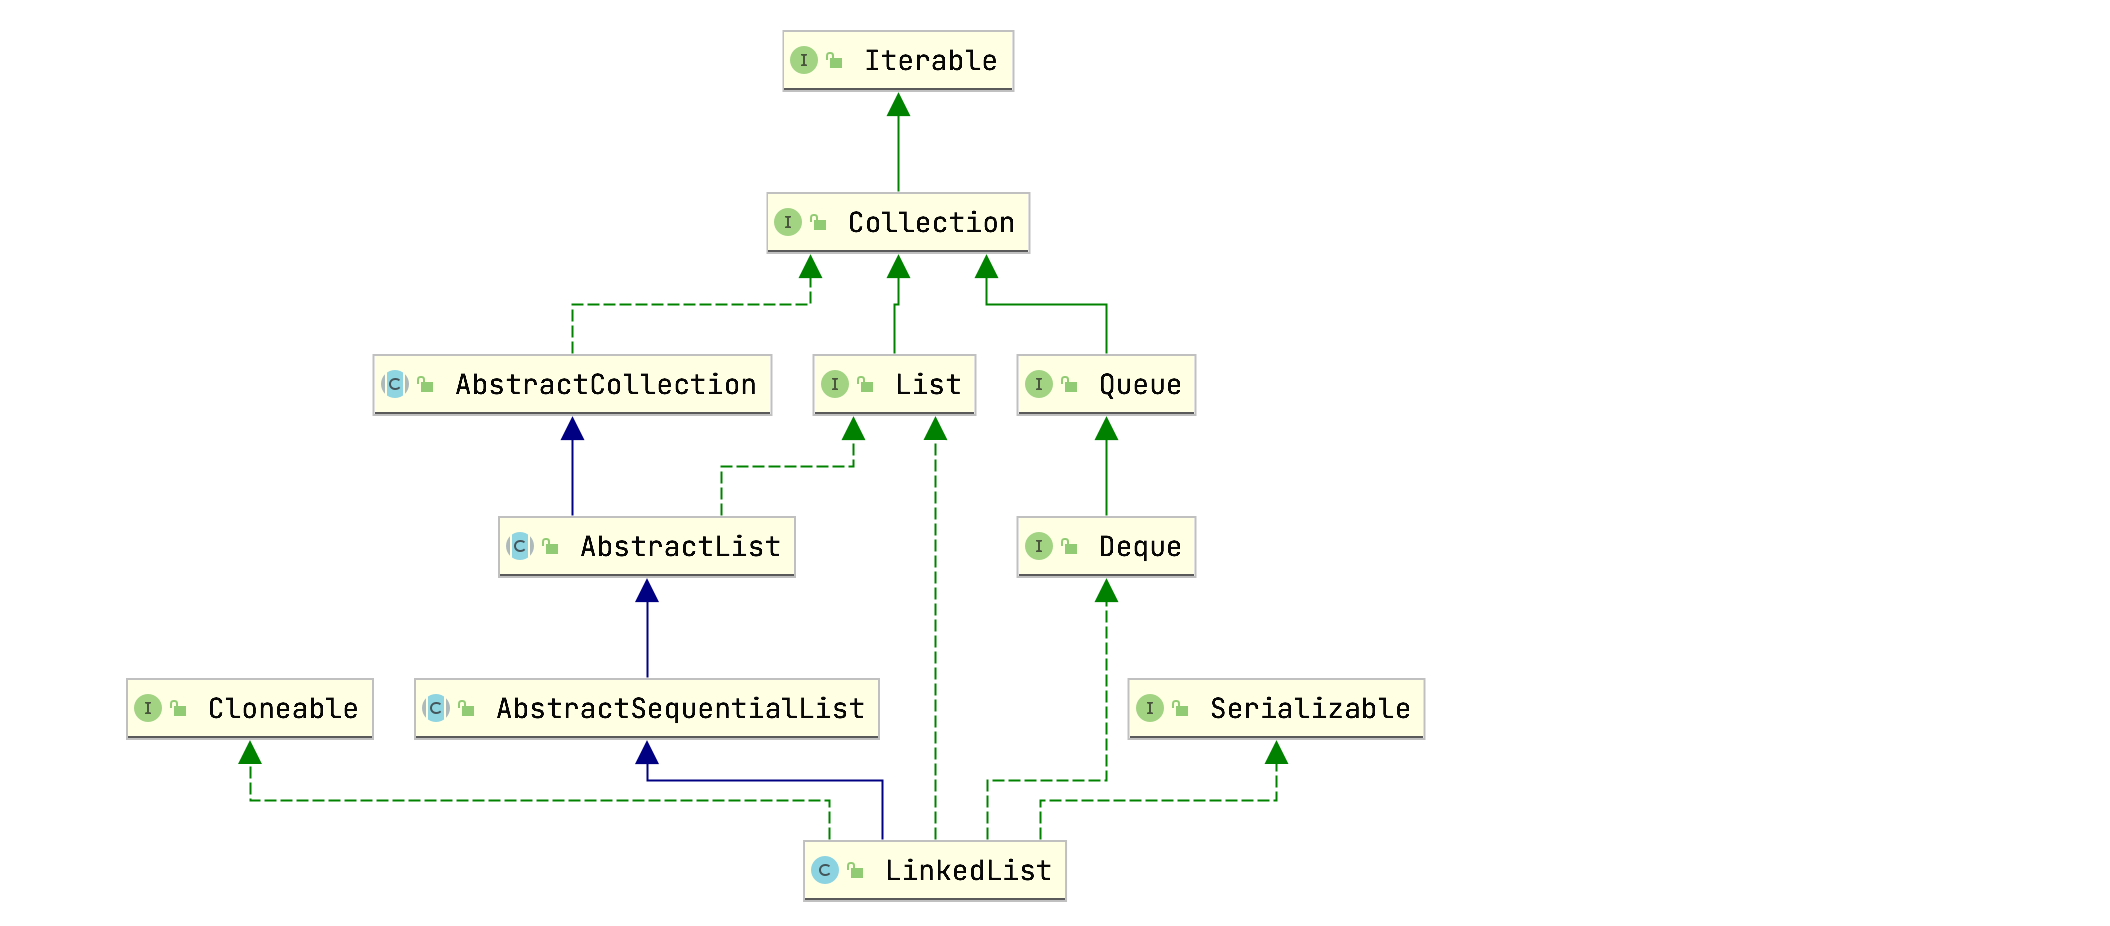
可以看到LinkedList类并没有实现RandomAccess接口,额外实现了Deque接口,所以包含一些队列方法。

LinkedList包含如下成员变量:

1
2
3
4
5
6
7
8
// 元素个数,默认为0
transient int size = 0;

// 表示第一个节点,第一个节点必须满足(first == null && last == null) || (first.prev == null && first.item != null)
transient Node<E> first;

// 表示最后一个节点,最后一个节点必须满足(first == null && last == null) || (last.next == null && last.item != null)
transient Node<E> last;

方法解析

构造函数

LinkedList()

1
2
public LinkedList() {
}

空参构造函数,默认size为0,每次添加新元素都要创建Node节点。

LinkedList(Collection<? extends E> c)

1
2
3
4
5
6
7
8
9
10
11
12
13
14
15
16
17
18
19
20
21
22
23
24
25
26
27
28
29
30
31
32
33
34
35
36
37
38
39
40
41
42
43
44
45
46
47
public LinkedList(Collection<? extends E> c) {
this();
addAll(c);
}

public boolean addAll(Collection<? extends E> c) {
return addAll(size, c);
}

public boolean addAll(int index, Collection<? extends E> c) {
checkPositionIndex(index);

Object[] a = c.toArray();
int numNew = a.length;
if (numNew == 0)
return false;

Node<E> pred, succ;
if (index == size) {
succ = null;
pred = last;
} else {
succ = node(index);
pred = succ.prev;
}
// 循环创建节点,设置prev,next指向
for (Object o : a) {
@SuppressWarnings("unchecked") E e = (E) o;
Node<E> newNode = new Node<>(pred, e, null);
if (pred == null)
first = newNode;
else
pred.next = newNode;
pred = newNode;
}

if (succ == null) {
last = pred;
} else {
pred.next = succ;
succ.prev = pred;
}

size += numNew;
modCount++;
return true;
}

该构造函数用于创建LinkedList,并往里添加指定集合元素。

add(int index, E element)

add(int index, E element)指定下标插入元素:

1
2
3
4
5
6
7
8
9
10
11
12
13
14
15
16
17
18
19
20
21
22
23
24
25
26
27
28
29
30
31
32
33
34
35
36
37
38
39
40
41
42
43
44
45
46
47
48
49
50
51
52
53
54
55
56
57
58
59
60
61
62
63
64
65
66
67
68
69
70
71
72
73
74
75
public void add(int index, E element) {
// 下标合法性检查
checkPositionIndex(index);

if (index == size)
// 如果插入下标等于size,说明是在尾部插入,执行尾部插入操作
linkLast(element);
else
// 如果不是尾插入,则在指定下标节点前插入
linkBefore(element, node(index));
}

private void checkPositionIndex(int index) {
if (!isPositionIndex(index))
throw new IndexOutOfBoundsException(outOfBoundsMsg(index));
}

private boolean isPositionIndex(int index) {
return index >= 0 && index <= size;
}

void linkLast(E e) {
// 获取最后一个节点
final Node<E> l = last;
// 创建一个新节点,prev为原链表最后一个节点,next为null
final Node<E> newNode = new Node<>(l, e, null);
// 更新last为新节点
last = newNode;
if (l == null)
// 如果原链表最后一个节点为null,说明原链表没有节点,将新节点赋给first
first = newNode;
else
// 否则更新原链表最后一个节点的next为新节点
l.next = newNode;
// size递增
size++;
// 模数递增,用于快速失败
modCount++;
}

void linkBefore(E e, Node<E> succ) {
// succ为原链表指定index位置的节点,获取其prev节点
final Node<E> pred = succ.prev;
// 创建新节点,prev为原链表指定index位置的节点的prev节点,next为原链表指定index位置的节点
final Node<E> newNode = new Node<>(pred, e, succ);
// 将原链表指定index位置的节点的prev更新为新节点
succ.prev = newNode;
if (pred == null)
// 如果链表指定index位置的节点的prev为null,说明原链表没有节点,将新节点赋给first
first = newNode;
else
// 否则更新原链表指定index位置的节点的prev的next节点为新节点
pred.next = newNode;
// size递增
size++;
// 模数递增,用于快速失败
modCount++;
}

// 采用二分法遍历每个Node节点,直到找到index位置的节点
Node<E> node(int index) {
// assert isElementIndex(index);

if (index < (size >> 1)) {
Node<E> x = first;
for (int i = 0; i < index; i++)
x = x.next;
return x;
} else {
Node<E> x = last;
for (int i = size - 1; i > index; i--)
x = x.prev;
return x;
}
}

代码较为简单,无非就是设置节点的prev和next关系。可以看到,除了头插和尾插外,在链表别的位置插入新节点,涉及到节点遍历操作,所以我们常说的链表插入速度快,指的是插入节点改变前后节点的引用过程很快。

get(int index)

get(int index)获取指定下标元素:

1
2
3
4
5
6
7
8
9
10
11
12
13
14
15
16
17
18
19
20
21
public E get(int index) {
checkElementIndex(index);
return node(index).item;
}

// 采用二分法遍历每个Node节点,直到找到index位置的节点
Node<E> node(int index) {
// assert isElementIndex(index);

if (index < (size >> 1)) {
Node<E> x = first;
for (int i = 0; i < index; i++)
x = x.next;
return x;
} else {
Node<E> x = last;
for (int i = size - 1; i > index; i--)
x = x.prev;
return x;
}
}

代码较为简单,就是通过node函数查找指定index下标Node,然后获取其item属性值,节点查找需要遍历。

set(int index, E element)

set(int index, E element)设置指定下标节点的item为指定值:

1
2
3
4
5
6
7
8
9
10
11
12
13
14
15
16
17
18
19
20
21
22
23
24
25
26
27
28
29
public E set(int index, E element) {
// 下标合法性检查
checkElementIndex(index);
// 获取index下标节点
Node<E> x = node(index);
// 获取旧值
E oldVal = x.item;
// 设置新值
x.item = element;
// 返回旧值
return oldVal;
}

// 采用二分法遍历每个Node节点,直到找到index位置的节点
Node<E> node(int index) {
// assert isElementIndex(index);

if (index < (size >> 1)) {
Node<E> x = first;
for (int i = 0; i < index; i++)
x = x.next;
return x;
} else {
Node<E> x = last;
for (int i = size - 1; i > index; i--)
x = x.prev;
return x;
}
}

可以看到,set方法也需要通过遍历查找目标节点。

remove(int index)

remove(int index)删除指定下标节点:

1
2
3
4
5
6
7
8
9
10
11
12
13
14
15
16
17
18
19
20
21
22
23
24
25
26
27
28
29
30
public E remove(int index) {
checkElementIndex(index);
return unlink(node(index));
}

E unlink(Node<E> x) {
// assert x != null;
final E element = x.item;
final Node<E> next = x.next;
final Node<E> prev = x.prev;

if (prev == null) {
first = next;
} else {
prev.next = next;
x.prev = null;
}

if (next == null) {
last = prev;
} else {
next.prev = prev;
x.next = null;
}

x.item = null;
size--;
modCount++;
return element;
}

remove(int index)通过node方法找到需要删除的节点,然后调用unlink方法改变删除节点的prev和next节点的前继和后继节点。

剩下的方法可以自己阅读源码。

RandomAccess接口

RandomAccess接口是一个空接口,不包含任何方法,只是作为一个标识:

1
2
3
4
package java.util;

public interface RandomAccess {
}

实现该接口的类说明其支持快速随机访问,比如ArrayList实现了该接口,说明ArrayList支持快速随机访问。所谓快速随机访问指的是通过元素的下标即可快速获取元素对象,无需遍历,而LinkedList则没有这个特性,元素获取必须遍历链表。

在Collections类的binarySearch(List<? extends Comparable<? super T>> list, T key)方法中,可以看到RandomAccess的应用:

1
2
3
4
5
6
7
public static <T>
int binarySearch(List<? extends Comparable<? super T>> list, T key) {
if (list instanceof RandomAccess || list.size()<BINARYSEARCH_THRESHOLD)
return Collections.indexedBinarySearch(list, key);
else
return Collections.iteratorBinarySearch(list, key);
}

当list实现了RandomAccess接口时,调用indexedBinarySearch方法,否则调用iteratorBinarySearch。所以当我们遍历集合时,如果集合实现了RandomAccess接口,优先选择普通for循环,其次foreach;遍历未实现RandomAccess的接口,优先选择iterator遍历。

请作者喝瓶肥宅水🥤

0