AOP底层为动态代理,AOP指的是:在程序运行期间动态地将某段代码切入到指定方法指定位置进行运行的编程方式,相关设计模式为代理模式。本节将通过一个简单的例子回顾Spring AOP的使用,并且通过debug源码深入理解内部原理。hints:本节图片较多,加载较慢。
回顾Spring AOP的使用
新建一个SpringBoot项目,SpringBoot版本为2.4.0,引入如下两个依赖:
1 | <dependencies> |
然后创建一个目标类TatgetClass,包含待会需要被AOP代理增强的方法test:
1 |
|
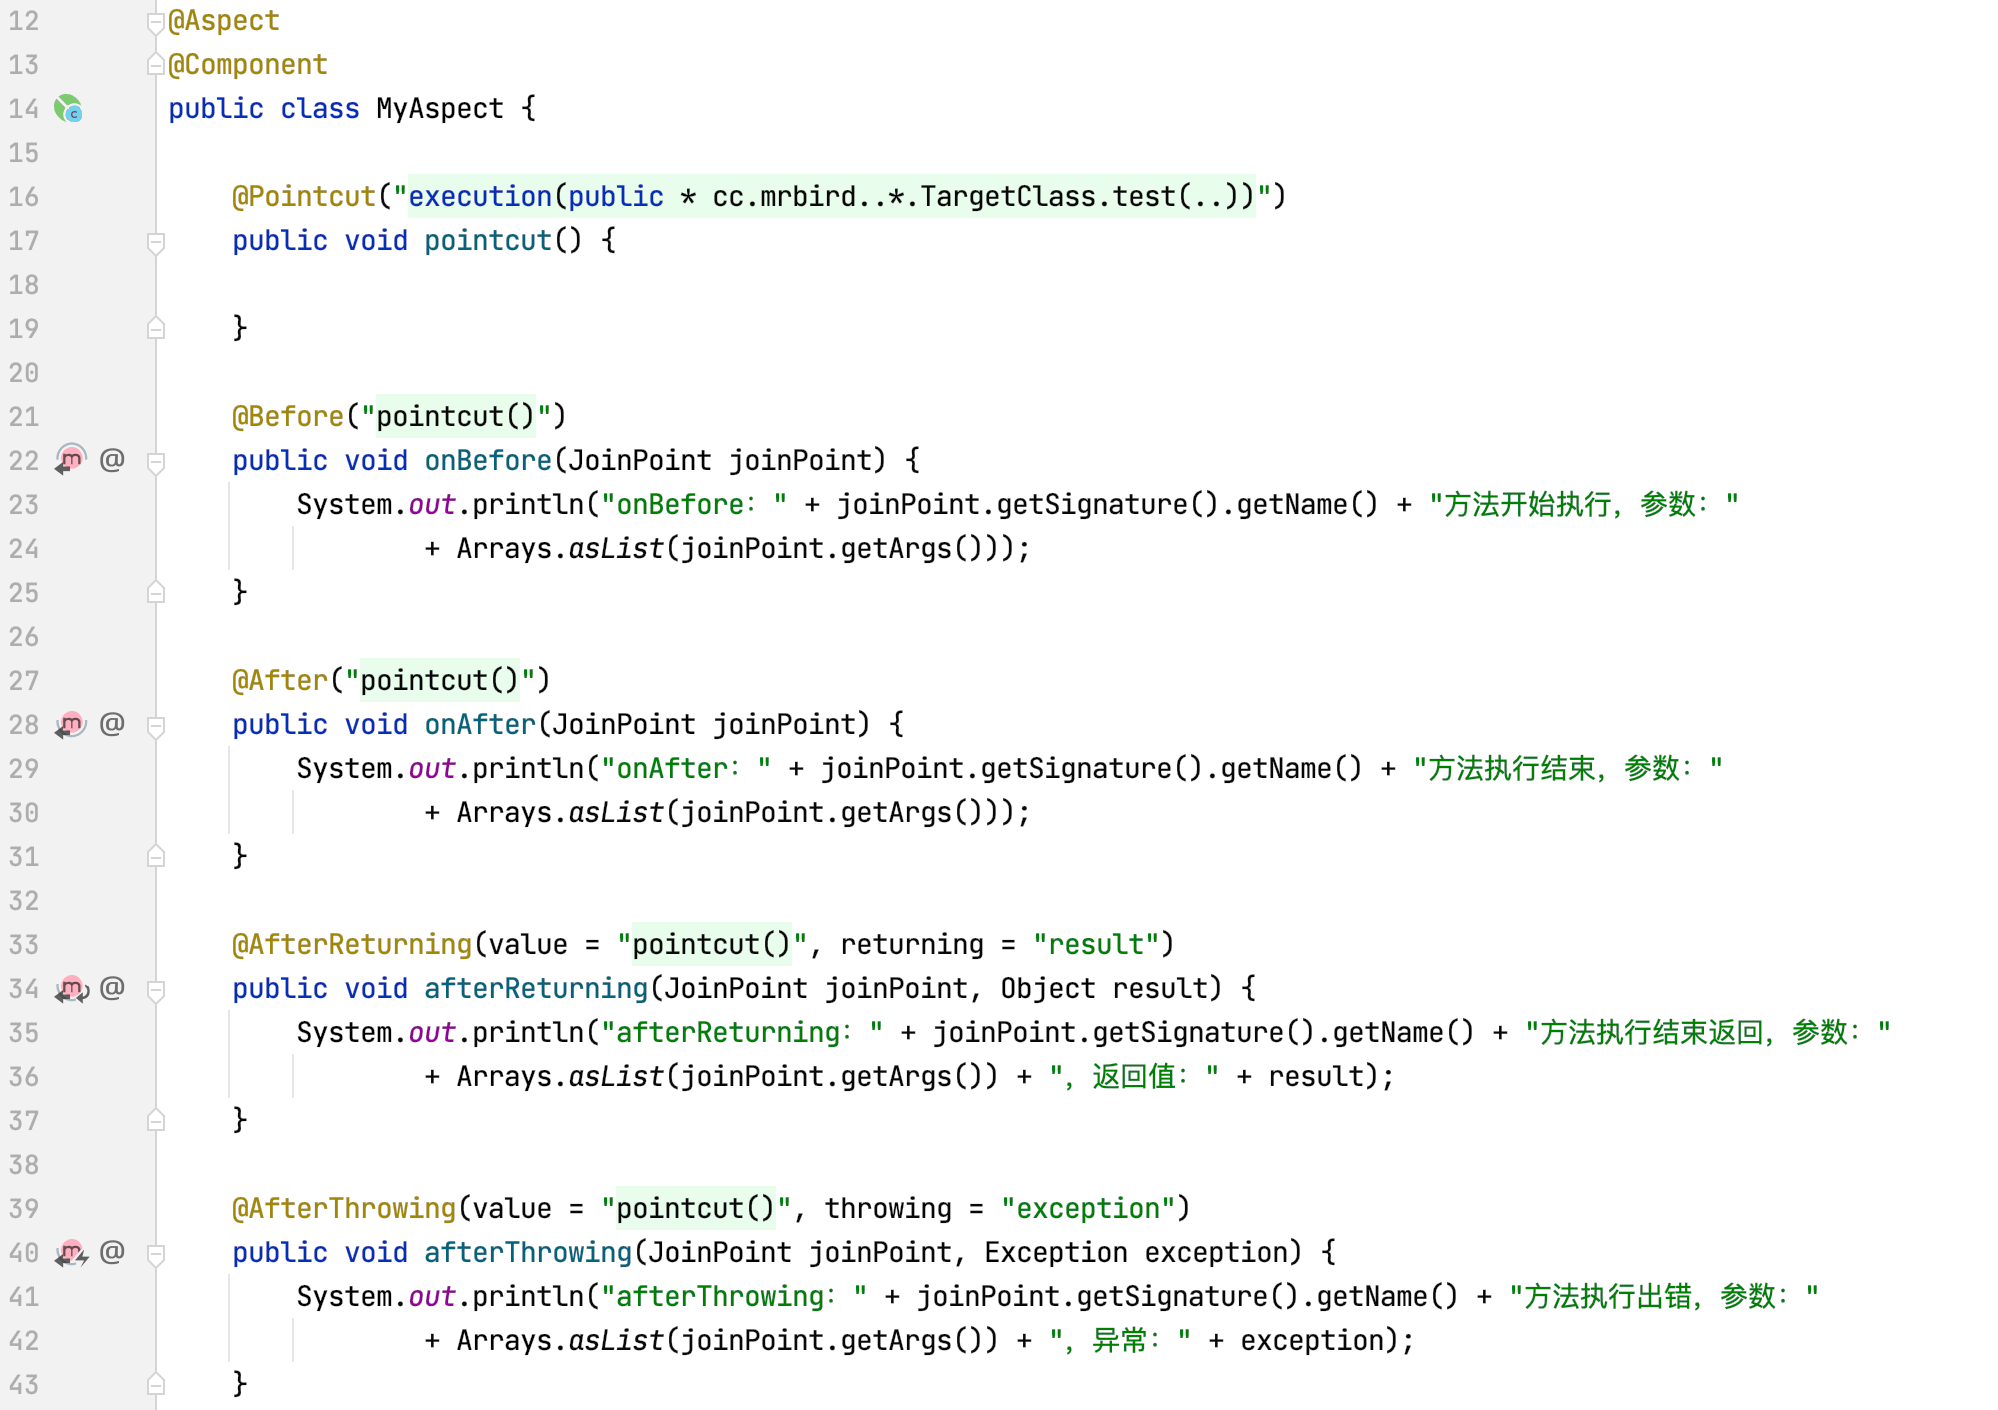
编写切面类MyAspect:
1 |
|
该切面包含了4个通知方法:
- 前置通知(@Before):在目标方法被调用之前调用通知功能;
- 后置通知(@After):在目标方法完成之后调用通知,此时不会关心方法的输出是什么;
- 返回通知(@AfterReturning):在目标方法成功执行之后调用通知;
- 异常通知(@AfterThrowing):在目标方法抛出异常后调用通知。
这几个通知的顺序在不同的Spring版本中有所不同:
Spring4.x
- 正常情况:@Before —-> 目标方法 —-> @After —-> @AfterReturning
- 异常情况:@Before —-> 目标方法 —-> @After —-> @AfterThrowing
Spring5.x
- 正常情况:@Before —-> 目标方法 —-> @AfterReturning —-> @After
- 异常情况:@Before —-> 目标方法 —-> @AfterThrowing —-> @After
具体可以参考这篇博客:https://www.cnblogs.com/orzjiangxiaoyu/p/13869747.html。通知顺序并不影响本文对SpringAOP源码的理解。
在SpringBoot入口类测试AOP结果:
1 |
|
主要逻辑为从IOC容器中获取TargetClass Bean,然后调用其test方法,程序运行结果如下:
1 | onBefore:test方法开始执行,参数:[aop] |
test方法参数为空时,程序运行结果如下:
1 | onBefore:test方法开始执行,参数:[] |
可以看到,我们成功通过Spring AOP将各个通知方法织入到了目标方法的各个执行阶段,下面我们就来深入探究Spring AOP的实现原理。
@EnableAspectJAutoProxy
前面我们引入了Spring AOP开箱即用的starterspring-boot-starter-aop,@Enable模块驱动注解EnableAspectJAutoProxy用于开启AspectJ自动代理,源码如下所示:
1 | ({ElementType.TYPE}) |
该注解类上通过@Import导入了AspectJAutoProxyRegistrarAspectJ自动代理注册器(对@Import不了解的读者可以参考深入学习Spring组件注册),查看AspectJAutoProxyRegistrar的源码:
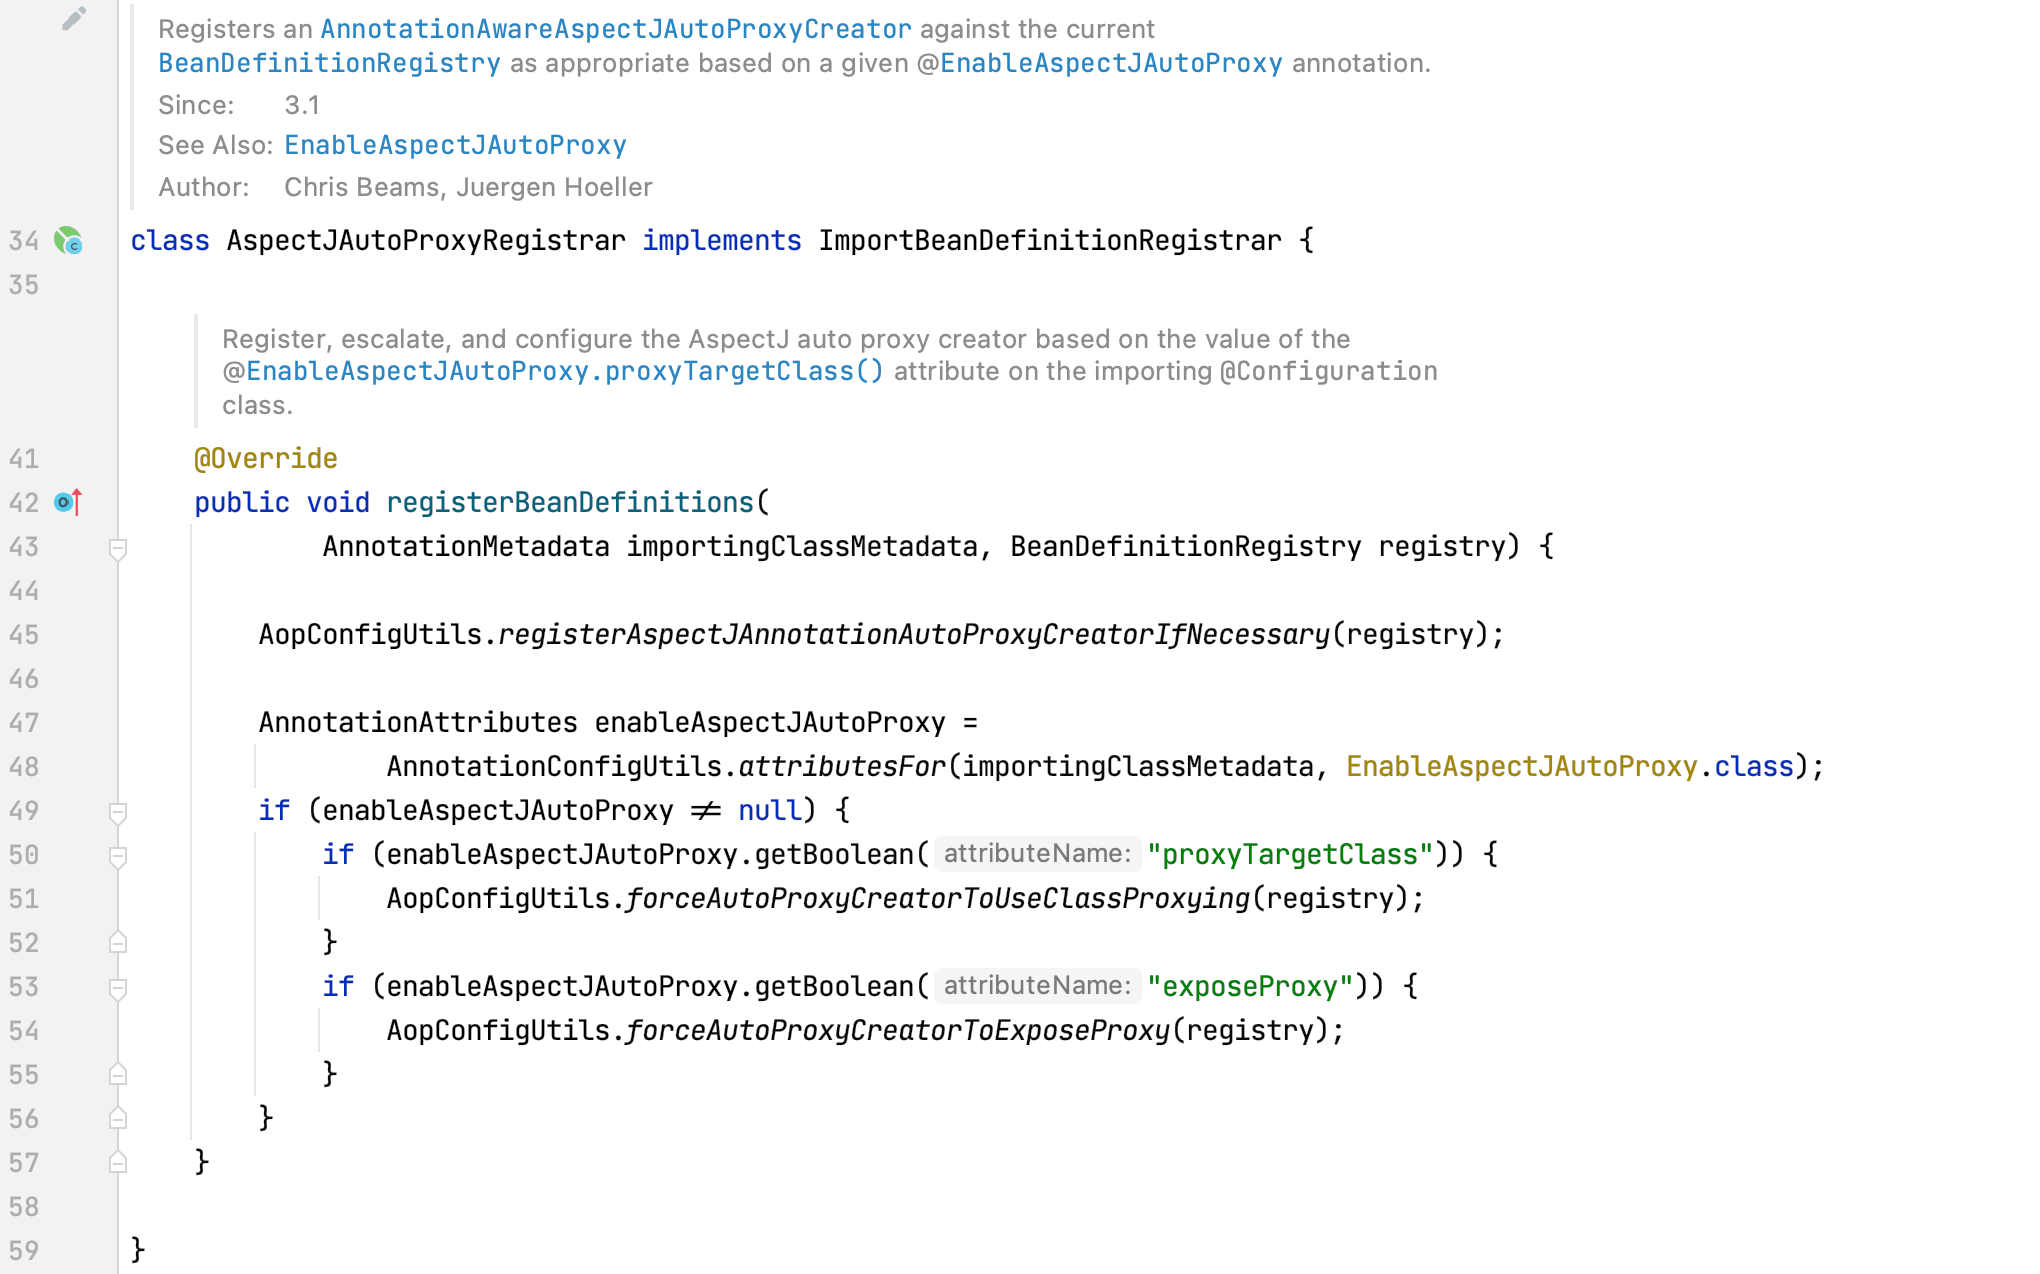
通过注释我们大体可以知道,该注册器的作用是往IOC容器里注册了一个类型为AnnotationAwareAspectJAutoProxyCreator(注解驱动的AspectJ自动代理创建器)的Bean。该类的registerBeanDefinitions方法主要关注:
1 | AopConfigUtils.registerAspectJAnnotationAutoProxyCreatorIfNecessary(registry); |
查看其源码:
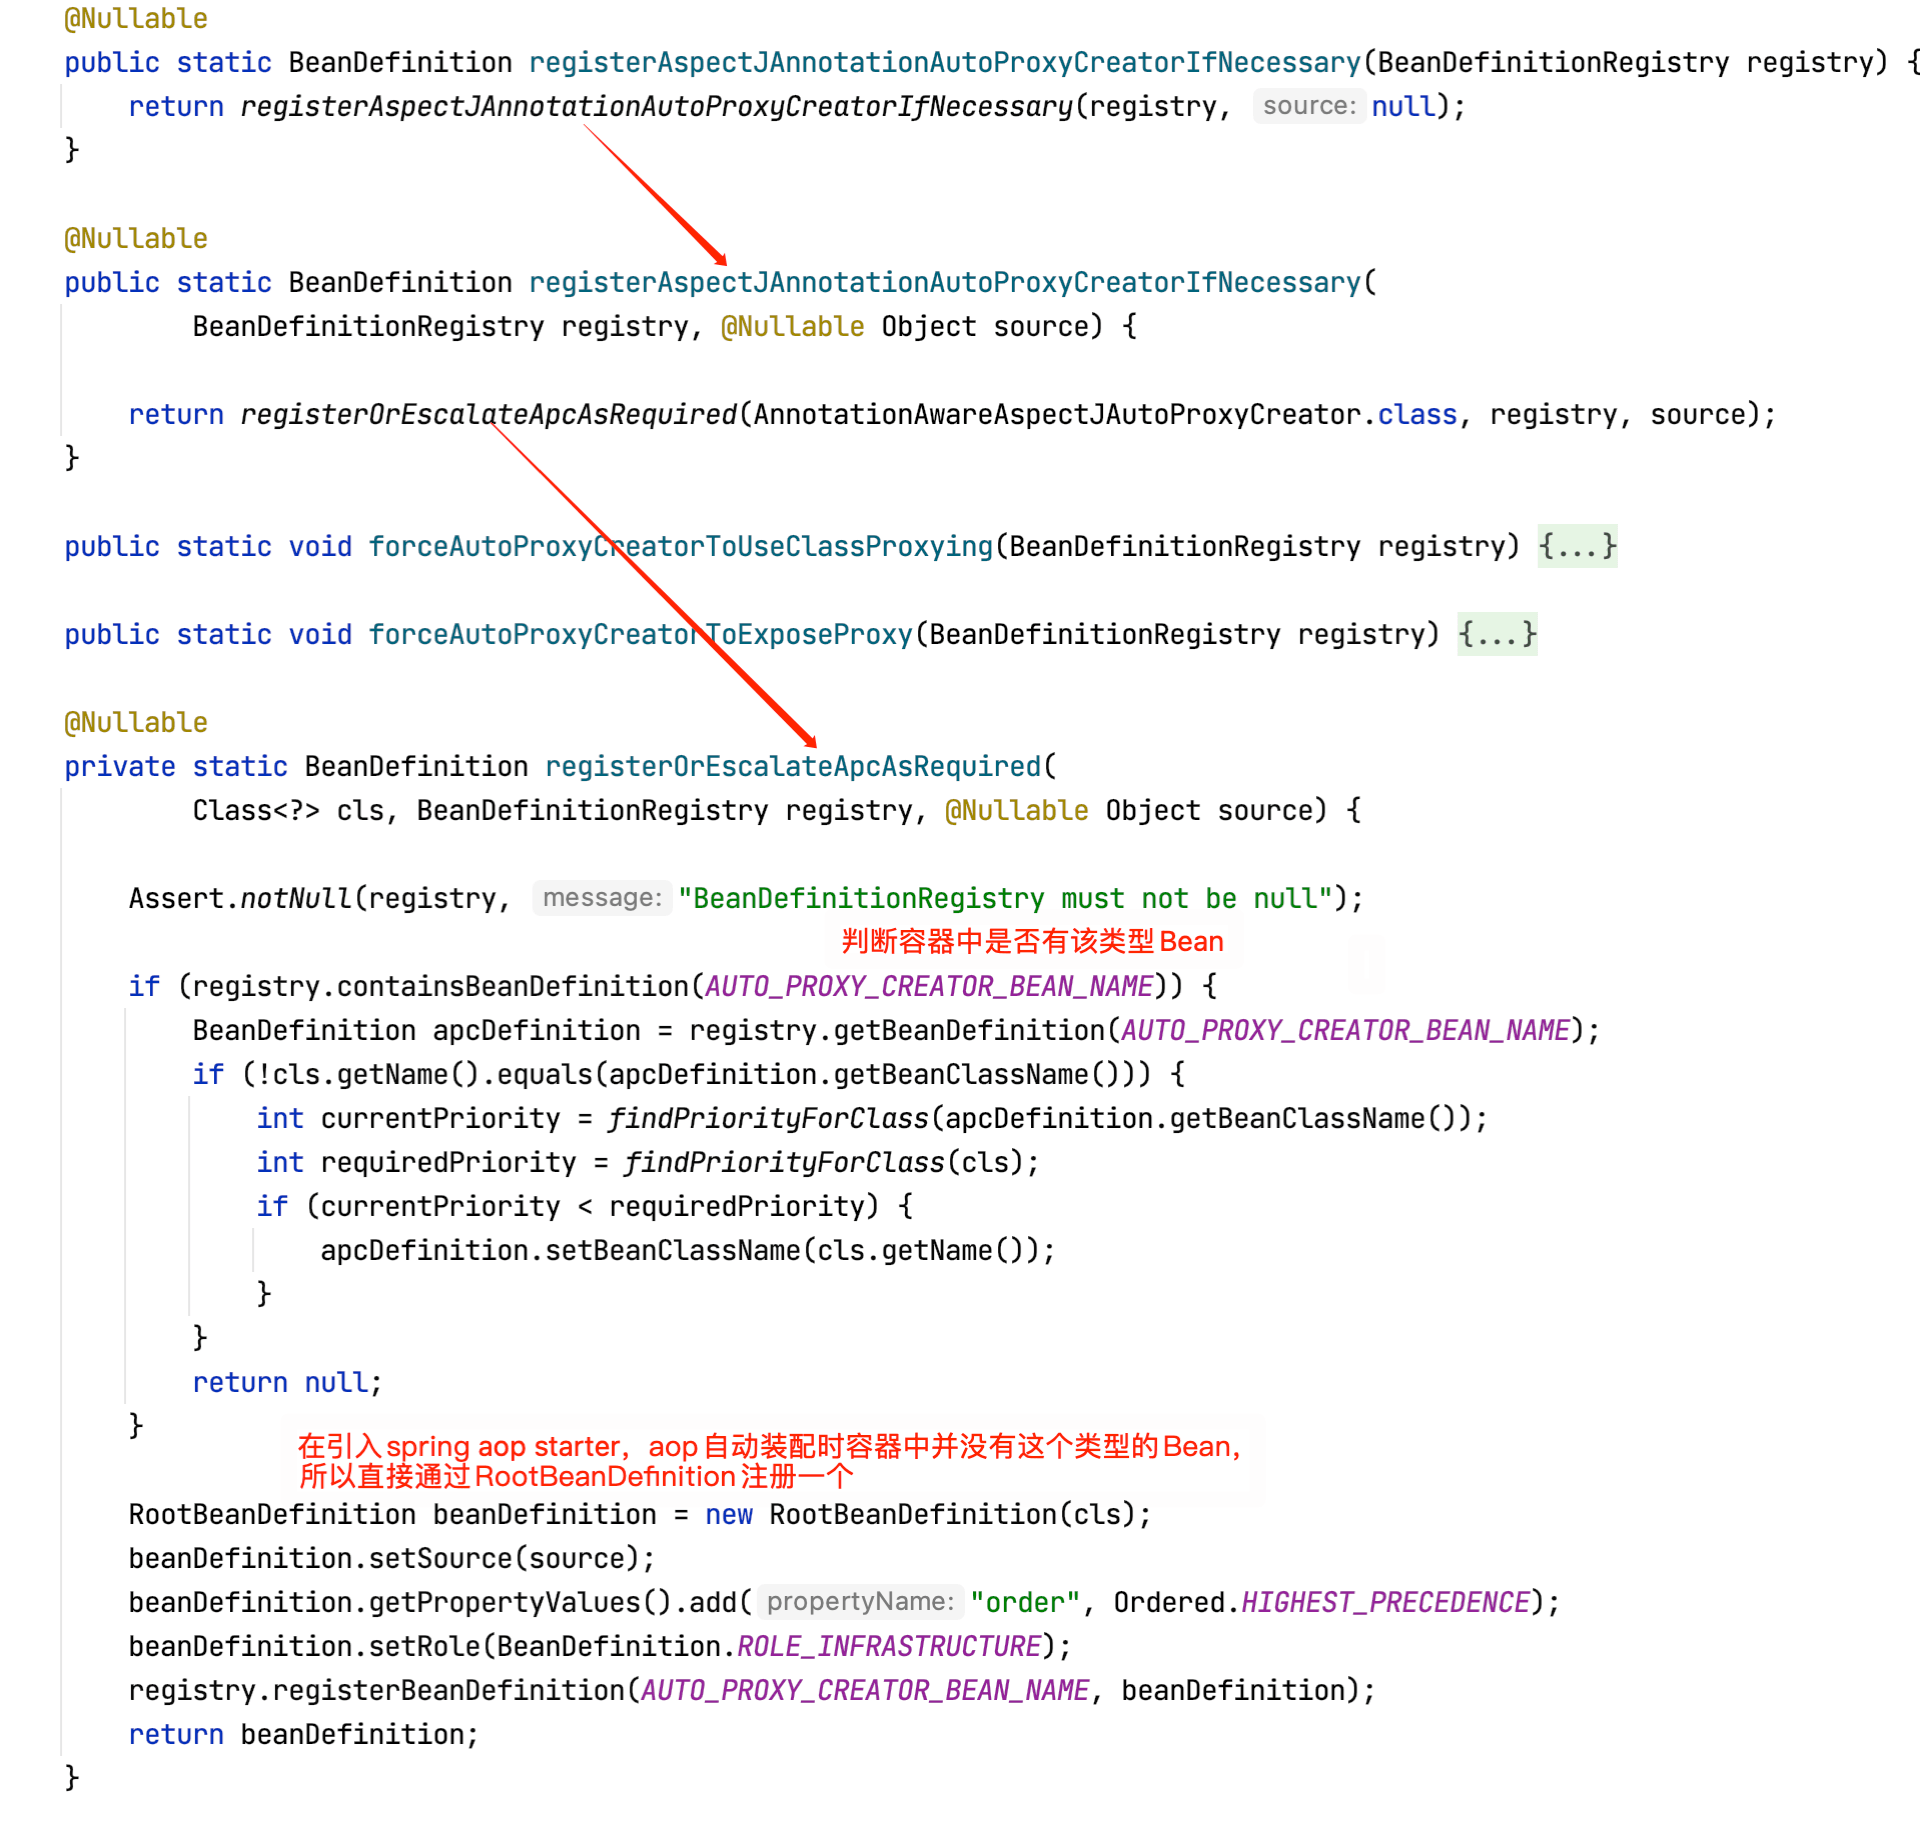
可以看到,核心逻辑为通过RootBeanDefinition往IOC注册了名称为AUTO_PROXY_CREATOR_BEAN_NAME(常量,值为org.springframework.aop.config.internalAutoProxyCreator),类型为AnnotationAwareAspectJAutoProxyCreator的Bean(对这种通过ImportBeanDefinitionRegistrar往IOC注册Bean方式不了解的读者可以参考深入学习Spring组件注册)。
@EnableAspectJAutoProxy模块驱动注解往IOC容器中注册了类型为AnnotationAwareAspectJAutoProxyCreator的Bean,Bean名称为org.springframework.aop.config.internalAutoProxyCreator。AnnotationAwareAspectJAutoProxyCreator class hierarchy
通过前面的分析,我们的目光聚焦在AnnotationAwareAspectJAutoProxyCreator类上,为了搞清楚这个类的作用,我们先捋清类的层级关系:
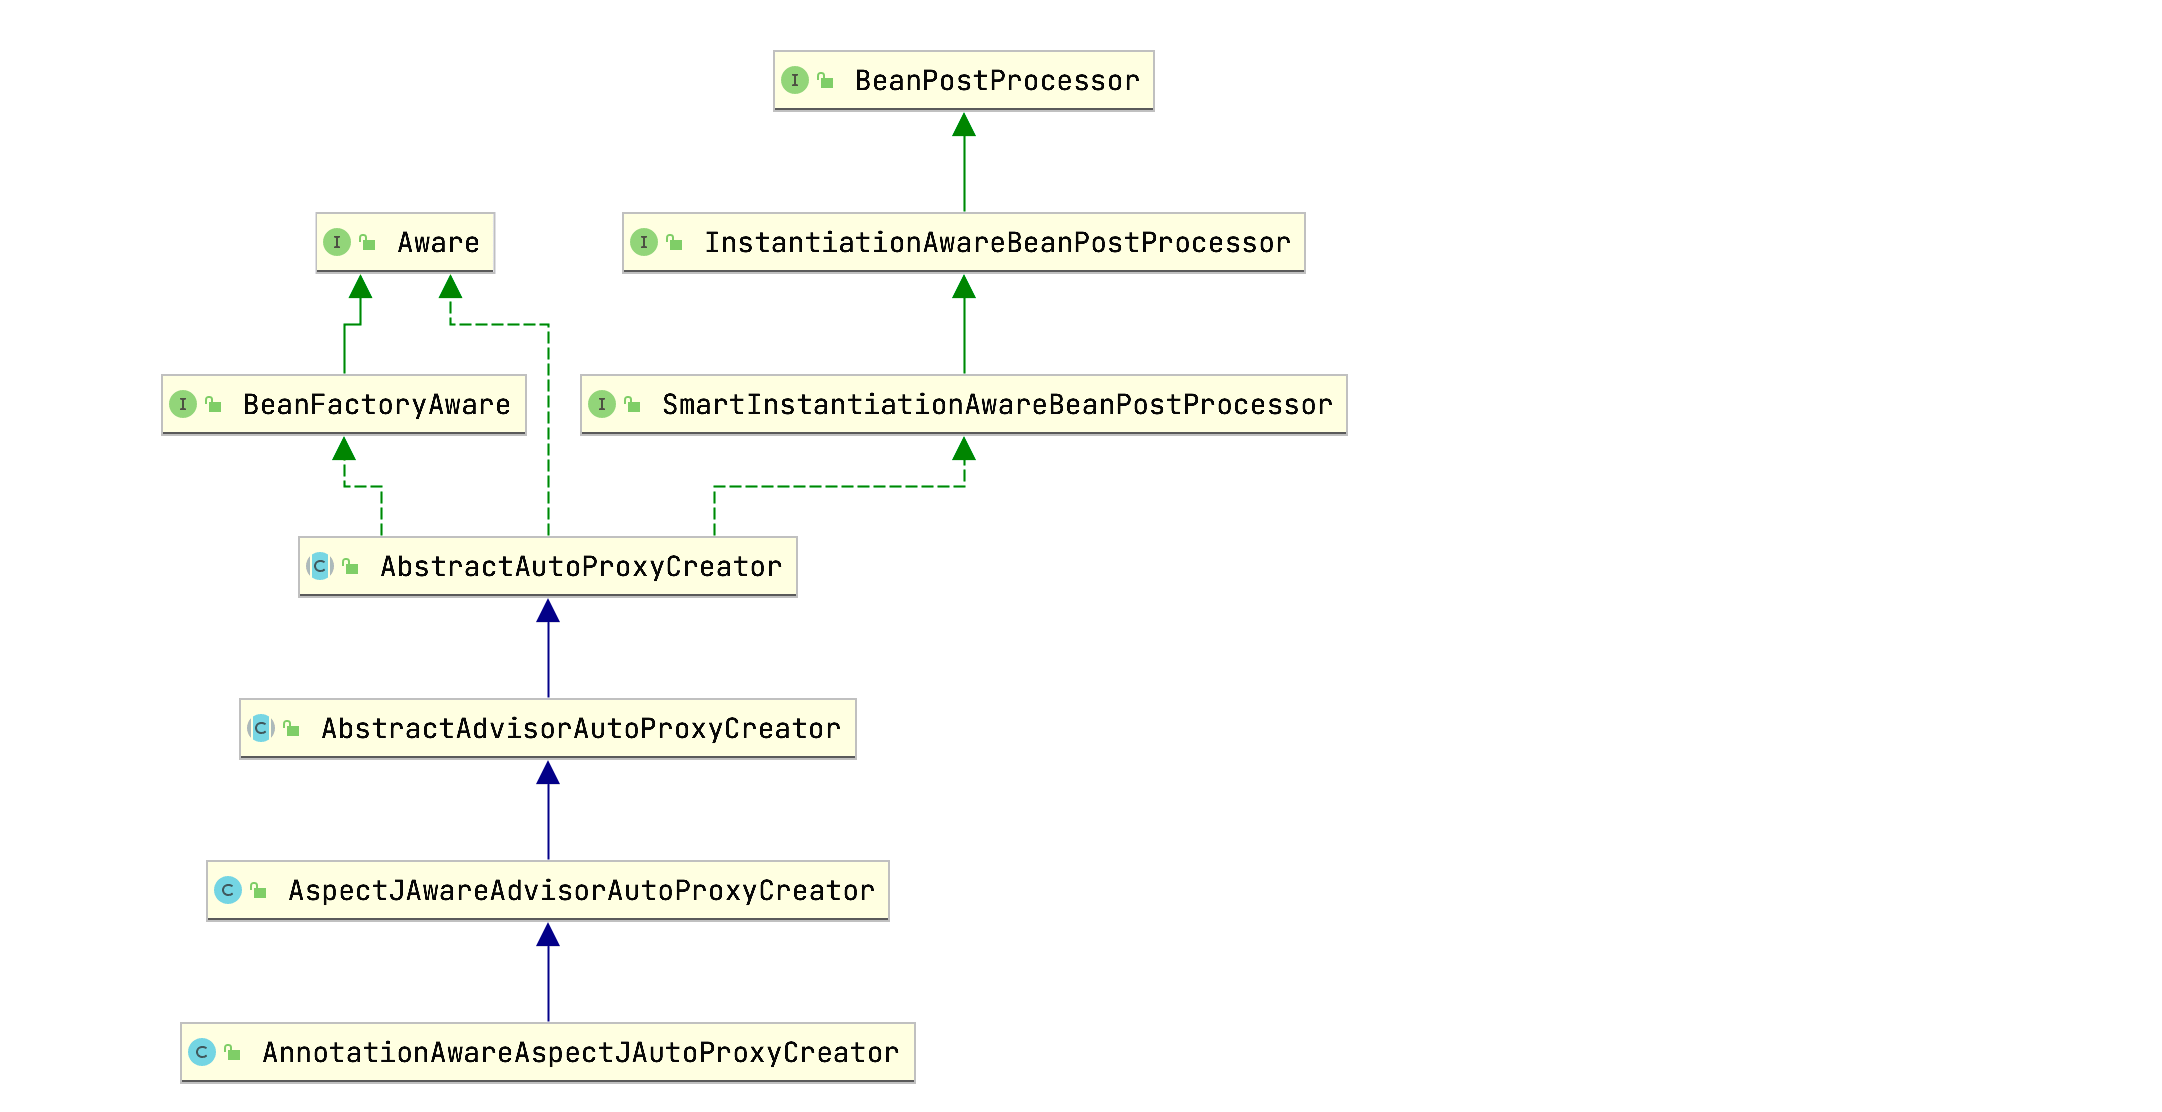
可以看到AnnotationAwareAspectJAutoProxyCreator的父类AbstractAutoProxyCreator实现了SmartInstantiationAwareBeanPostProcessor和BeanFactoryAware接口。实现BeanFactoryAware用于在Bean初始化时注入BeanFactory,而SmartInstantiationAwareBeanPostProcessor接口的父类为InstantiationAwareBeanPostProcessor接口,该接口继承自BeanPostProcessor接口。
通过深入理解Spring BeanPostProcessor & InstantiationAwareBeanPostProcessor一节的学习,我们知道BeanPostProcessor接口和InstantiationAwareBeanPostProcessor接口包含一些用于Bean实例化初始化前后进行自定义操作的方法,所以我们大体可以猜测出目标Bean的代理是在这些接口方法里实现的。
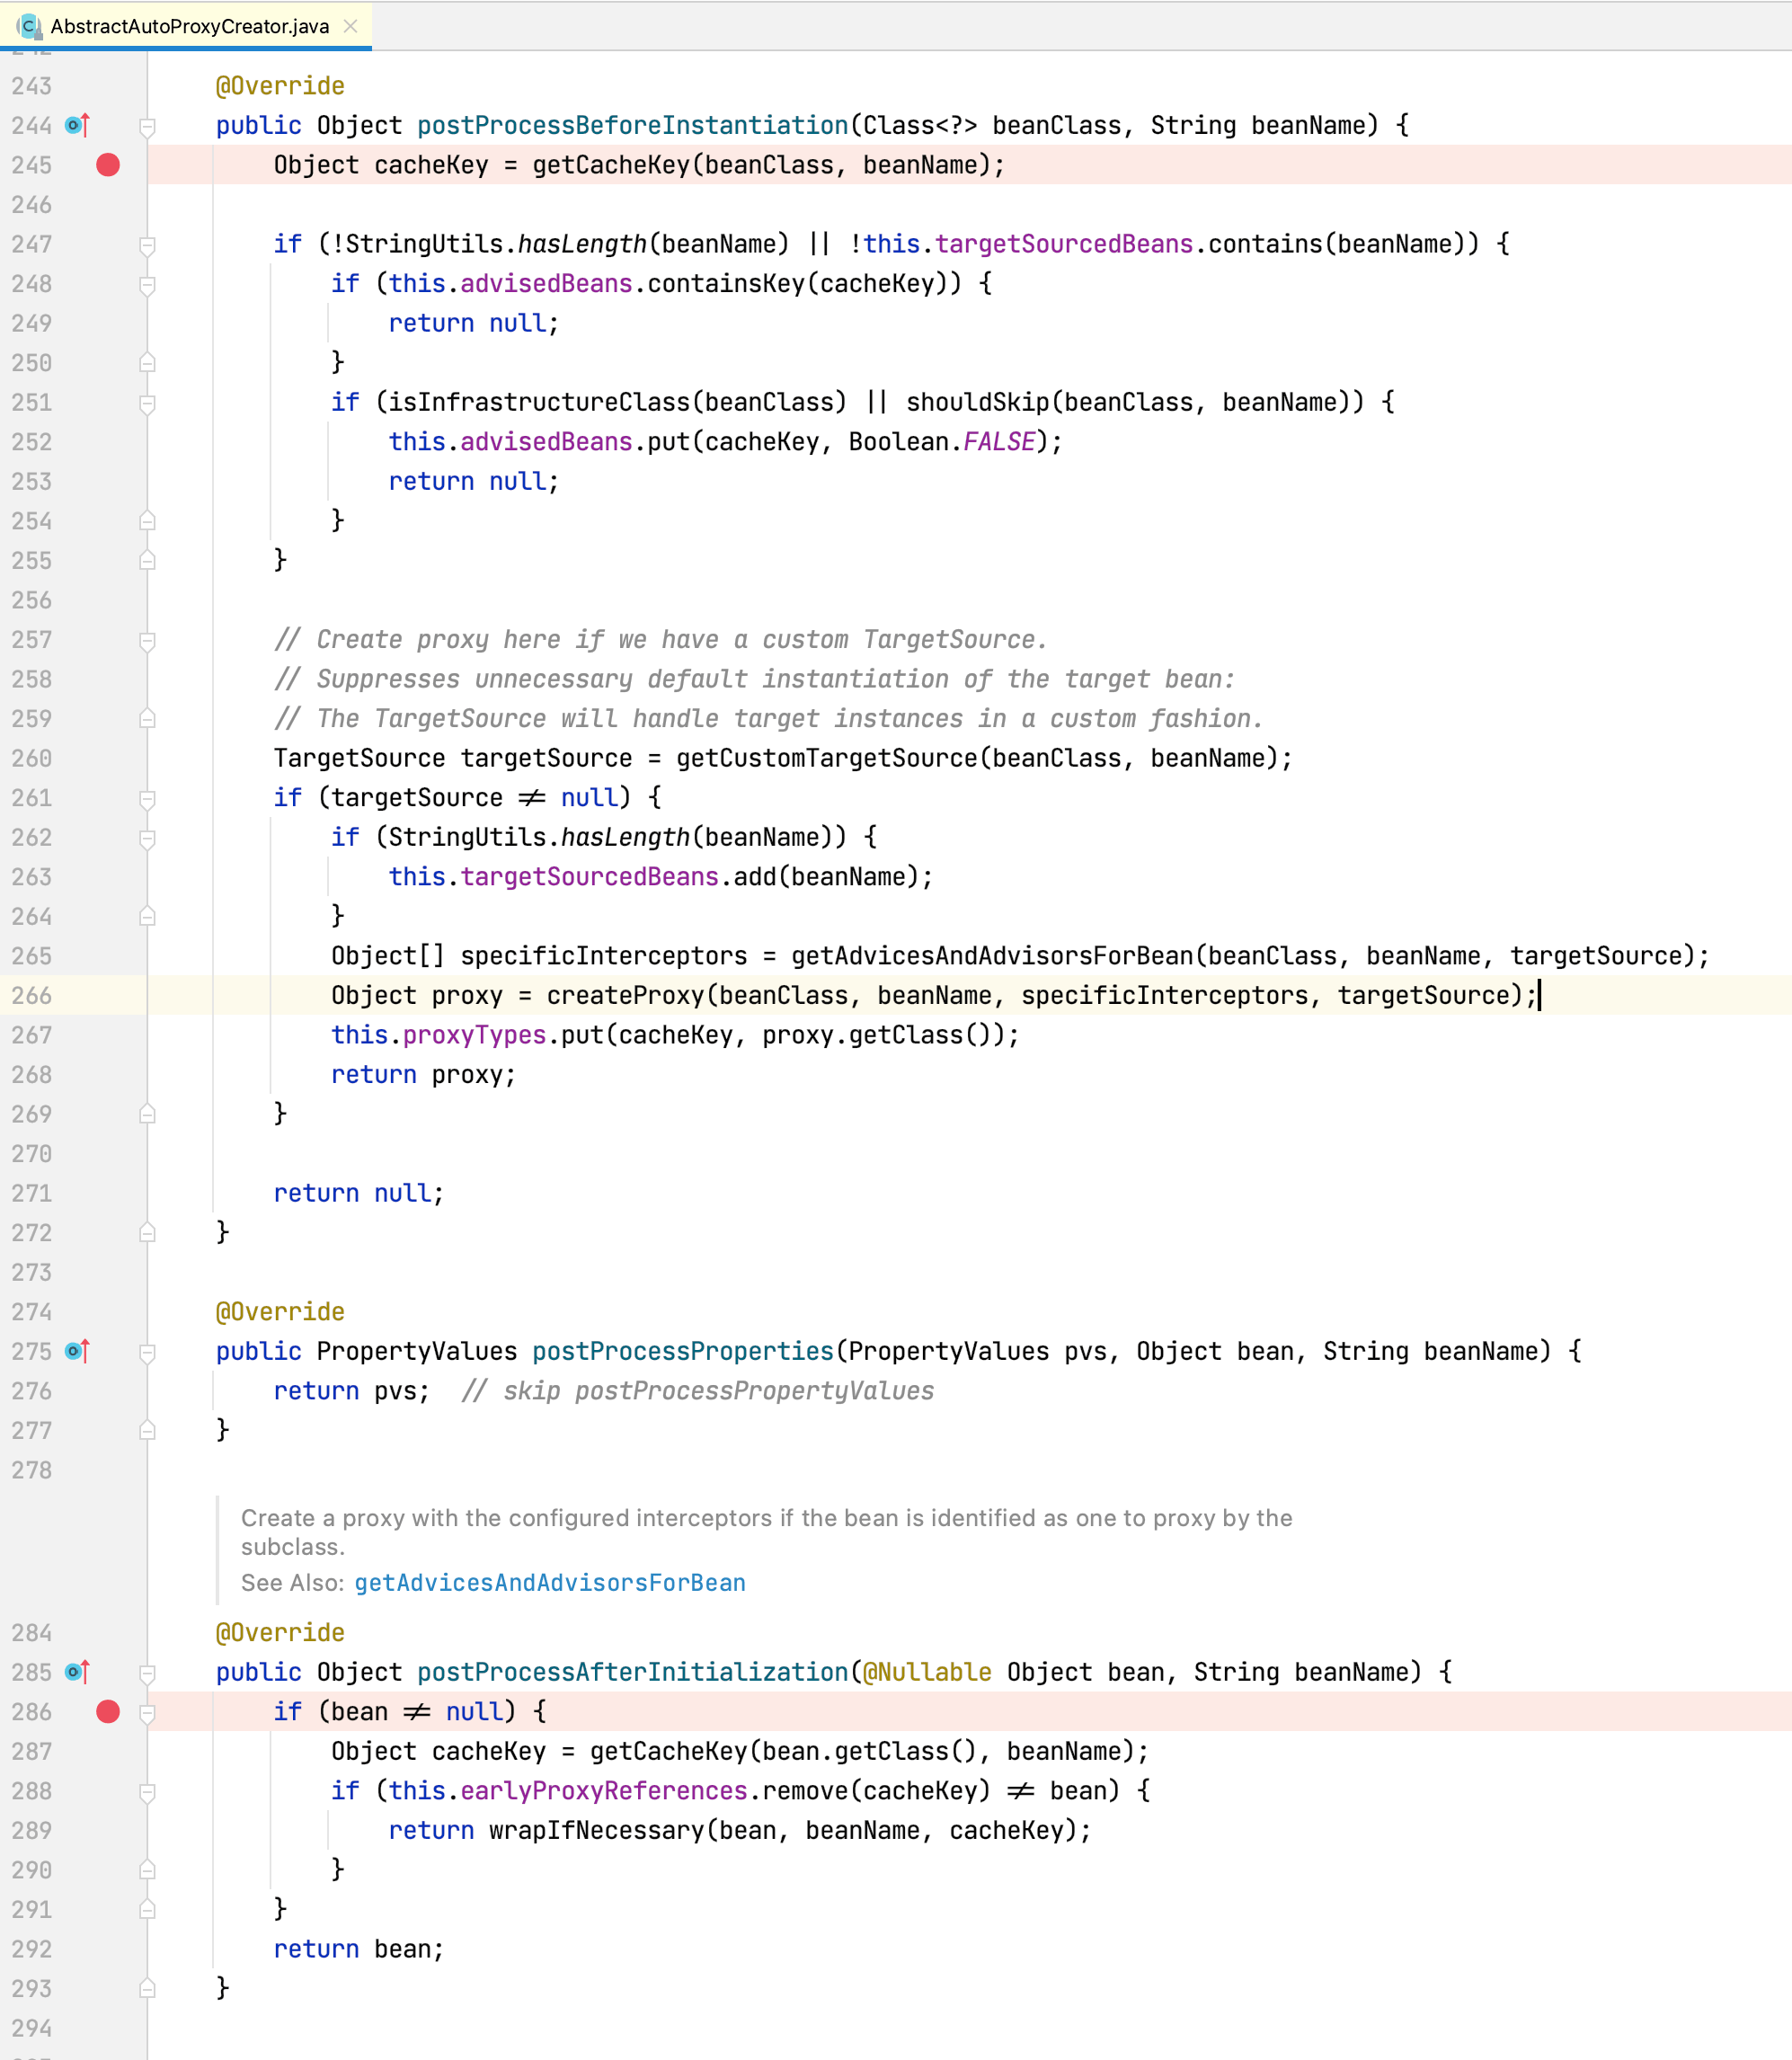
通过查看AnnotationAwareAspectJAutoProxyCreator及其各个层级父类源码可以发现,AbstractAutoProxyCreator类实现了InstantiationAwareBeanPostProcessor接口的postProcessBeforeInstantiation方法(自定义Bean实例化前操作逻辑),实现了BeanPostProcessor的postProcessAfterInitialization方法(自定义Bean初始化后操作逻辑),所以我们在这两个方法上打个端点,用于后续debug:
AOP代理创建过程
我们以debug的方式启动前面的AOP例子,因为后置处理器对所有Bean都生效,所以每个Bean创建时都会进入我们刚刚打断点的那两个方法中。但我们只关心Spring AOP是怎样增强我们定义的目标类TargetClass的,所以如果Bean类型不是TargetClass,我们都直接点击Resume Program按钮跳过,直到Bean类型是TargetClass:
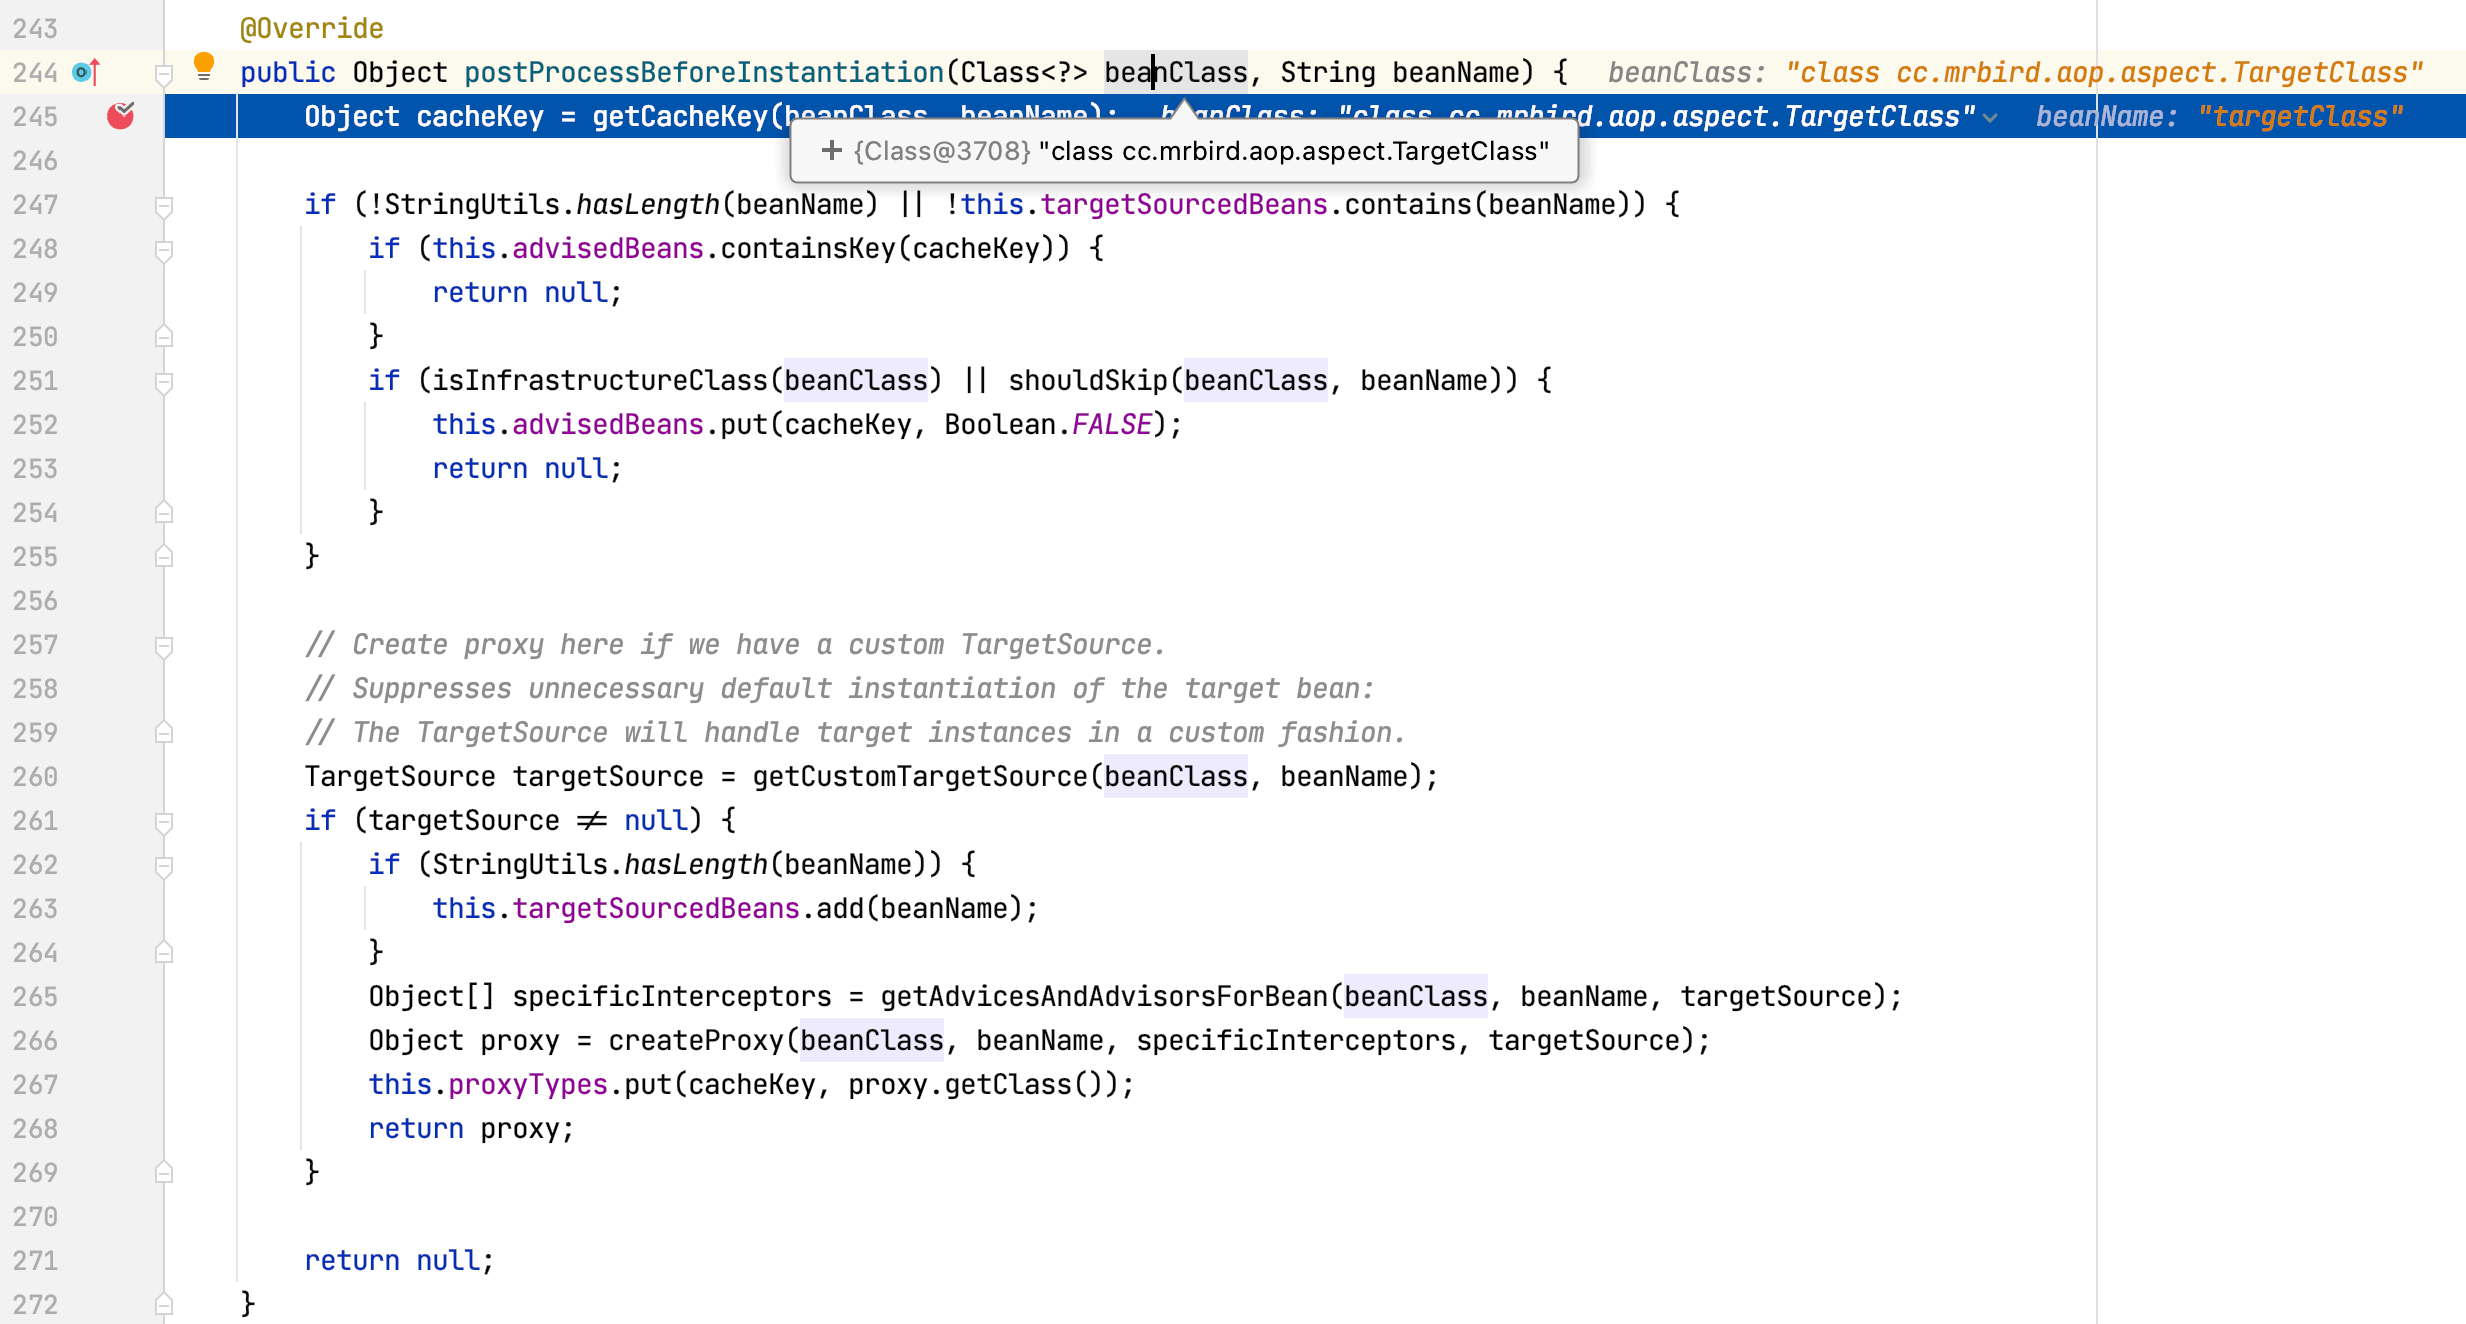
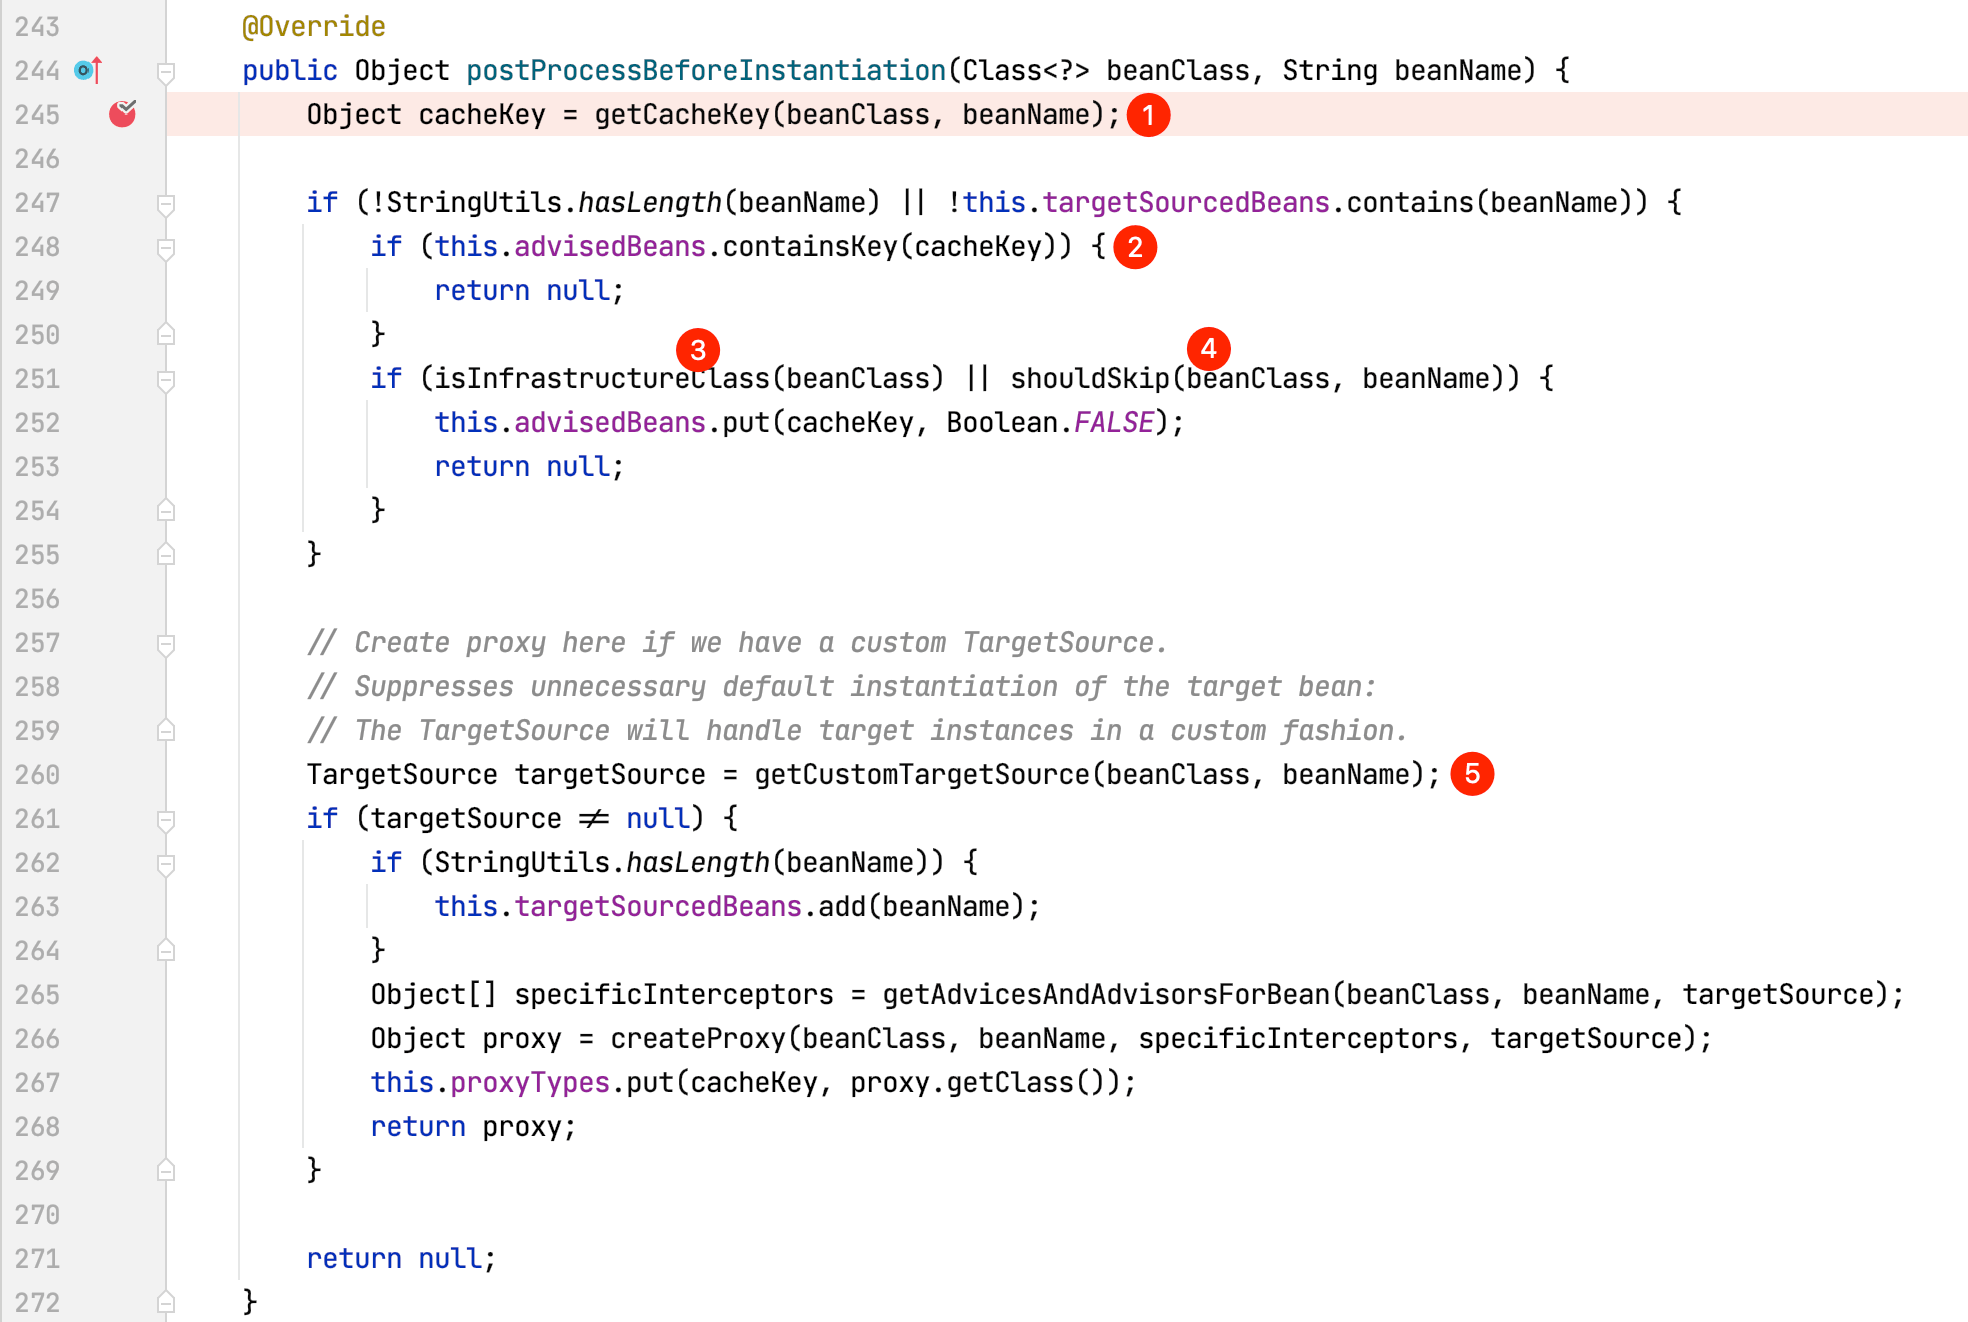
postProcessBeforeInstantiation方法主要包含以下几个核心步骤:
通过Bean名称和Bean类型获取该Bean的唯一缓存键名,getCacheKey方法源码如下所示:
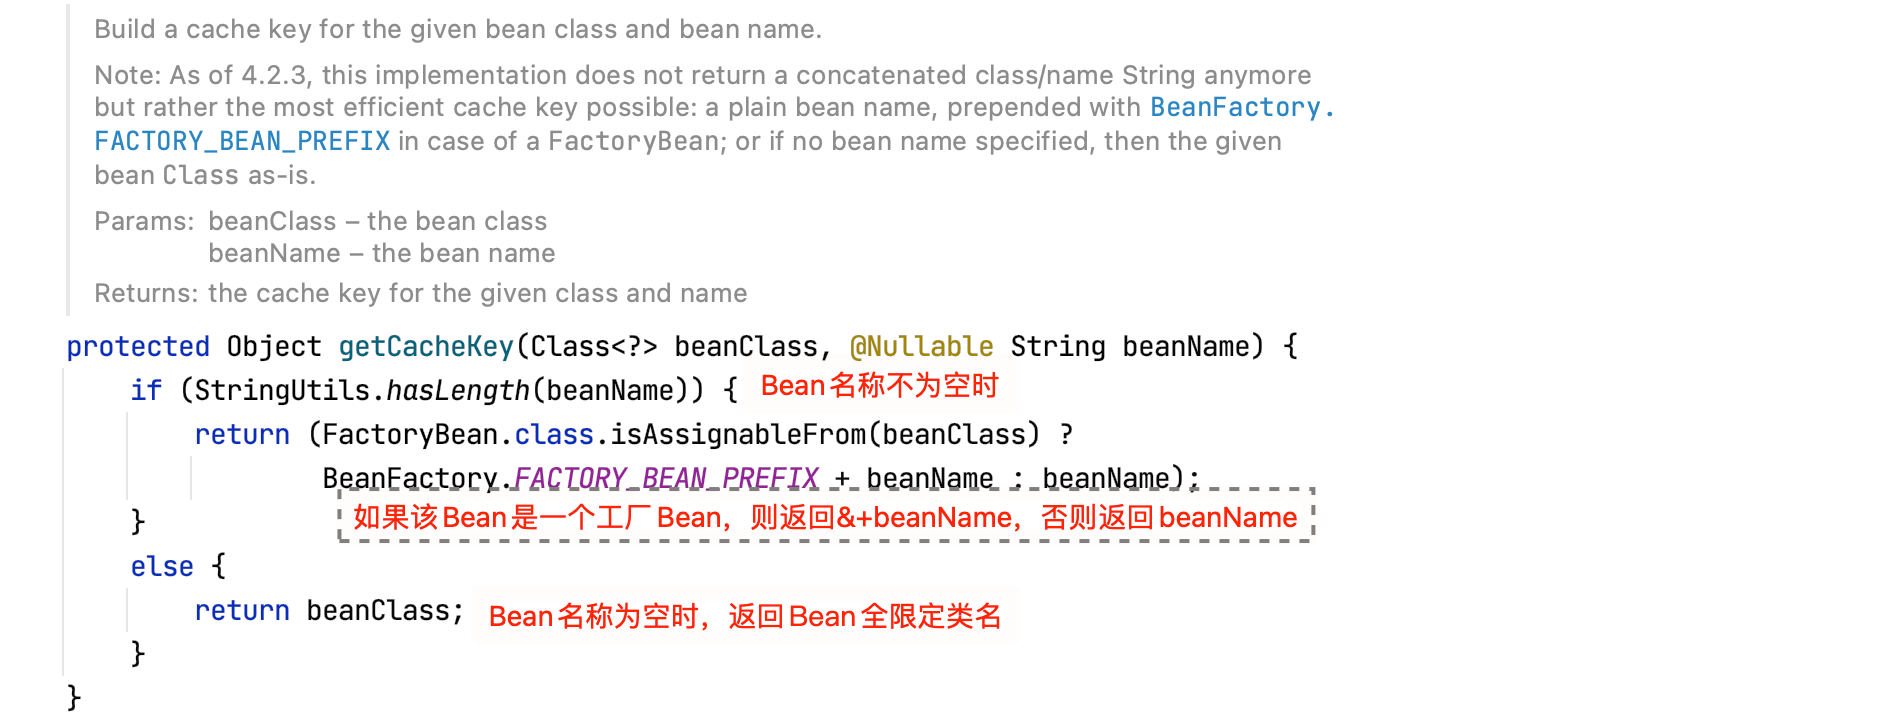
在这里,cacheKey的值为targetClass。
判断当前Bean(TargetClass)是否包含在advisedBeans集合中(AbstractAutoProxyCreator的成员变量
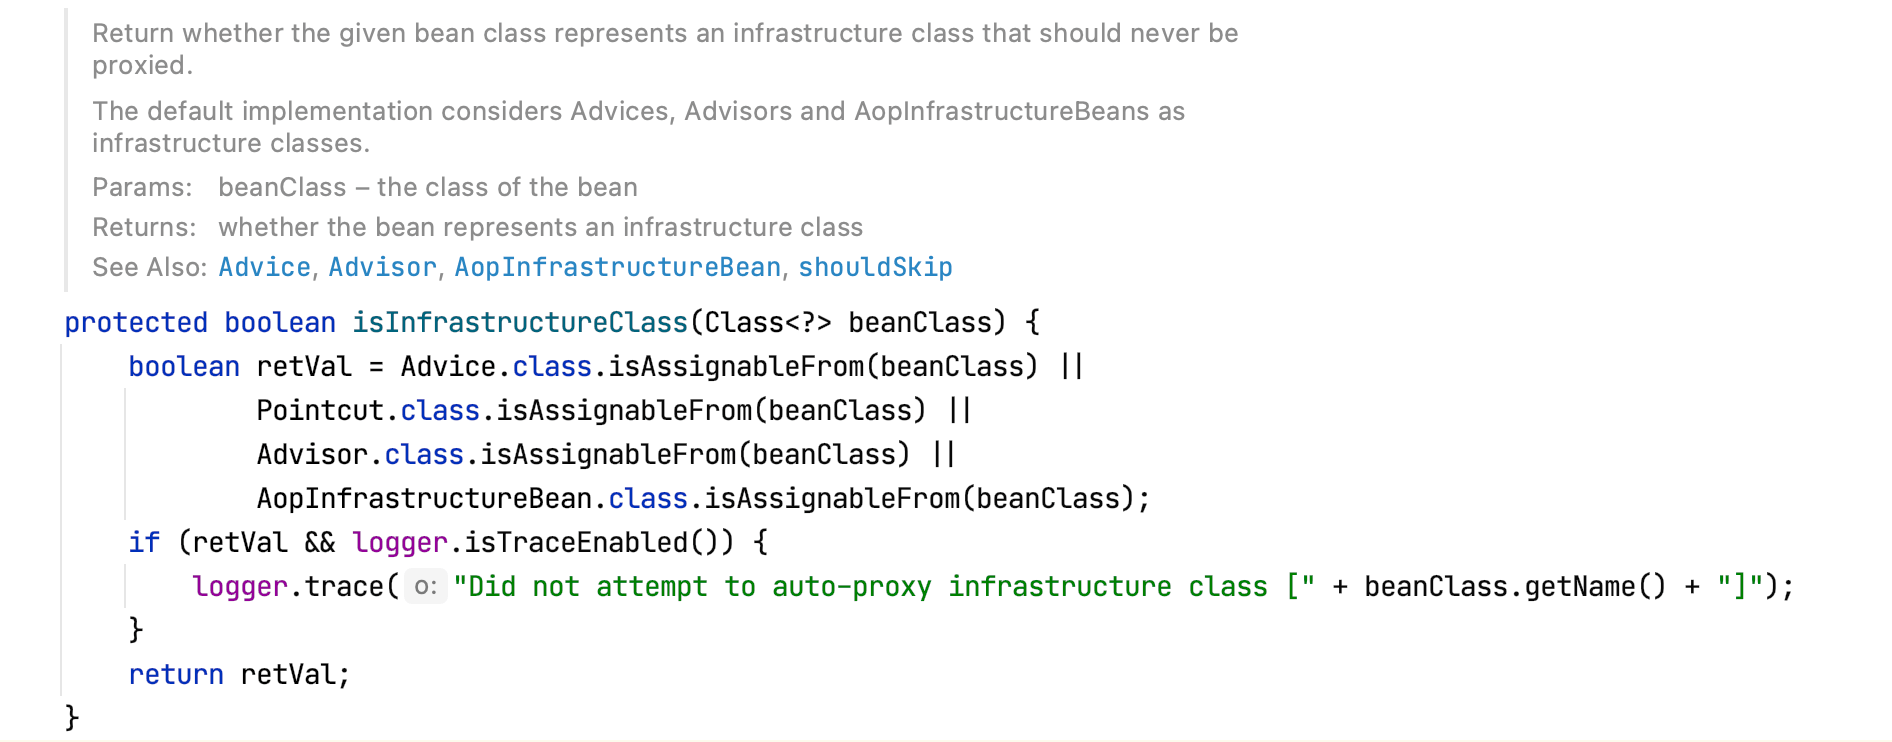
private final Map<Object, Boolean> advisedBeans = new ConcurrentHashMap<>(256),用于存放所有Bean是否需要增强标识,键为每个Bean的cacheKey,值为布尔类型,true表示需要增强,false表示不需要增强),此时TargetClass还未实例化,所以自然不在该集合中。判断当前Bean(TargetClass)是否是基础类,查看isInfrastructureClass方法源码:
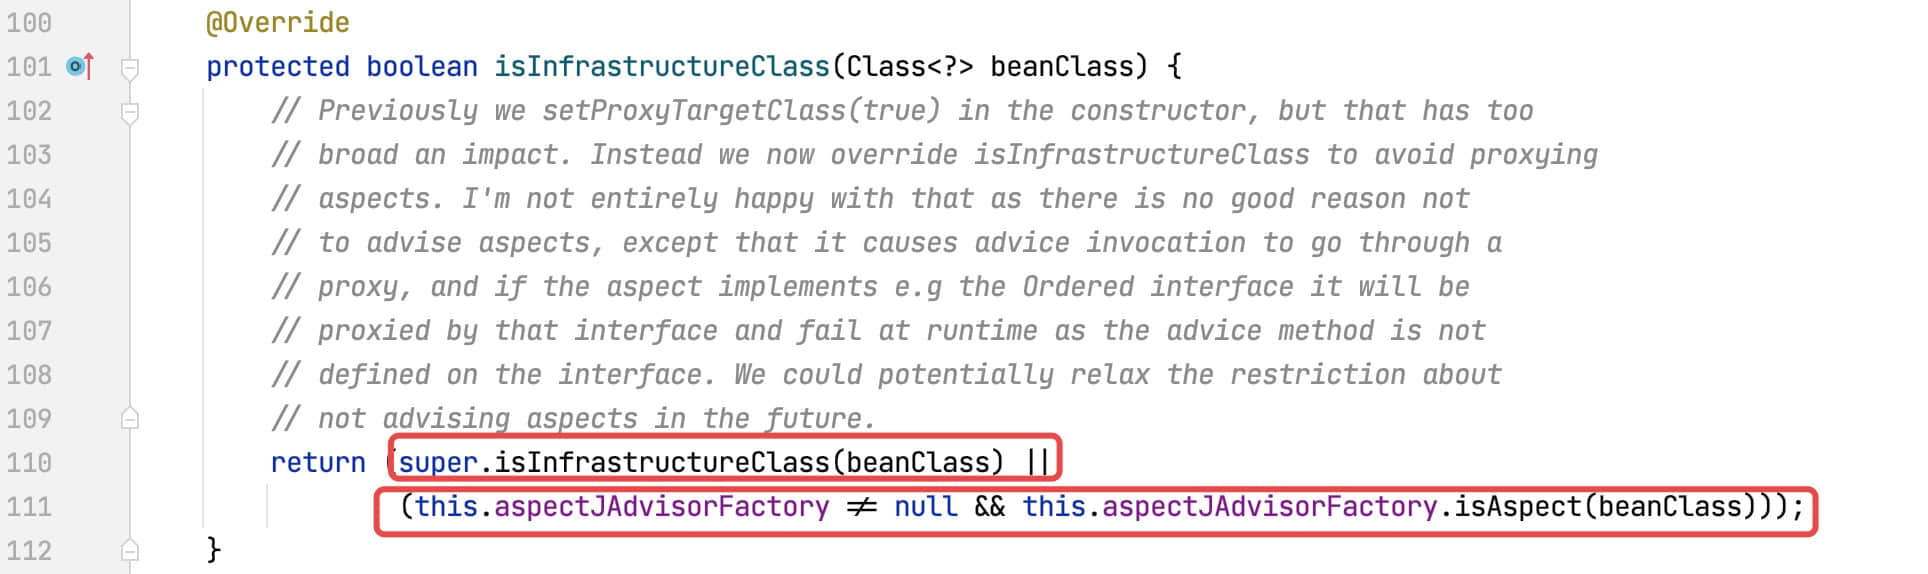
方法调用了父类的isInfrastructureClass方法:
this.aspectJAdvisorFactory.isAspect方法源码如下所示:
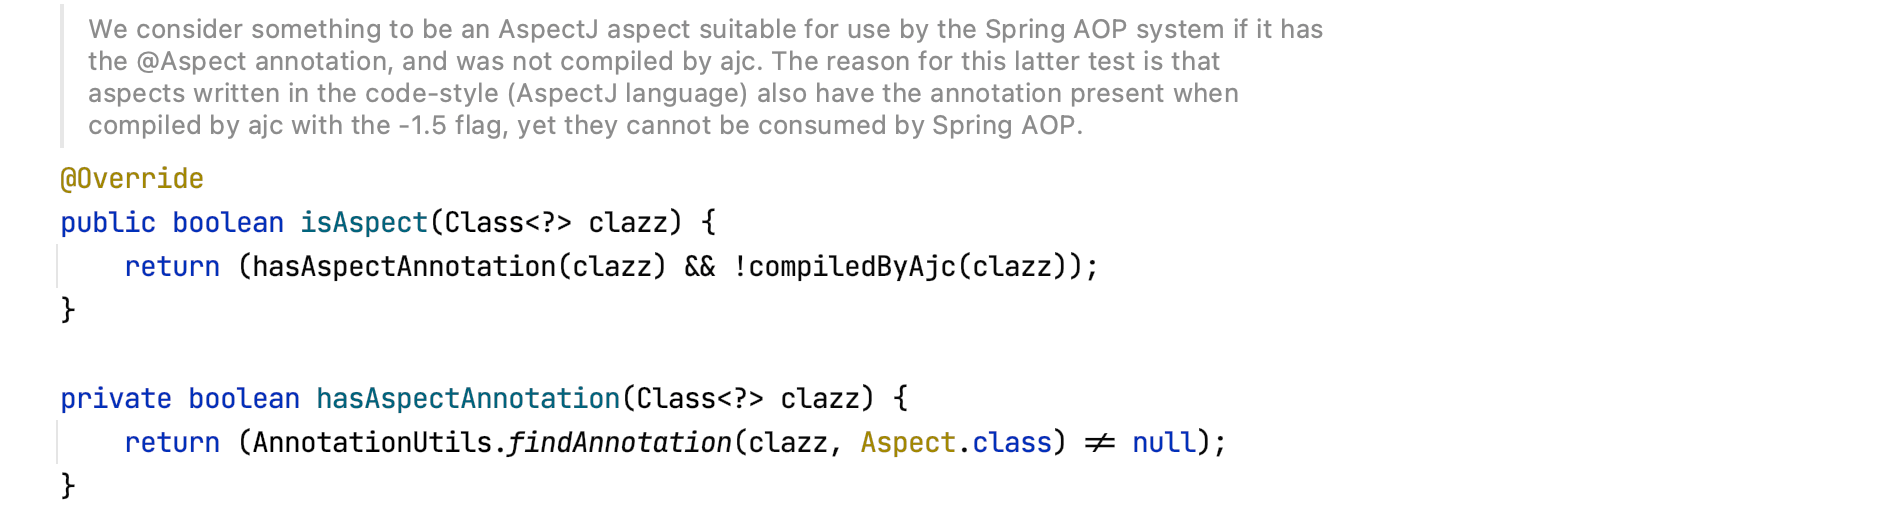
所以这一步逻辑为:判断当前Bean(TargetClass)是否是Advice,Pointcut,Advisor,AopInfrastructureBean的子类或者是否为切面类(@Aspect注解标注)。
判断是否需要跳过:
shouldSkip源码如下所示:
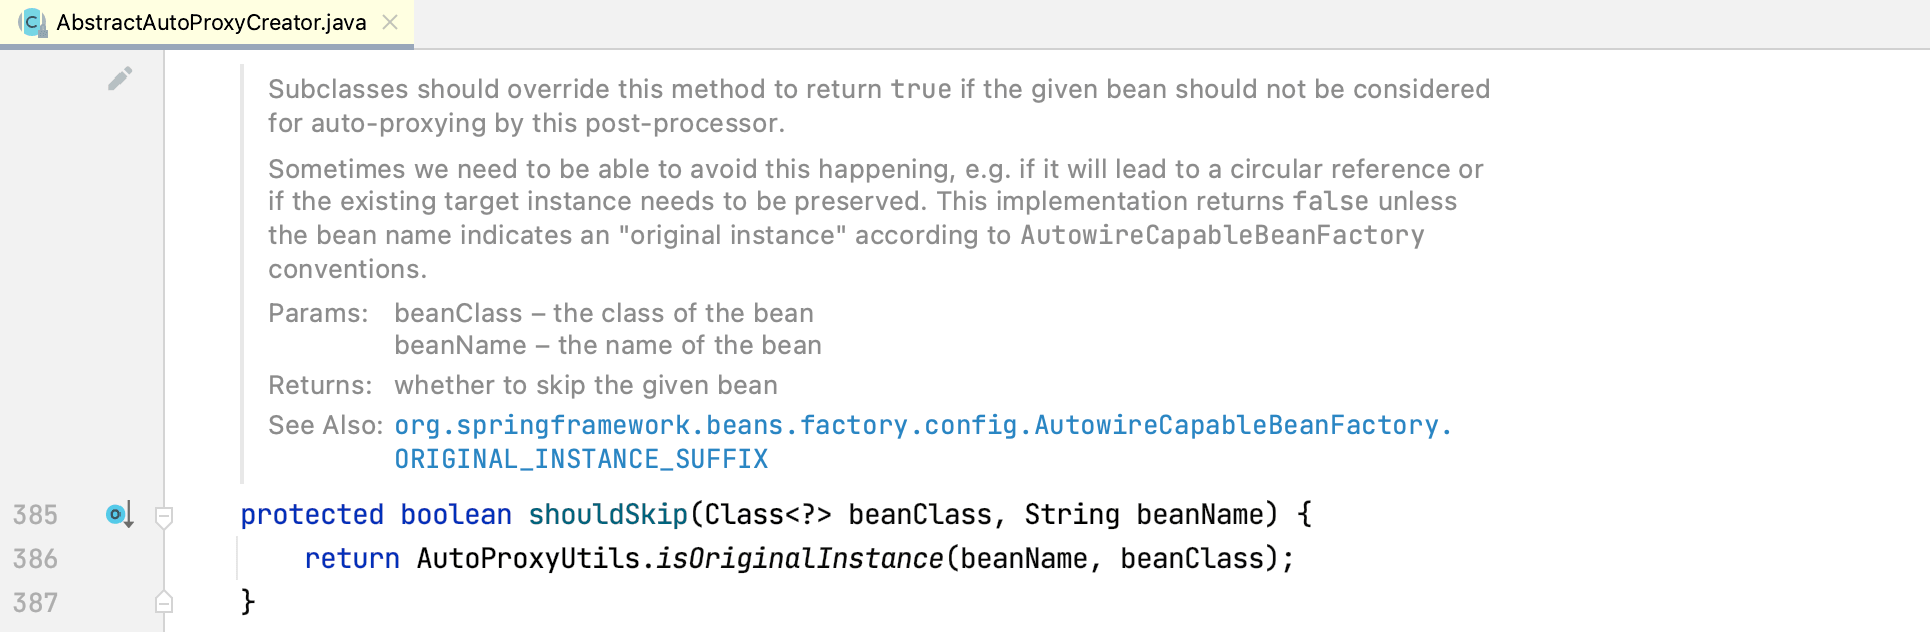
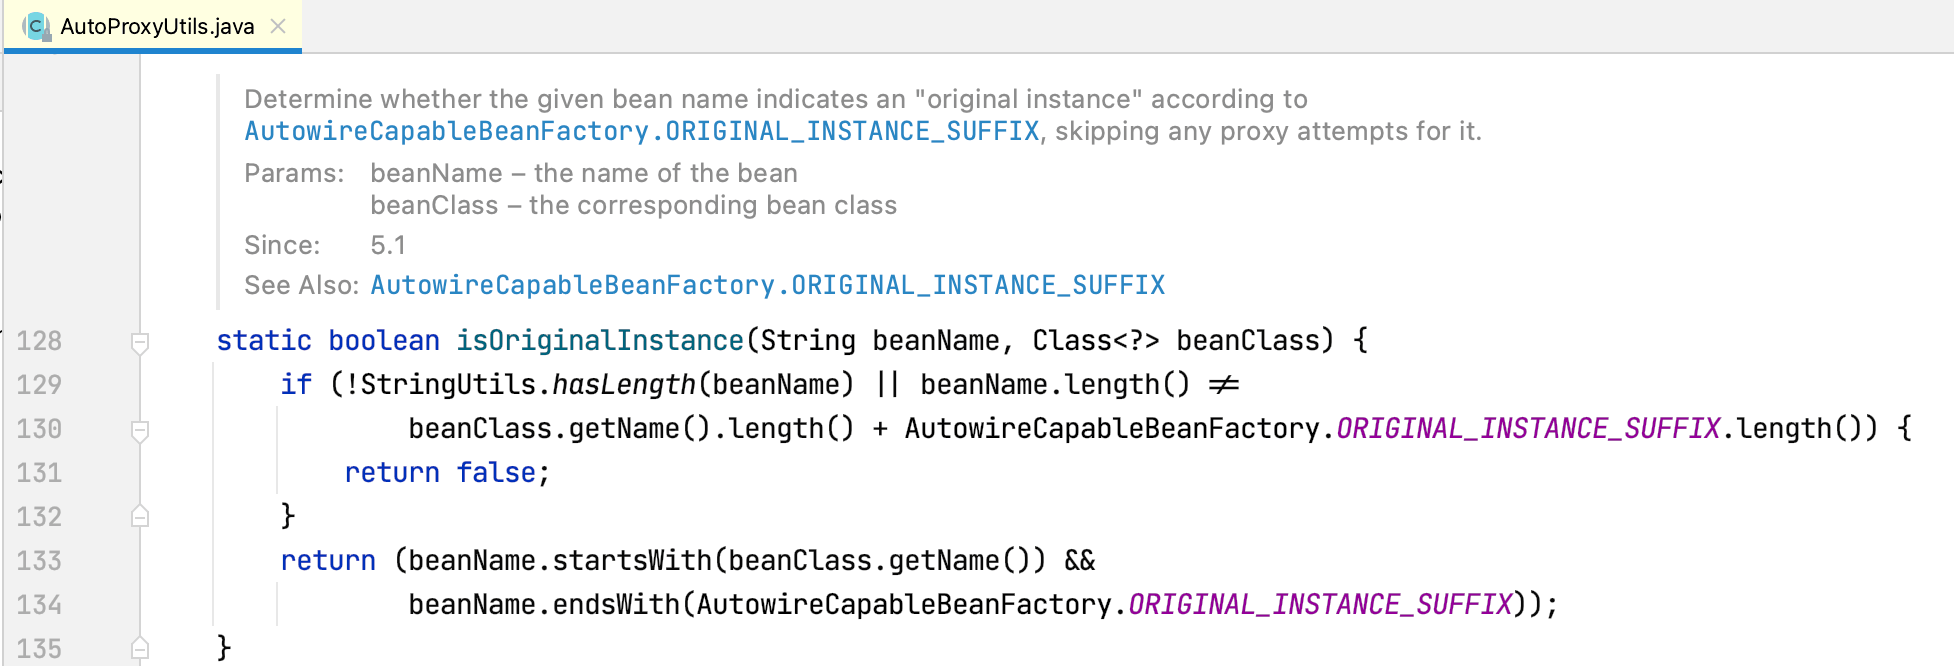
通过Bean名称判断是否以AutowireCapableBeanFactory.ORIGINAL_INSTANCE_SUFFIX(.ORIGINAL)结尾,是的话返回true表示跳过代理。
很明显我们的TargetClass不符合3和4,所以继续走第5步。
如果我们自定义了TargetSource,则在此处创建Bean代理,以取代目标Bean的后续默认实例化方式。我们并没有自定义TargetSource,所以直接跳过。
经过以上这些步骤,就TargetClass这个Bean而言,postProcessBeforeInstantiation方法最终返回null。Bean实例化前置处理到此完毕,点击Resume Program,继续Bean的后续生命周期处理逻辑,程序跳转到Bean初始化后置处理方法postProcessAfterInitialization:
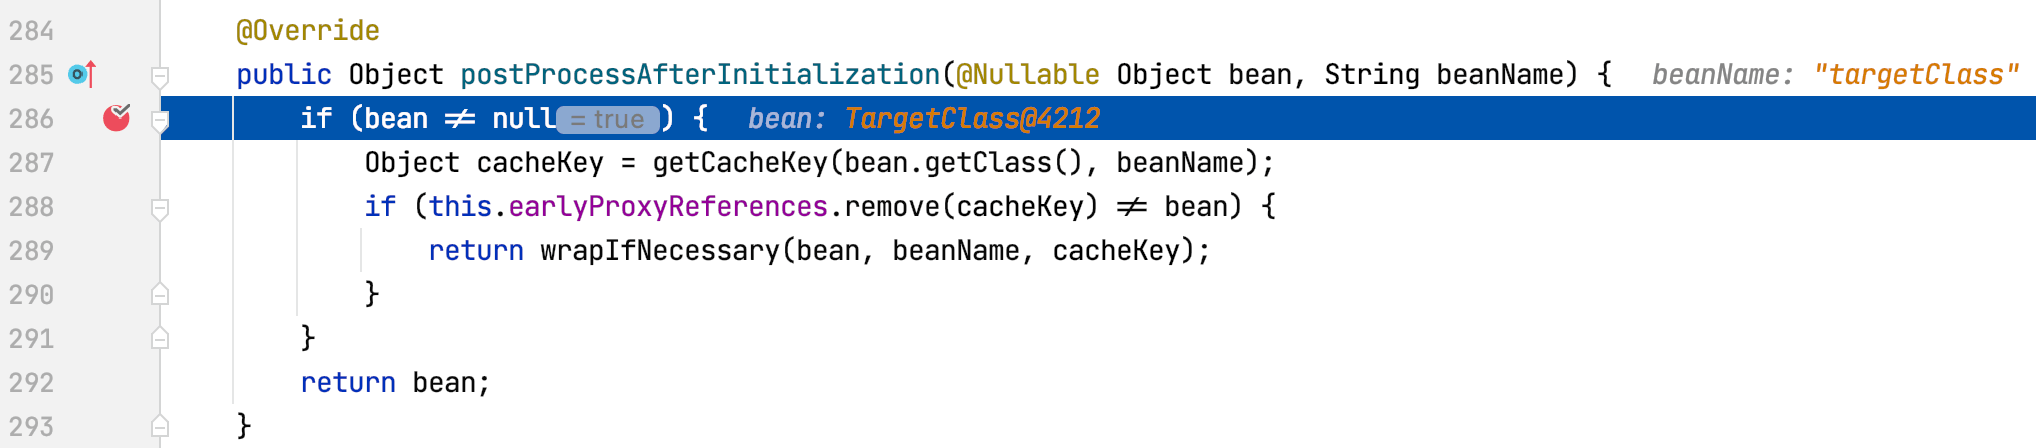
该方法重点关注wrapIfNecessary方法,查看wrapIfNecessary方法源码:
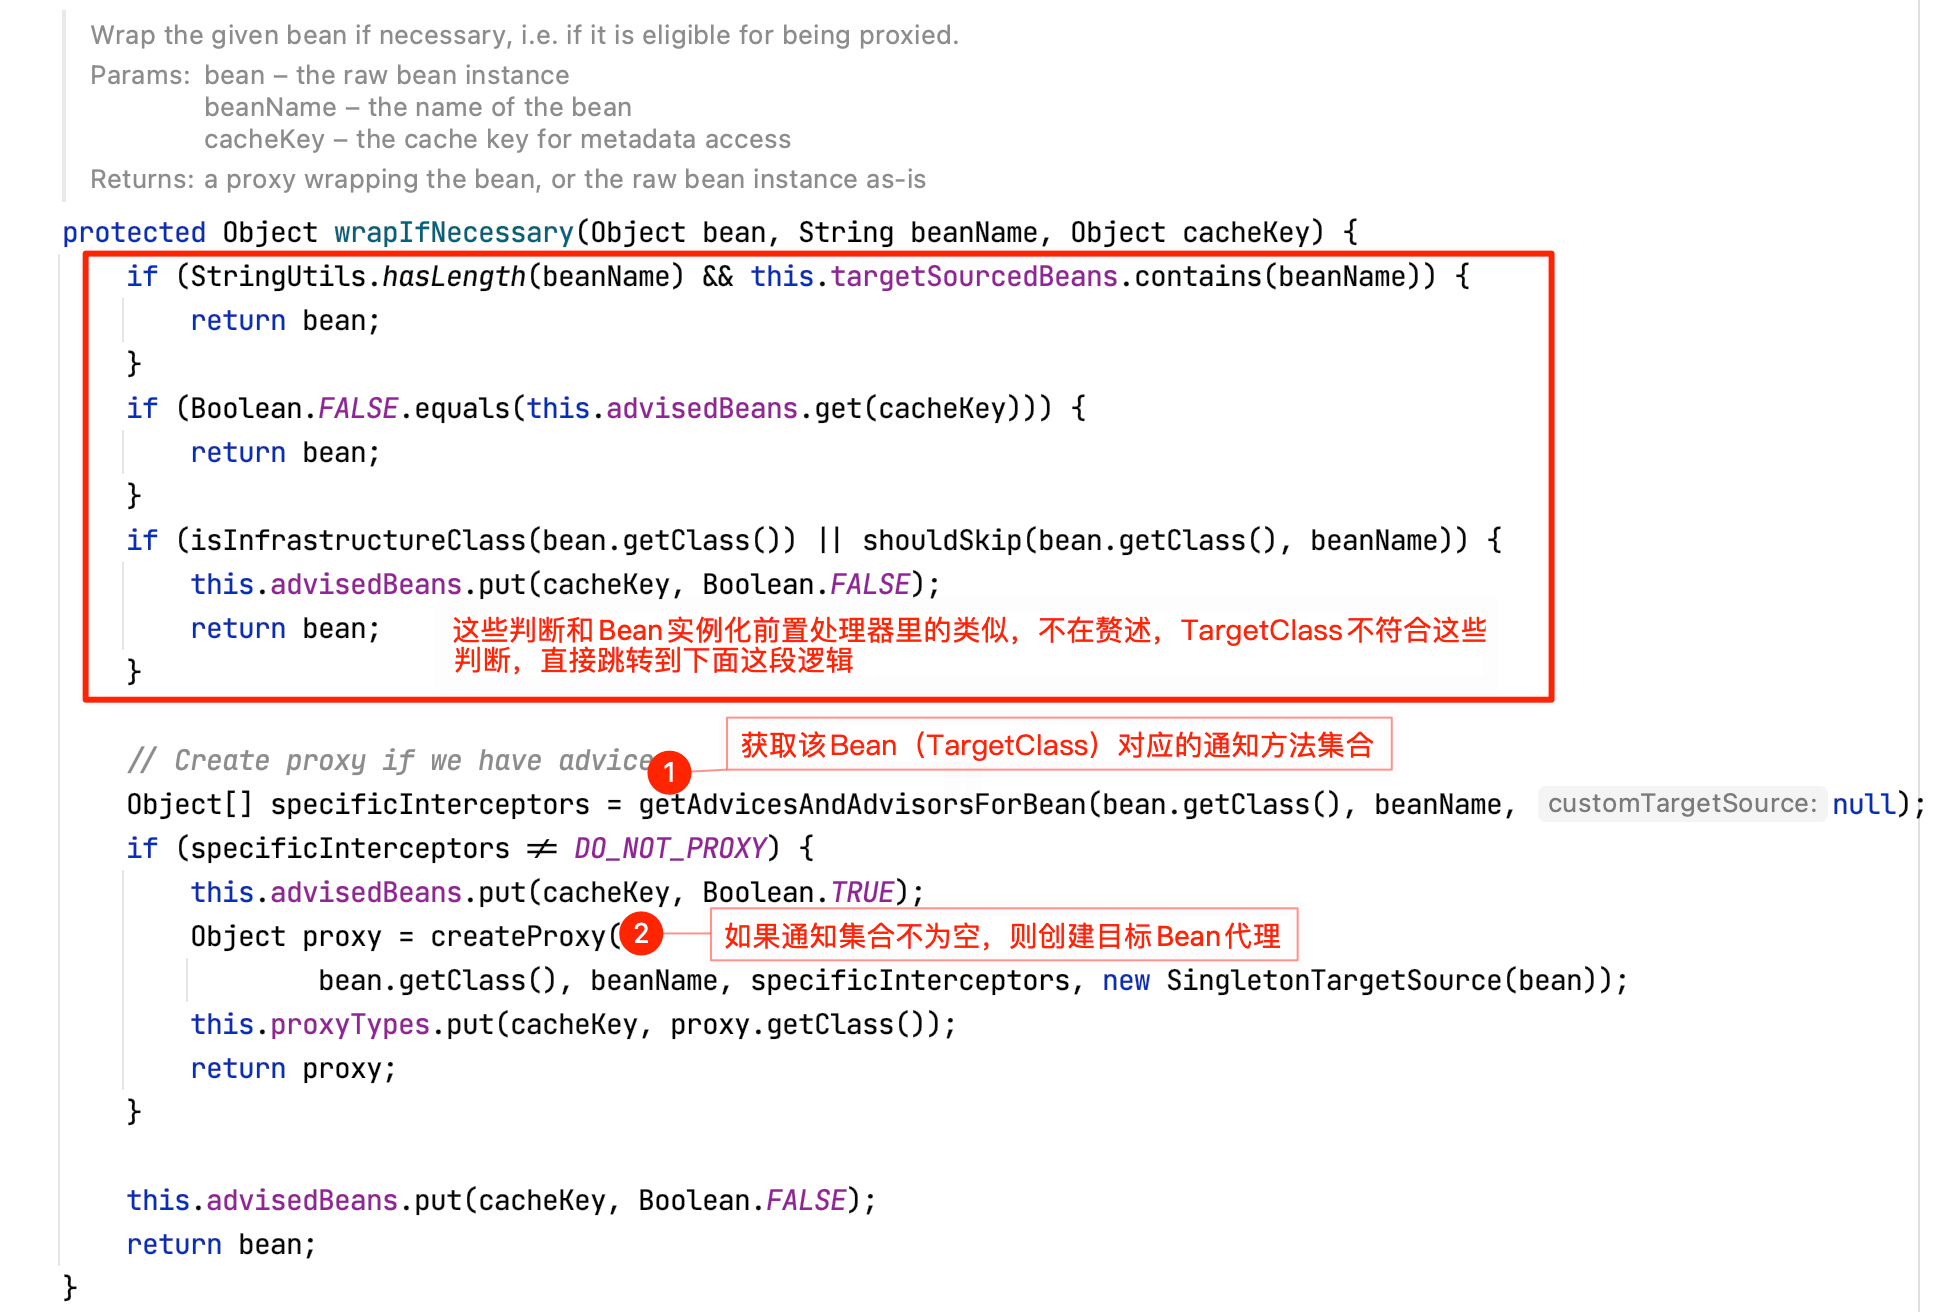
getAdvicesAndAdvisorsForBean方法内部主要包含以下这些逻辑(有兴趣自己debug查看具体判断逻辑实现,这里不再贴图,只做总结):
- 获取所有的通知方法(切面里定义的各个方法);
- 通过切点表达式判断这些通知方法是否可为当前Bean所用;
- 如果有符合的通知方法,则对它们进行排序(排序规则不同版本Spring有所不同,上面已经提及过)。
在前面的AOP例子中,切面MyAspect里的通知方法就是为了增强TargetClass所设的(根据切点表达式),所以getAdvicesAndAdvisorsForBean方法返回值如下所示:
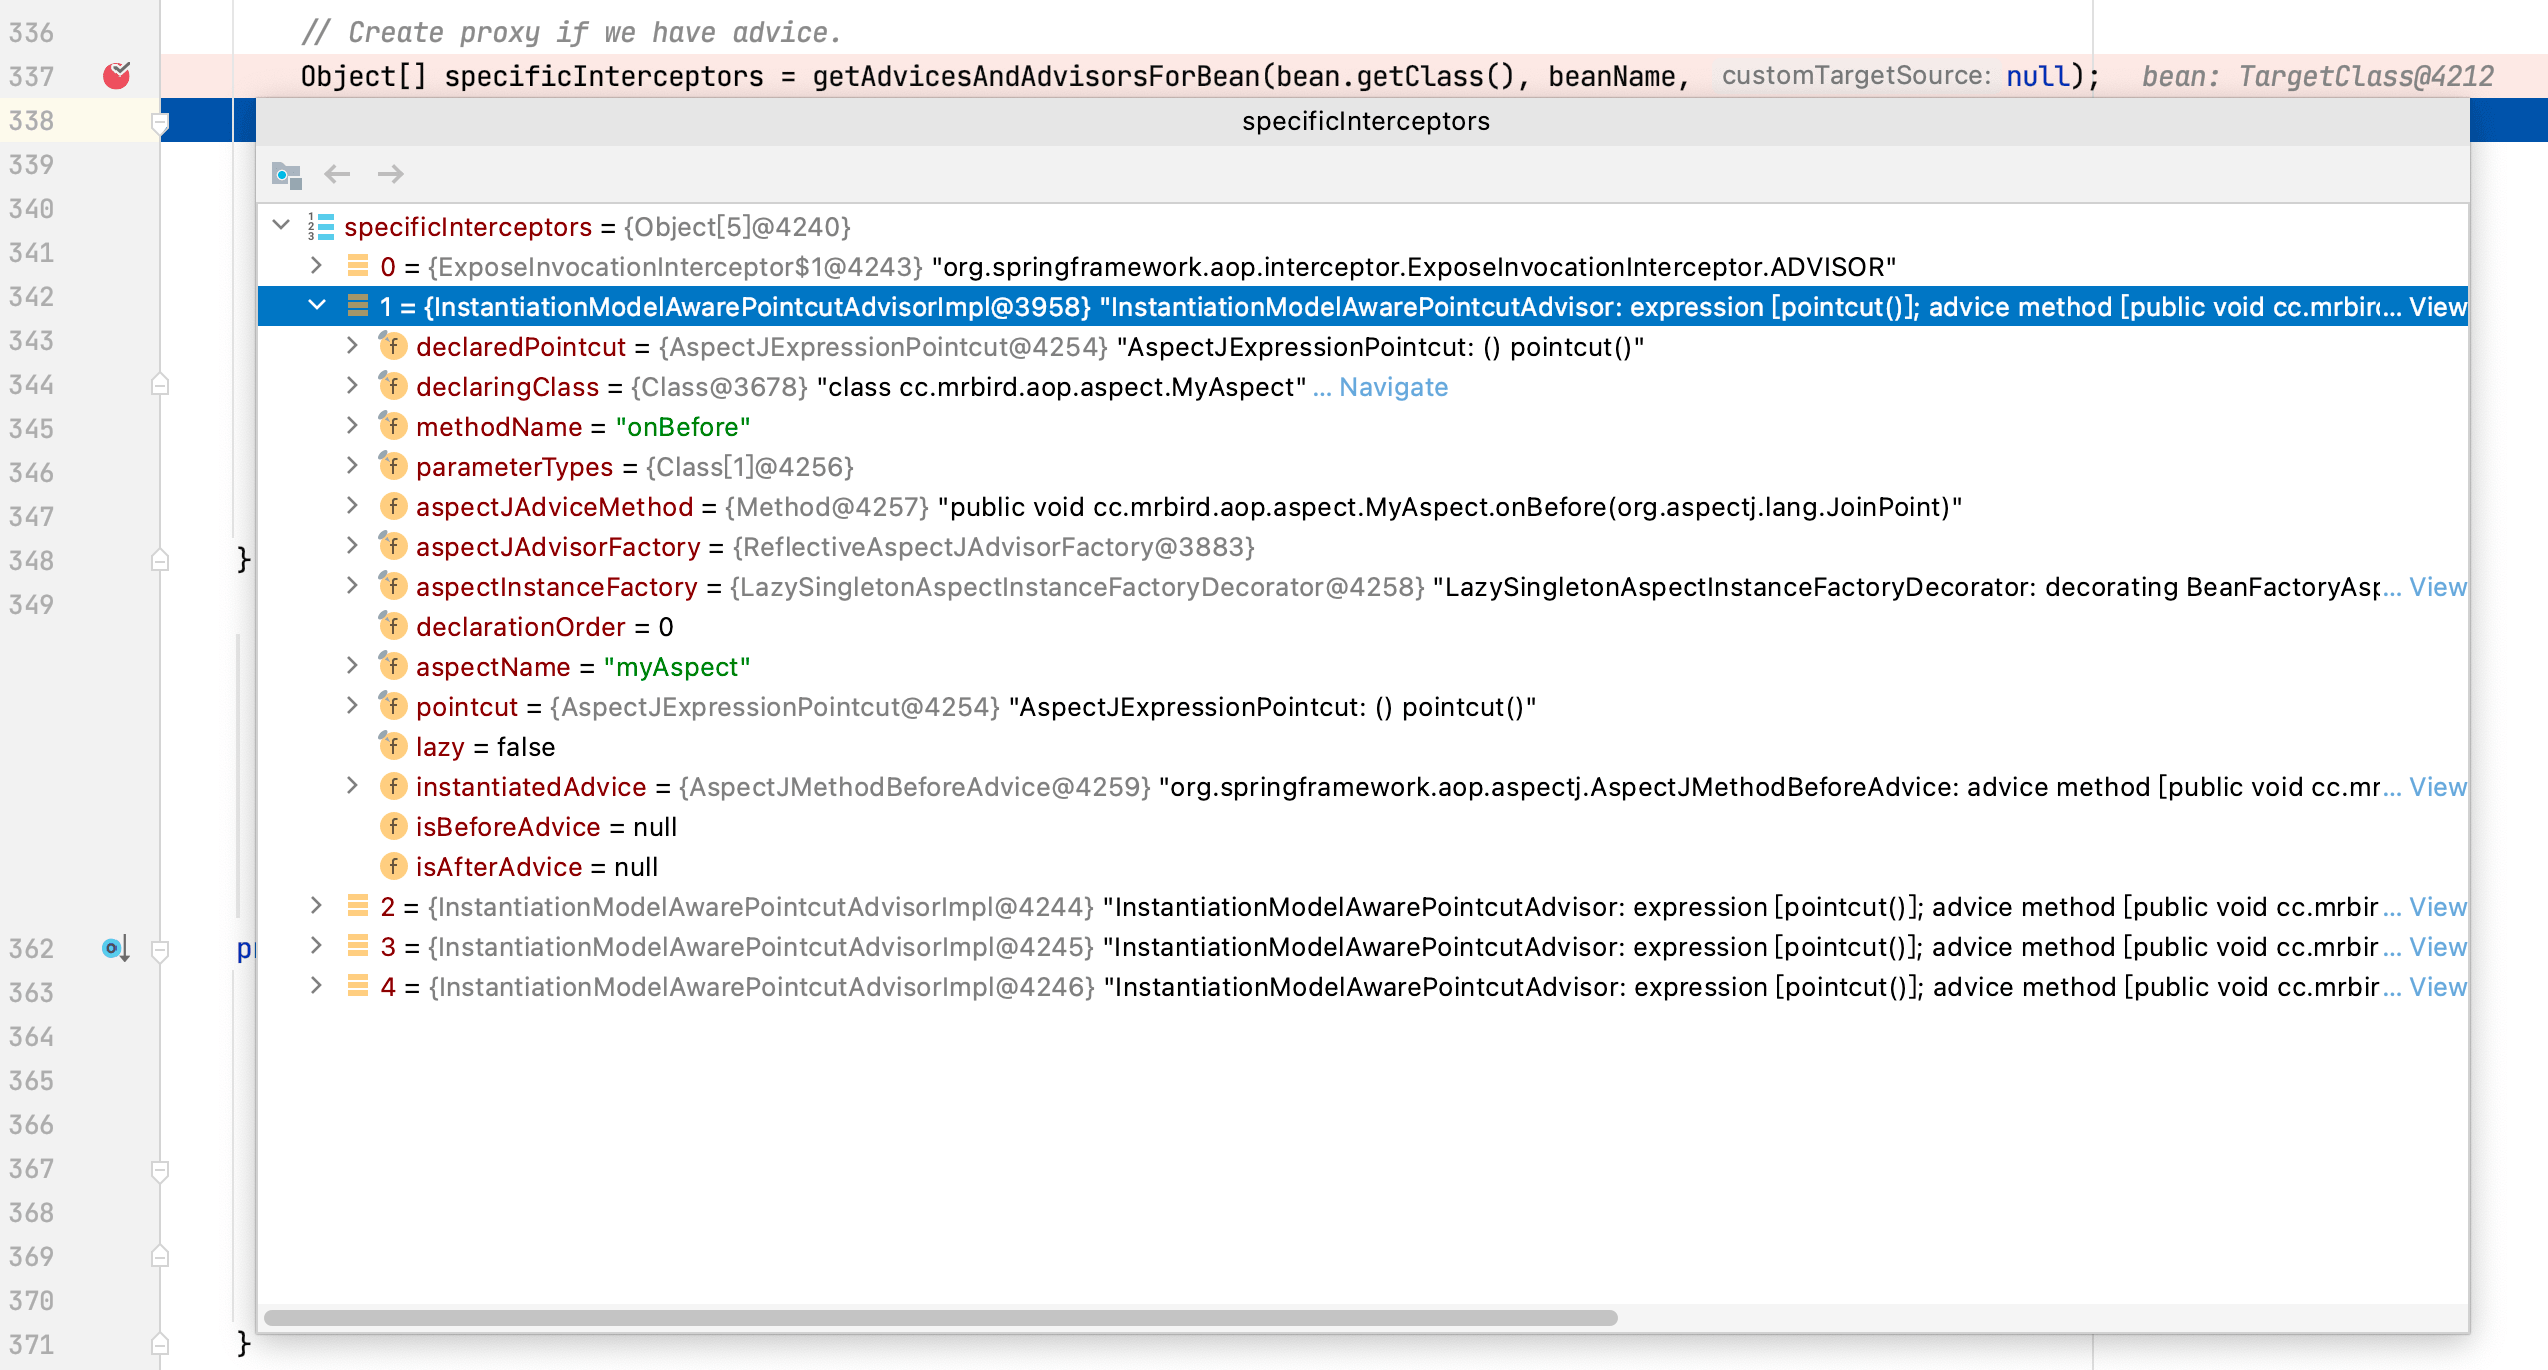
这些通知方法就是我们在MyAspect切面里定义的通知方法:
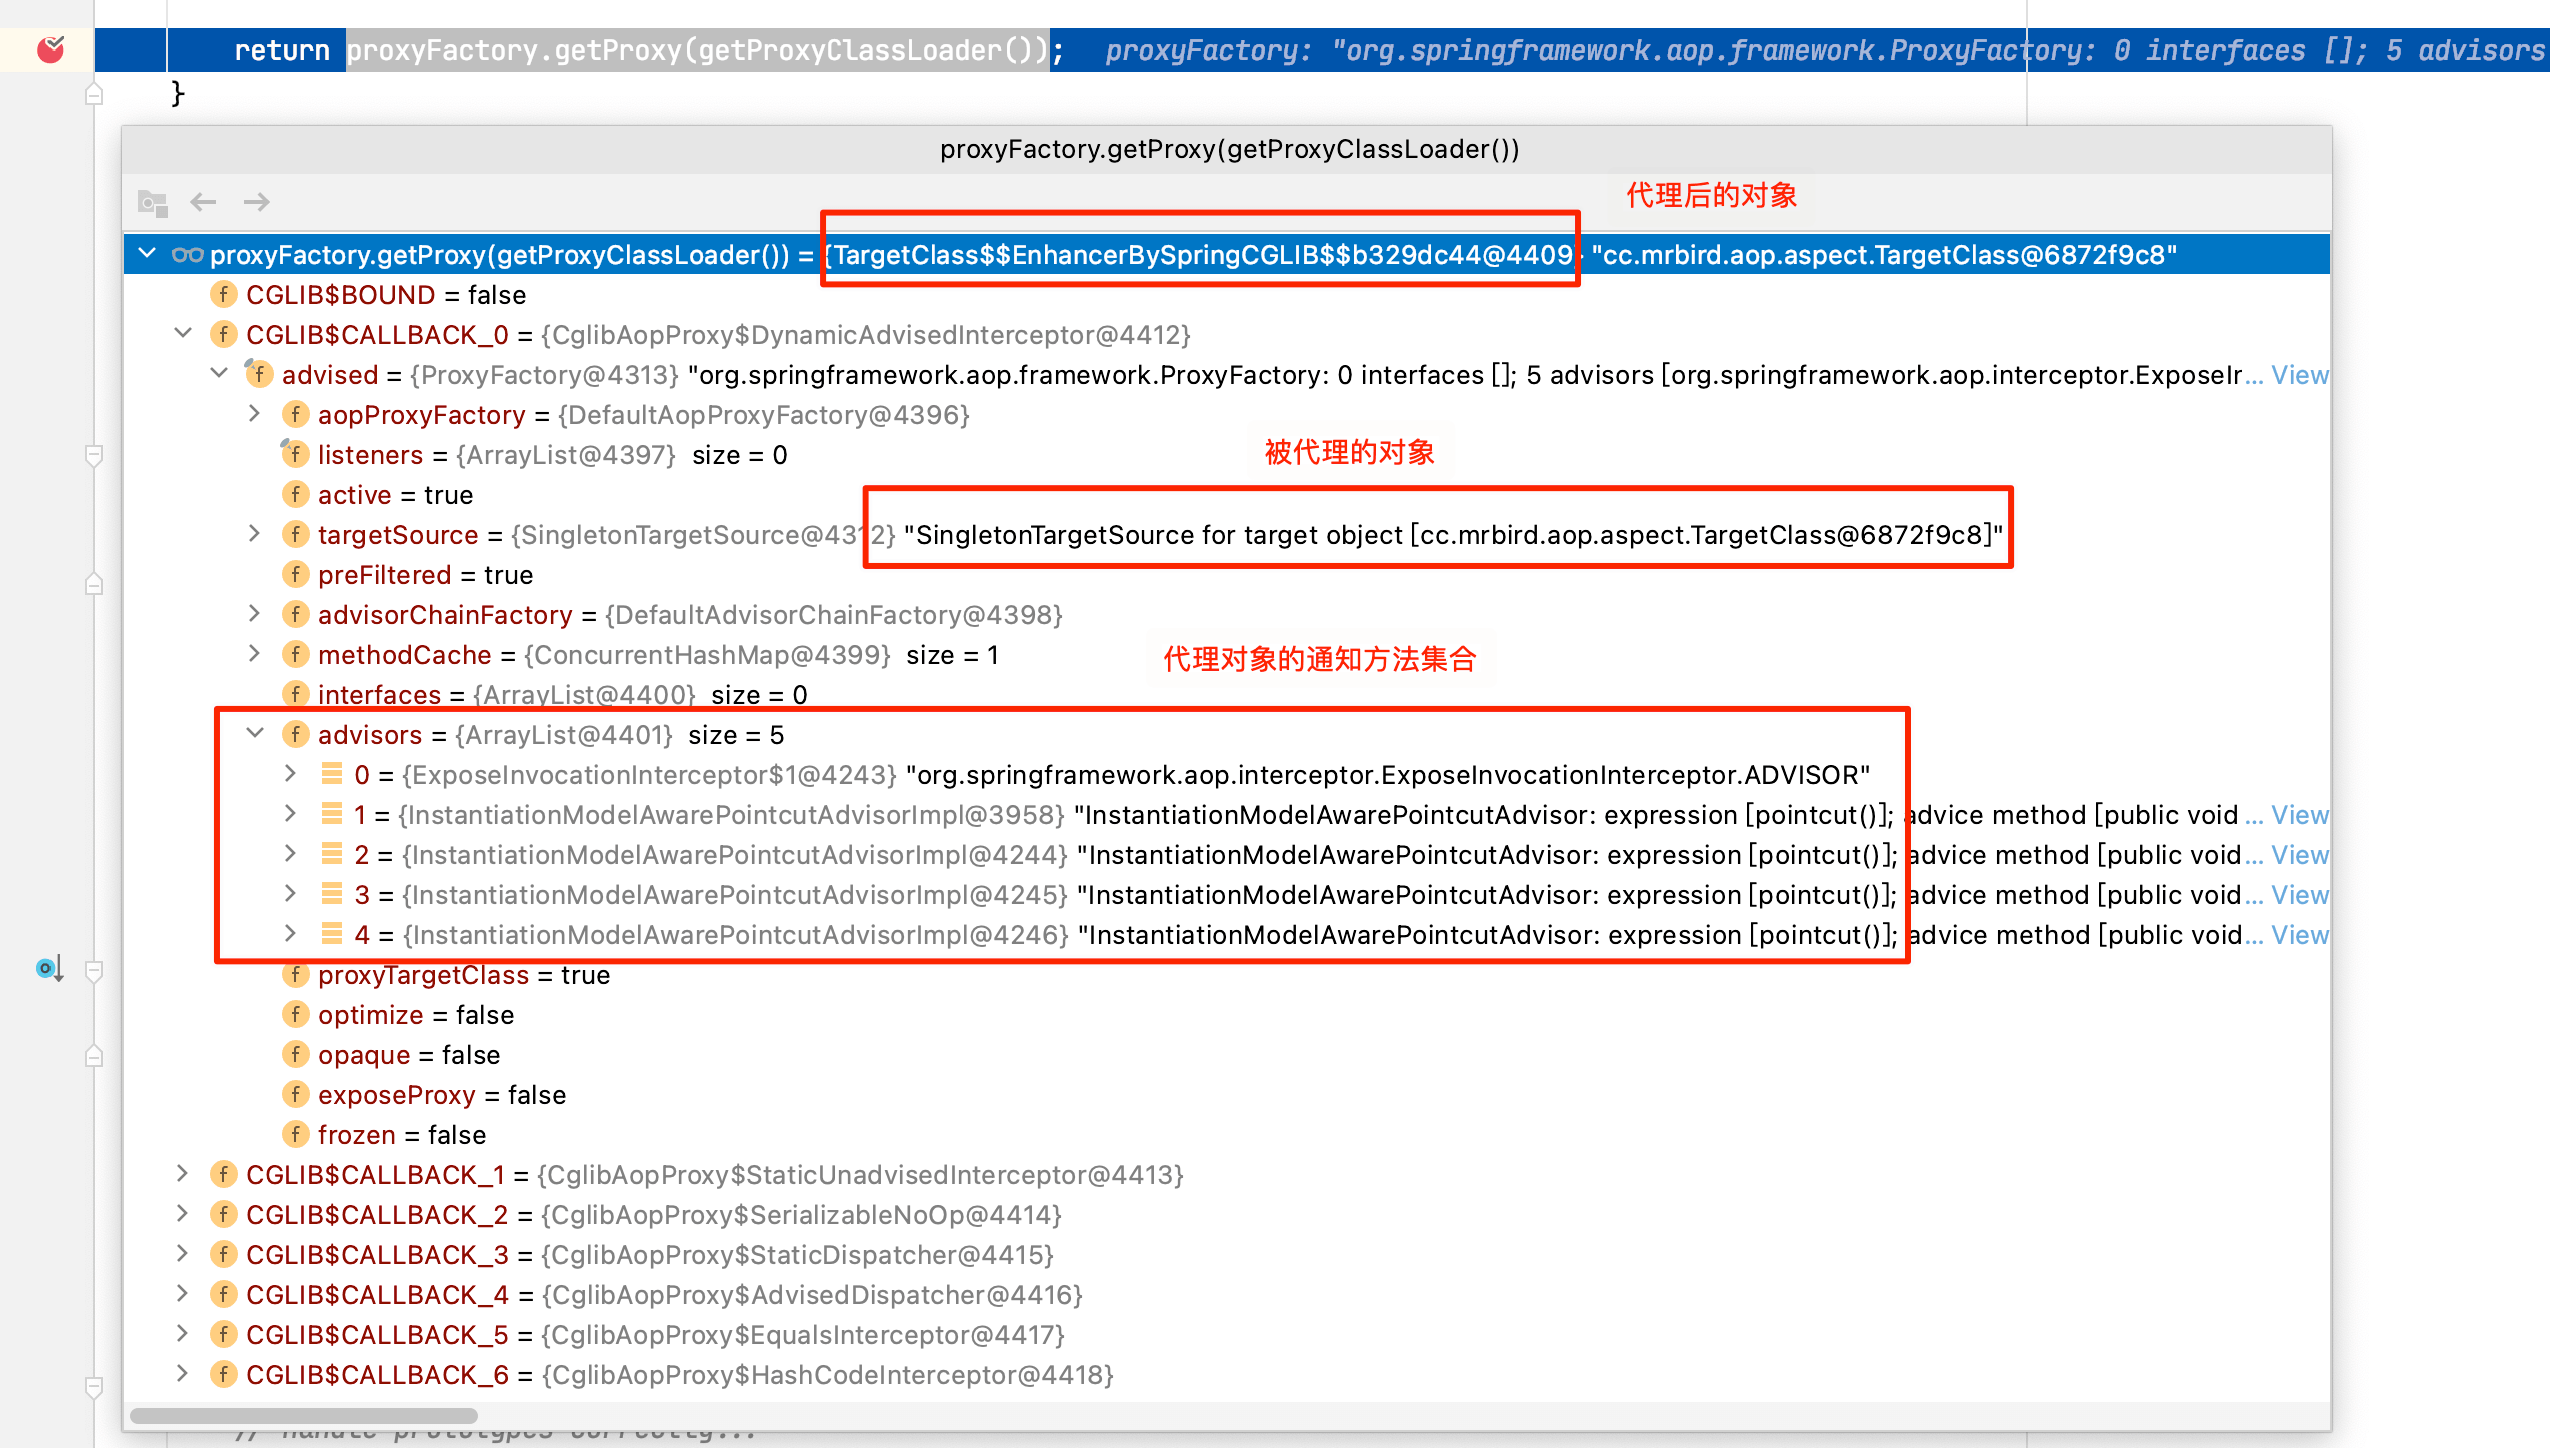
如果该Bean的通知方法集合不为空的话,则创建该Bean的代理对象,具体查看createProxy方法源码:

继续跟踪proxyFactory.getProxy(getProxyClassLoader())源码:
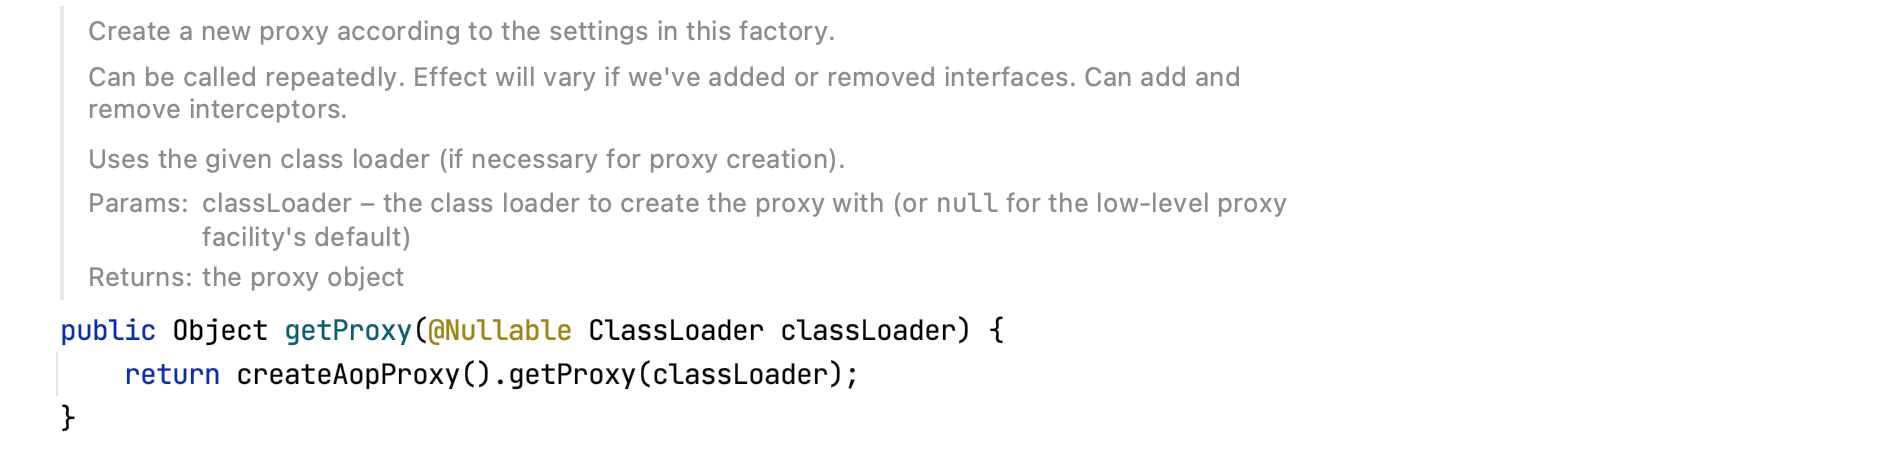

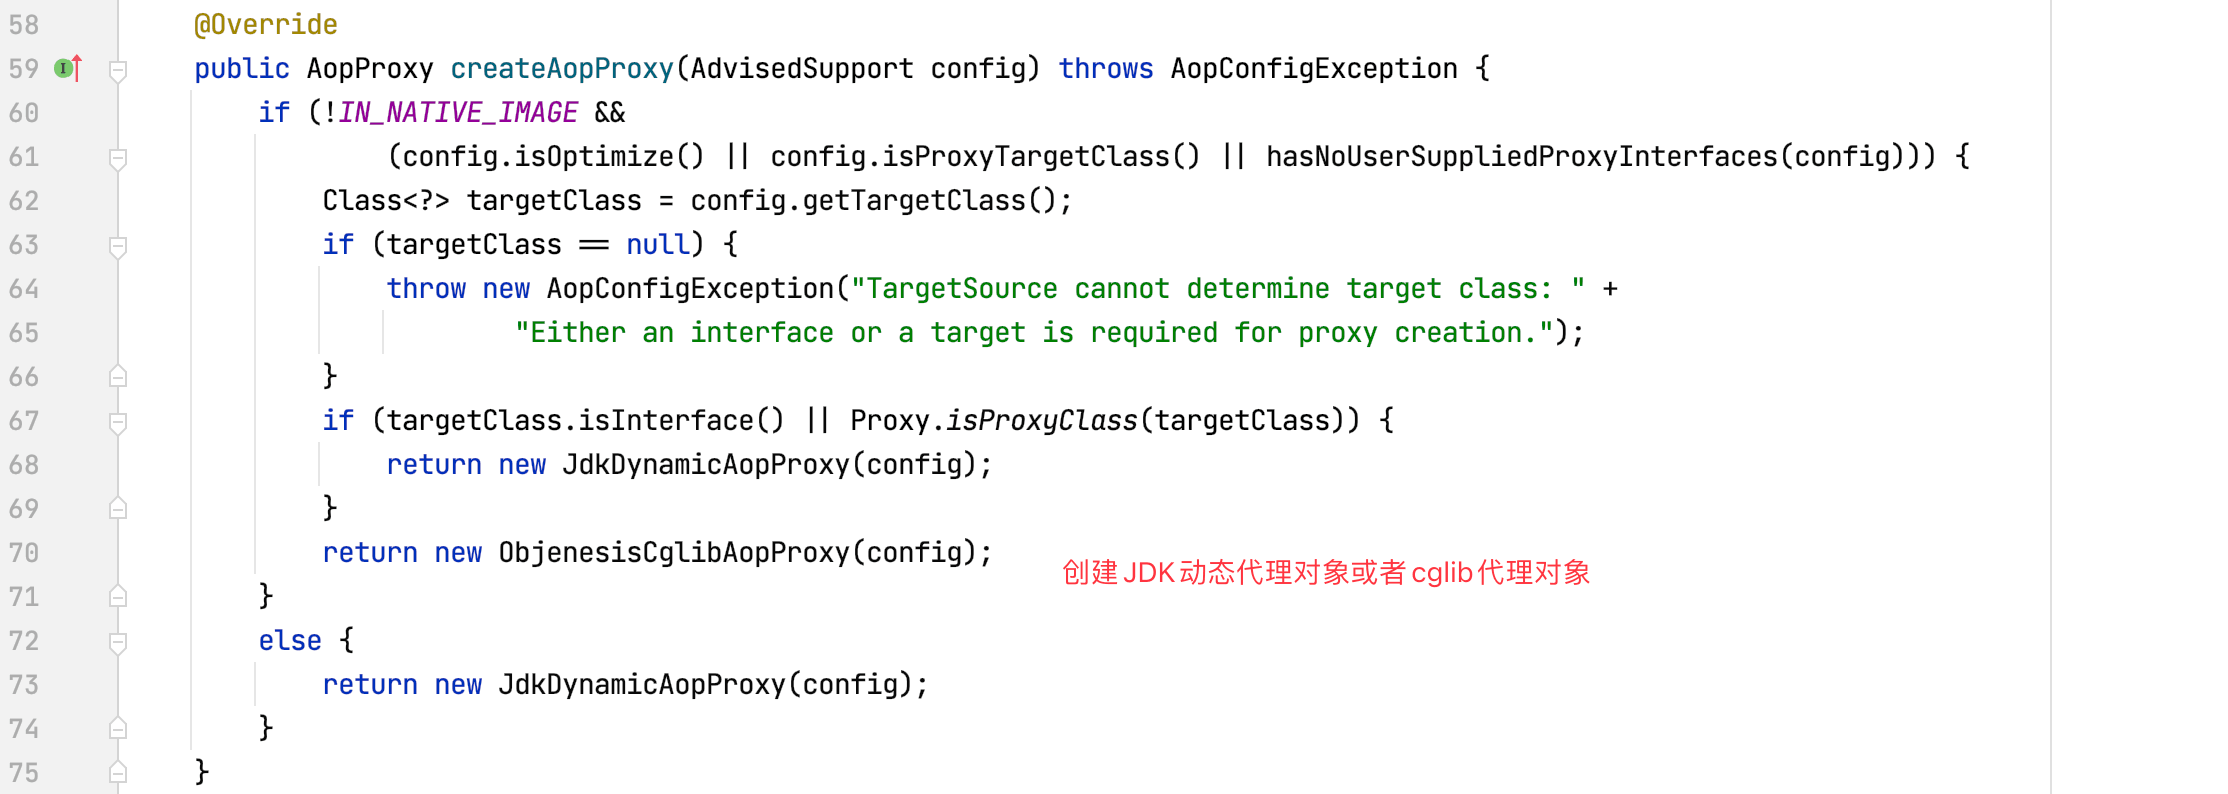
Spring会判断当前使用哪种代理对象(一般来说当Bean有实现接口时,使用JDK动态代理,当Bean没有实现接口时,使用cglib代理,在Boot中,我们可以通过
spring.aop.proxy-target-class=true配置来强制使用cglib代理)。
通过Bean初始化后置代理方法postProcessBeforeInstantiation处理后,TargetClass被包装为了cglib代理的增强Bean,注册到IOC容器中:
后续从IOC容器中获得的TargetClass就是被代理后的对象,执行代理对象的目标方法的时候,代理对象会执行相应的通知方法链,下面接着分析。
生成拦截器链MethodInterceptor
AOP代理对象生成后,我们接着关注代理对象的目标方法执行时,通知方法是怎么被执行的。
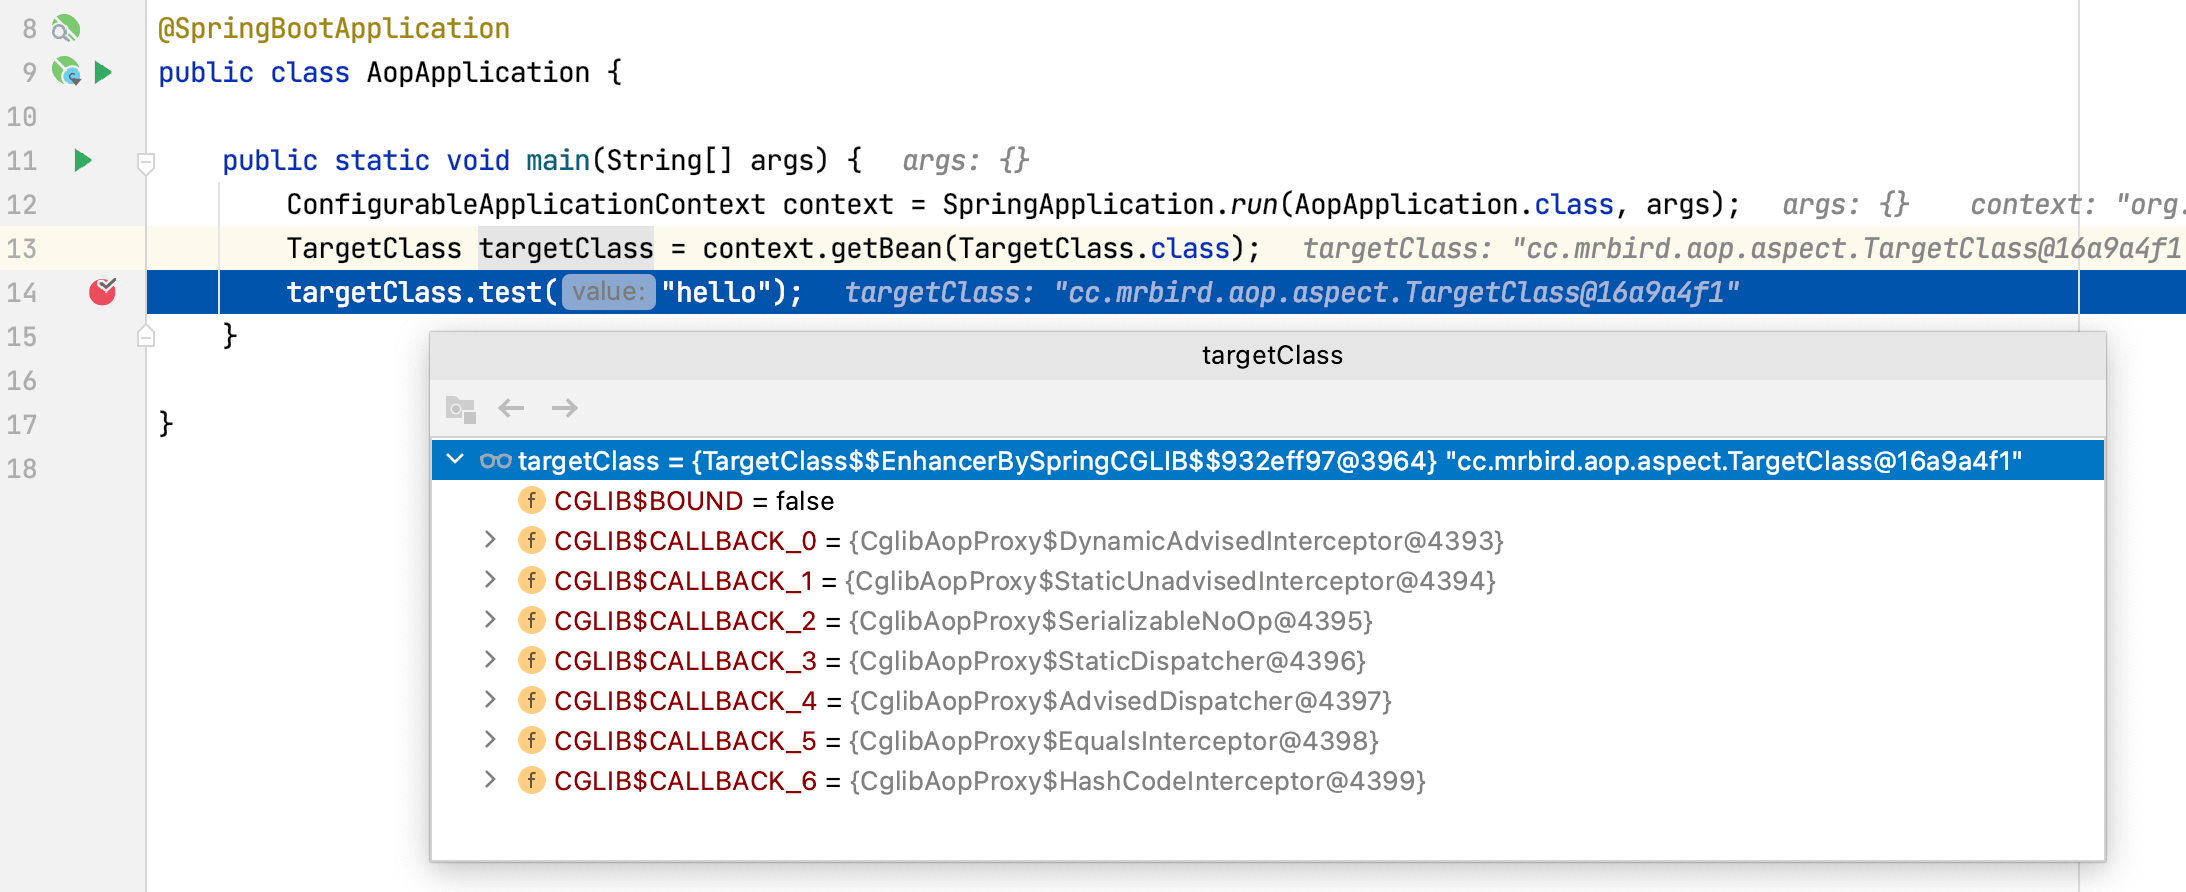
先将前面打的断点都去掉,然后在SpringBoot的入口类AopApplication的如下位置打个断点:

以debug方式启动程序:
可以看到获取到的TargetClass Bean就是前面cglib代理后的Bean(TargetClass$$EnhanceBySpringCGLIB):
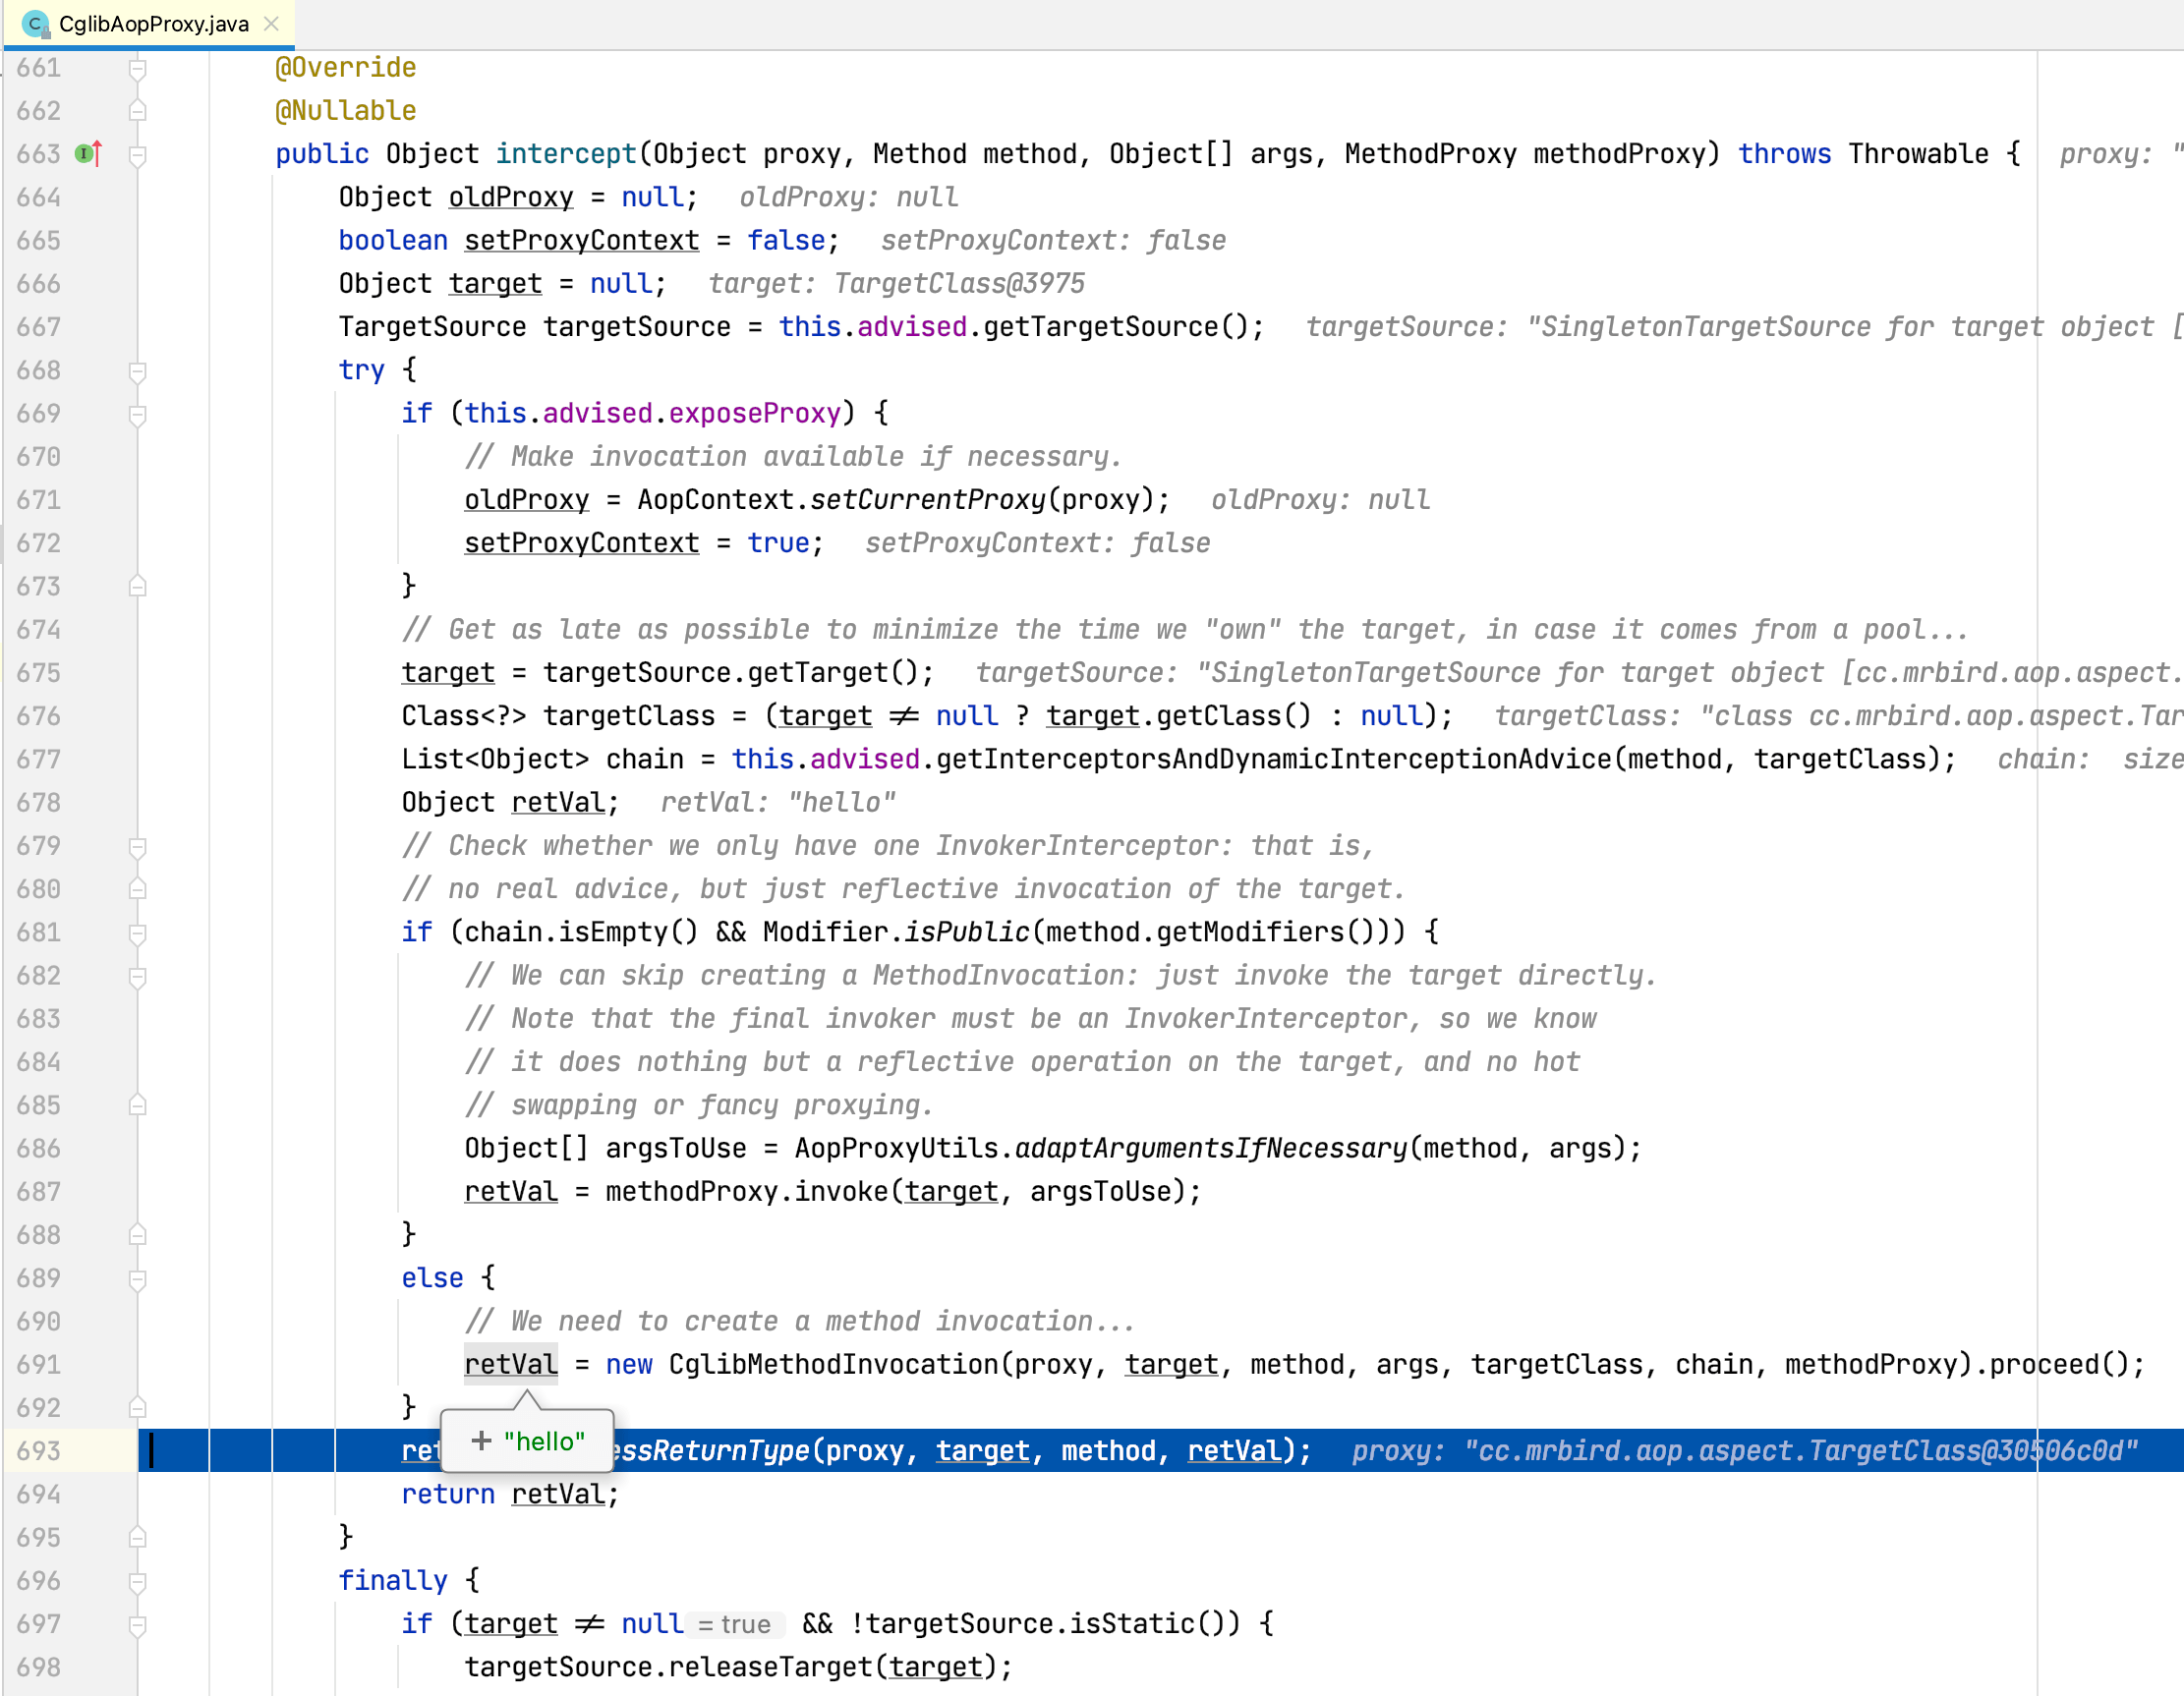
点击Step Into进入test方法内部调用逻辑,会发现程序跳转到了CglibAopProxy的intercept方法中,也就是说我们的目标对象的目标方法被CglibAopProxy的intercept方法拦截了,该拦截方法主要逻辑如下:
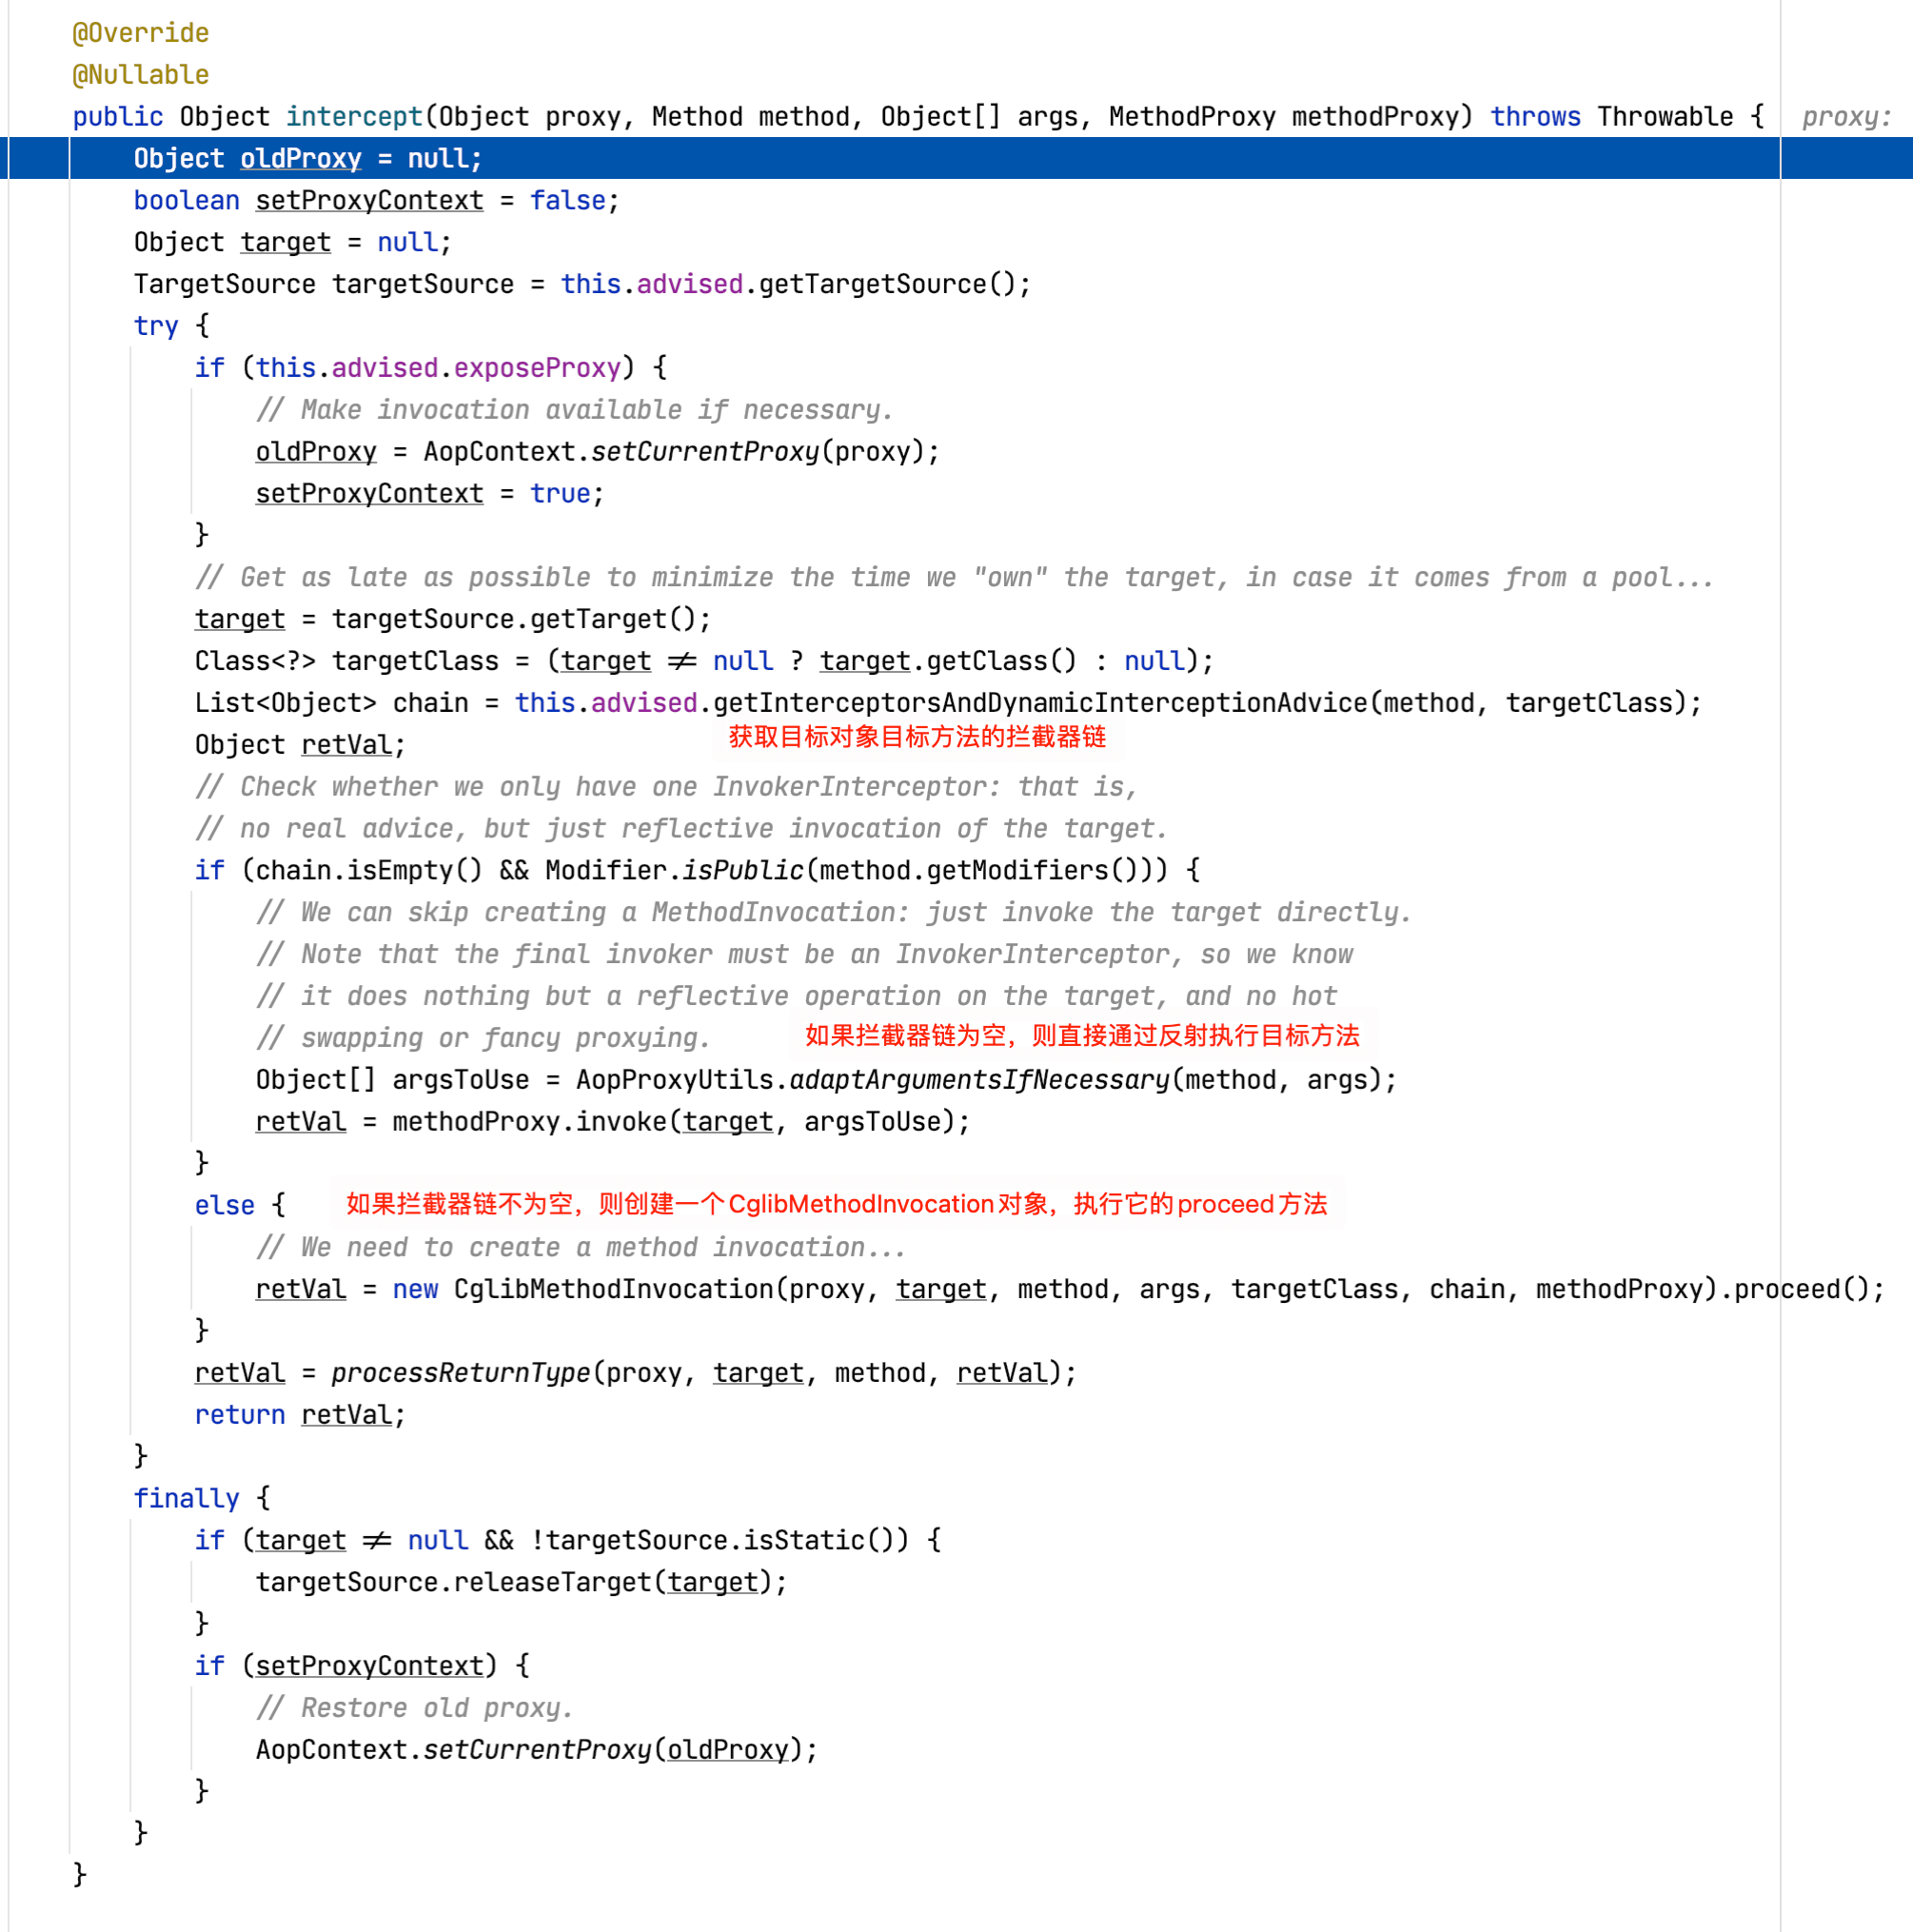
这里先重点关注下getInterceptorsAndDynamicInterceptionAdvice方法,其源码如下所示:
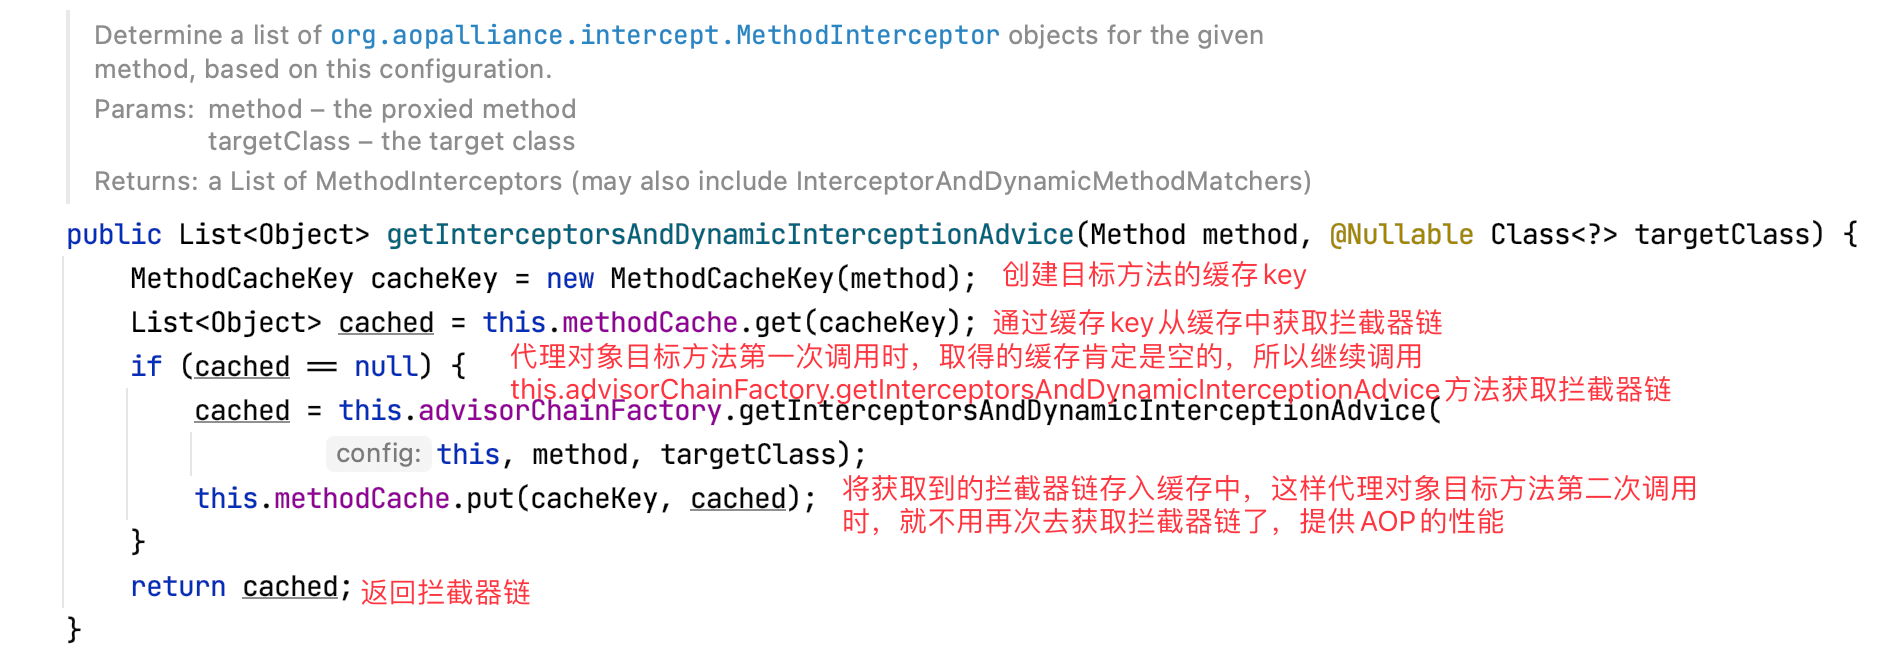
图中错别字纠正:提供->提高,懒得再次截图注释了😢
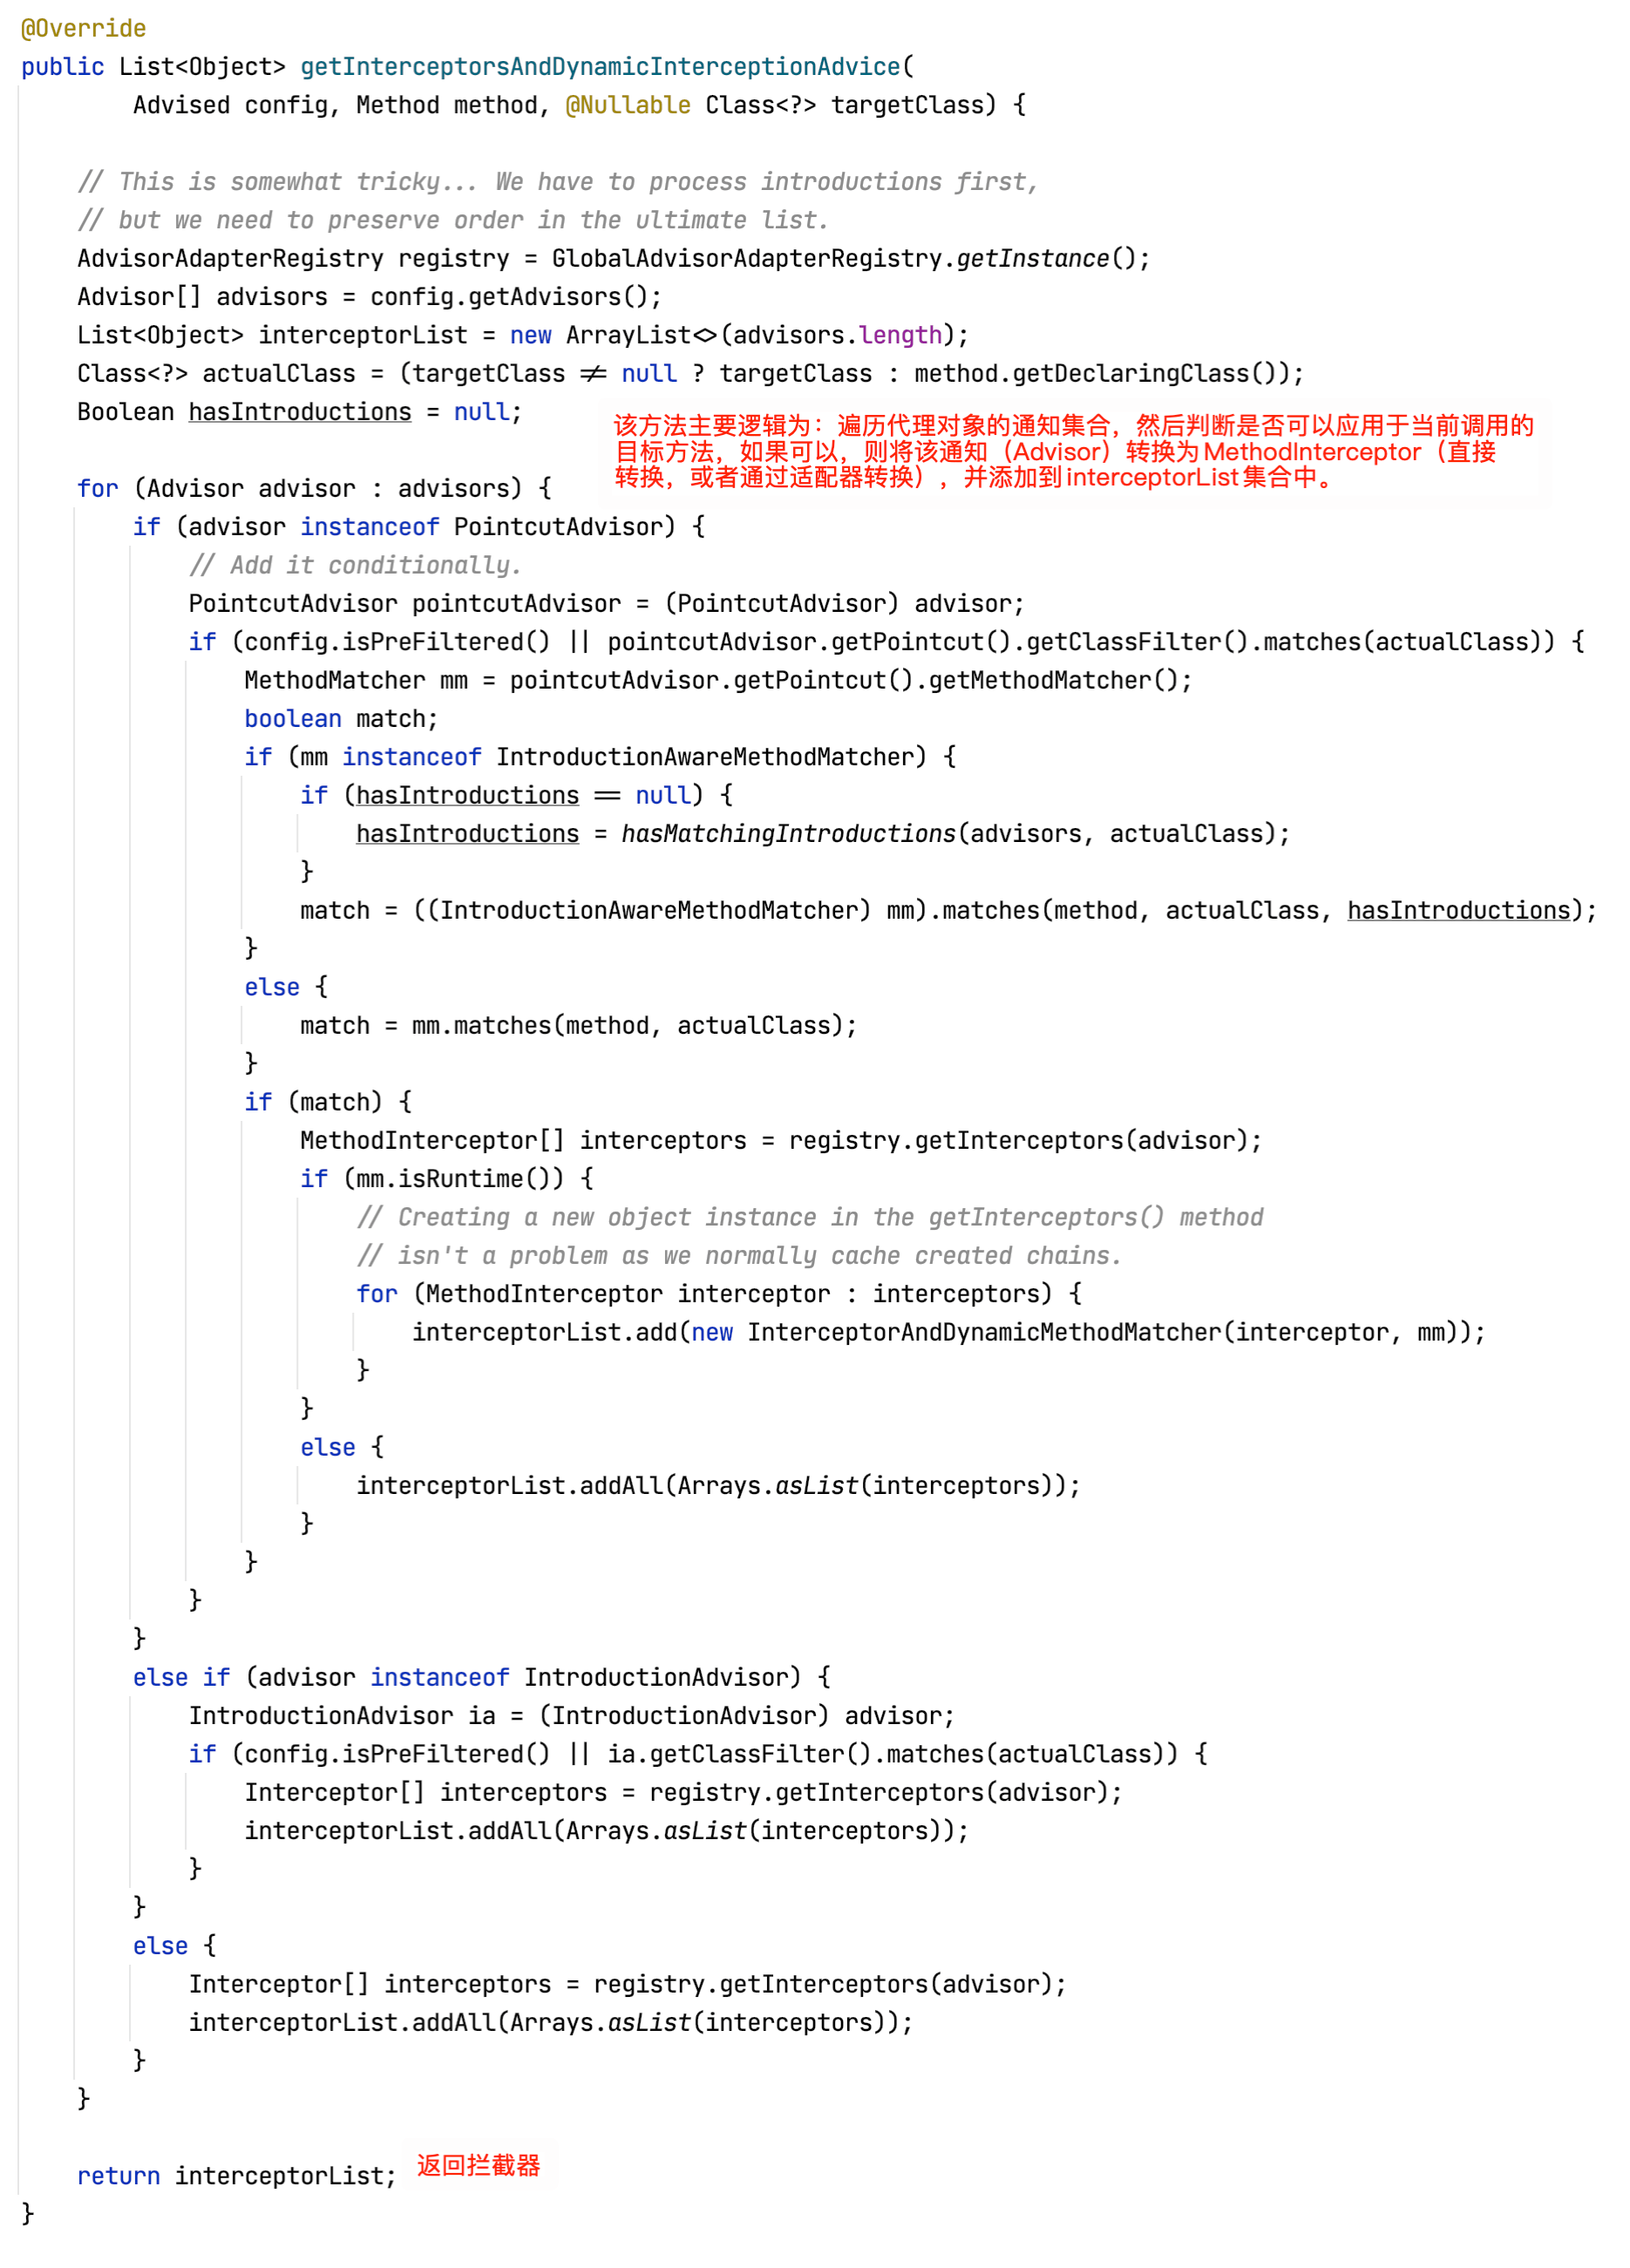
继续查看this.advisorChainFactory.getInterceptorsAndDynamicInterceptionAdvice源码:
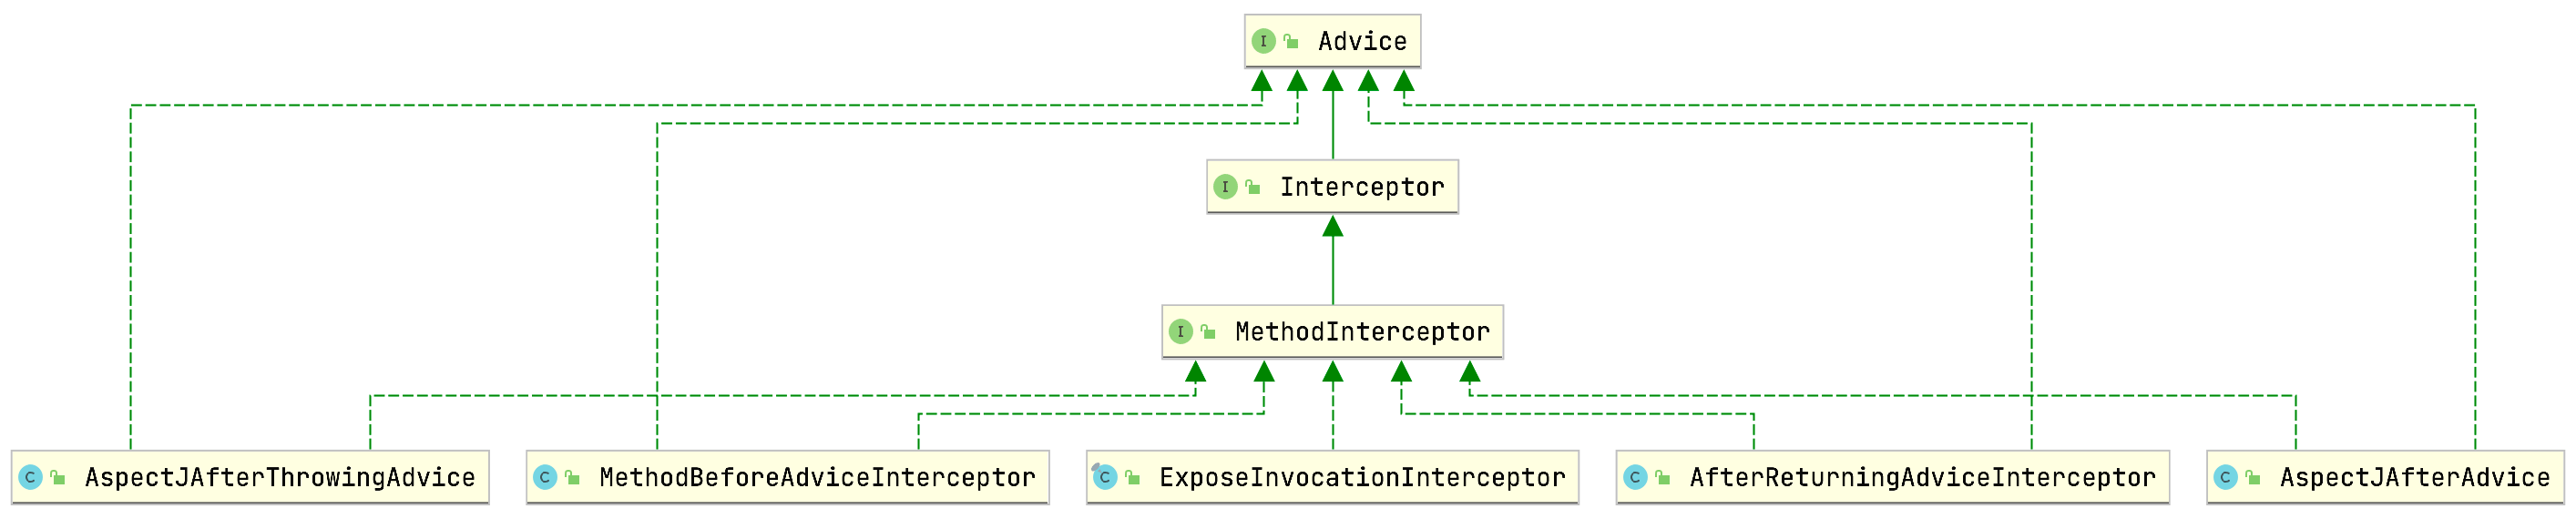
通过debug我们可以看到,当前代理对象的test方法的拦截器链不为空,并且元素个数为5:

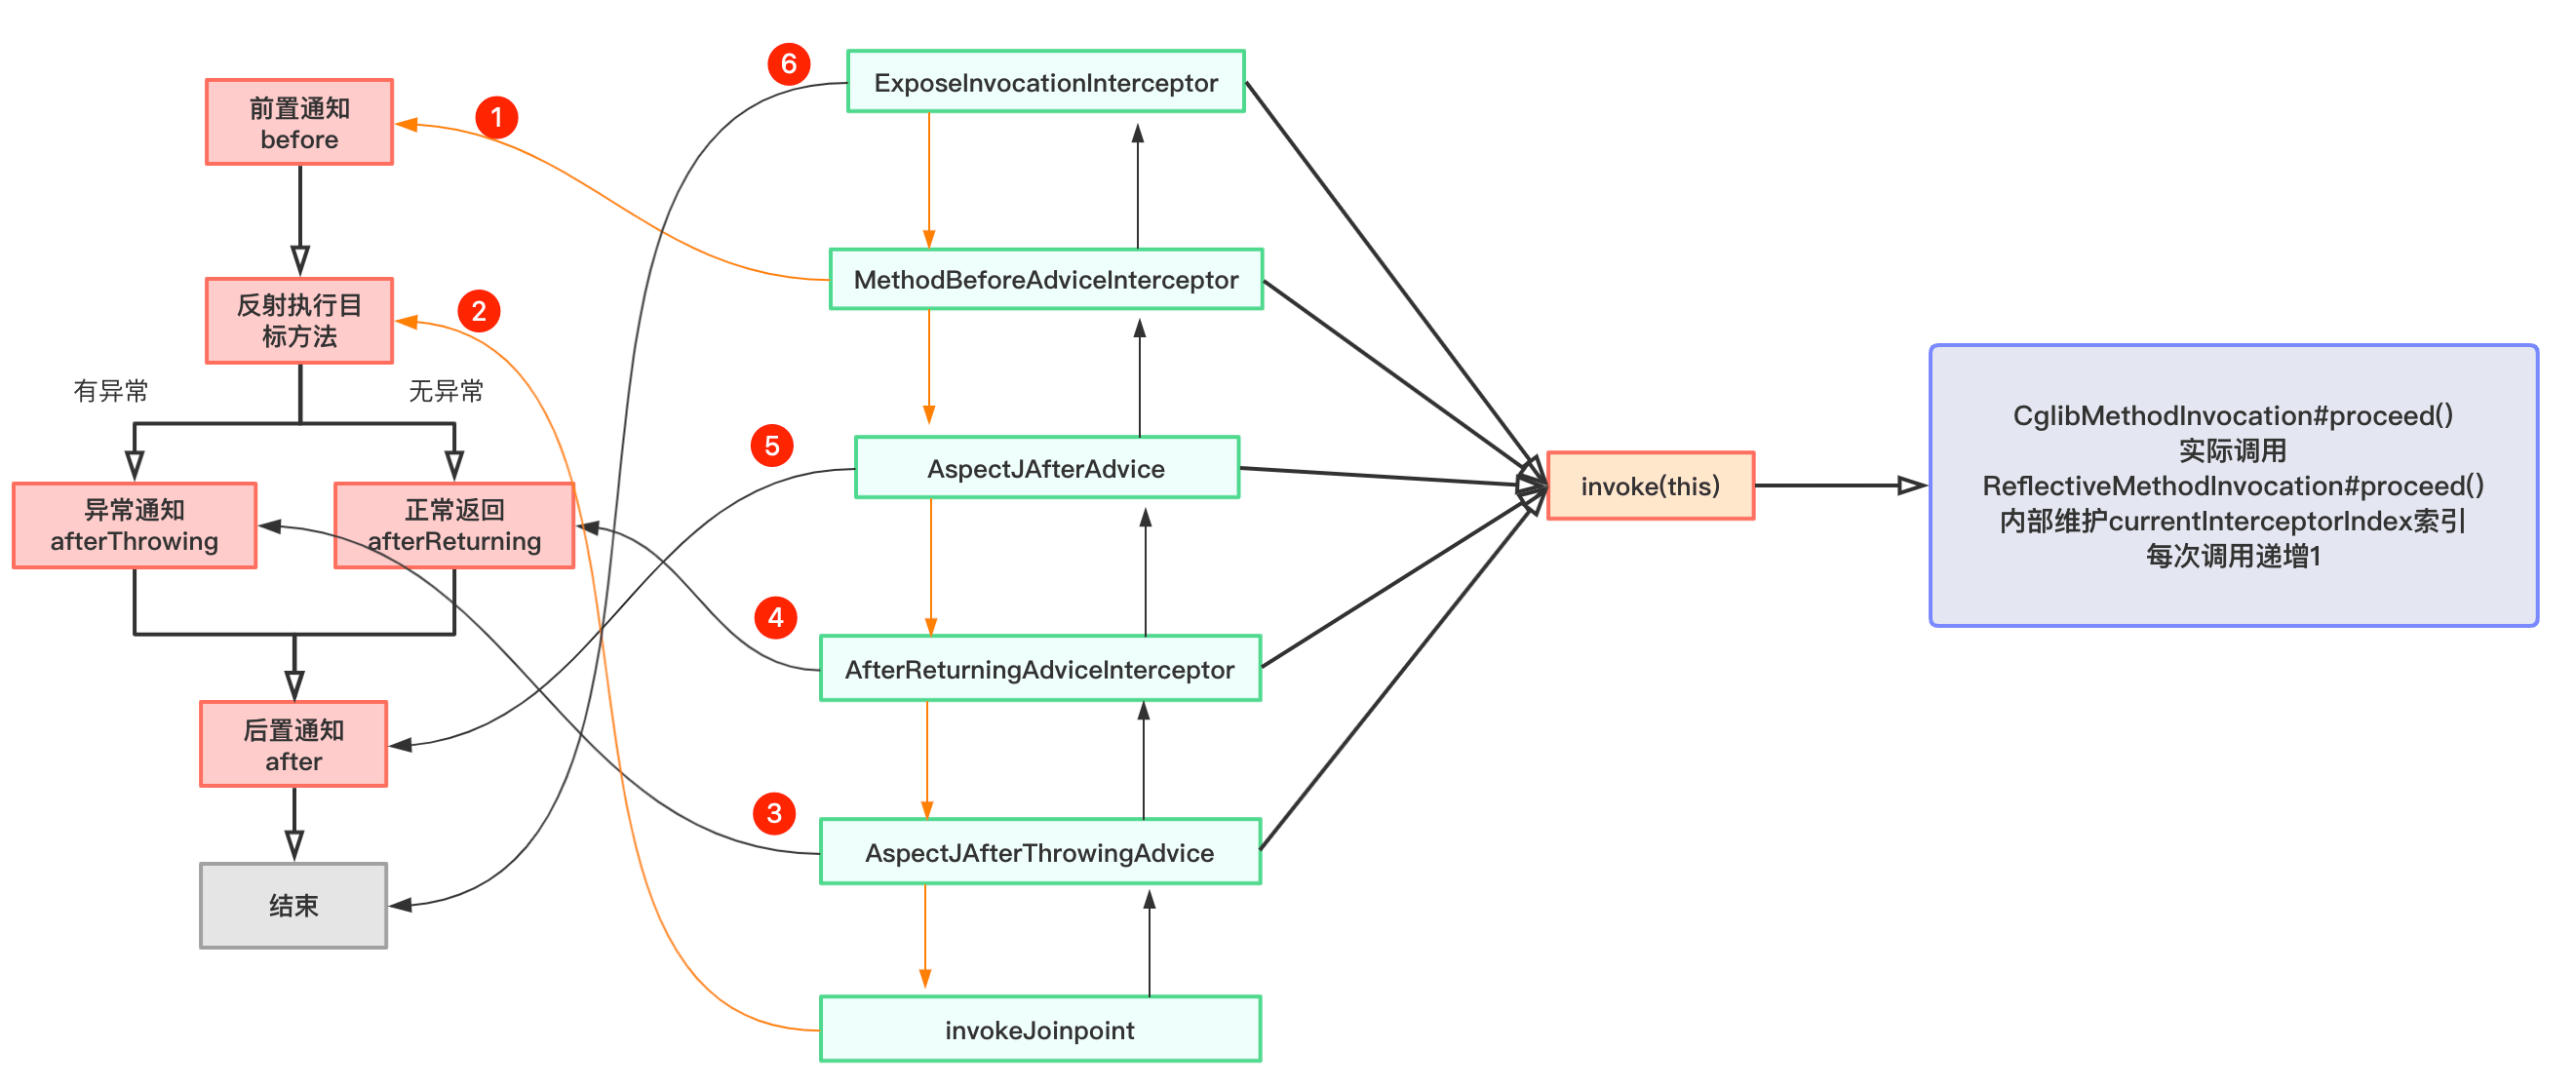
拦截器链第一个元素类型为ExposeInvocationInterceptor,是默认的拦截器,后面会介绍到它的作用。剩下四个依次为:MethodBeforeAdviceInterceptor、AspectJAfterAdvice、AfterReturningAdviceInterceptor和AspectJAfterThrowingAdvice,它们都是MethodInterceptor的实现类:
链式调用通知方法
获取到了代理对象目标方法的拦截器链后,我们最后来关注这些拦截器是如何链式调用通知方法的。获取拦截器链并且拦截器链不为空时,CglibAopProxy的intercept方法创建CglibMethodInvocation对象,并调用它的proceed方法:
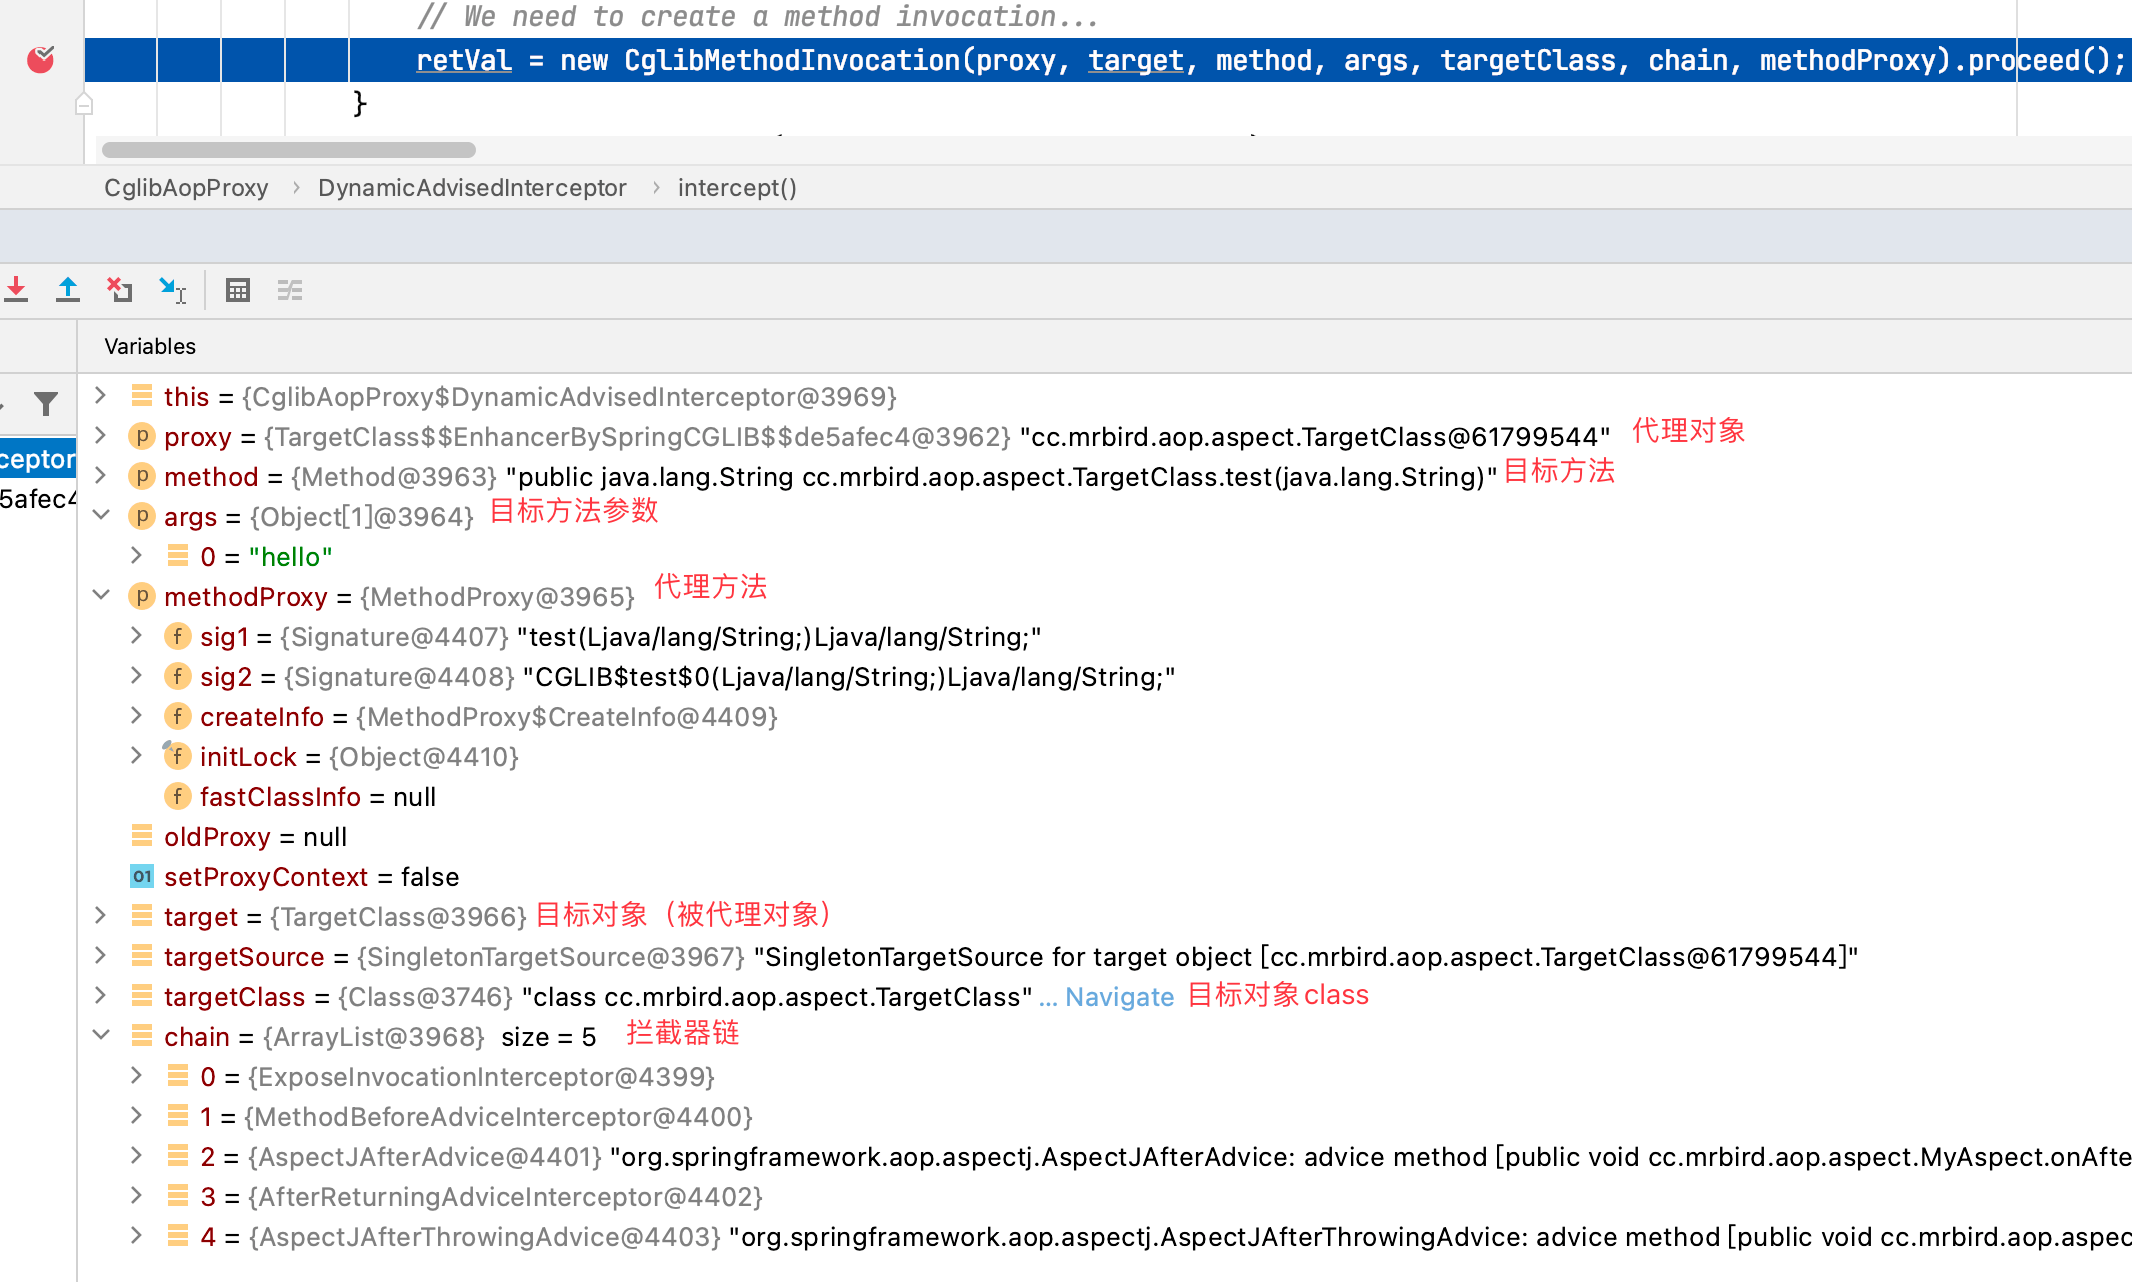
查看CglibMethodInvocation源码:
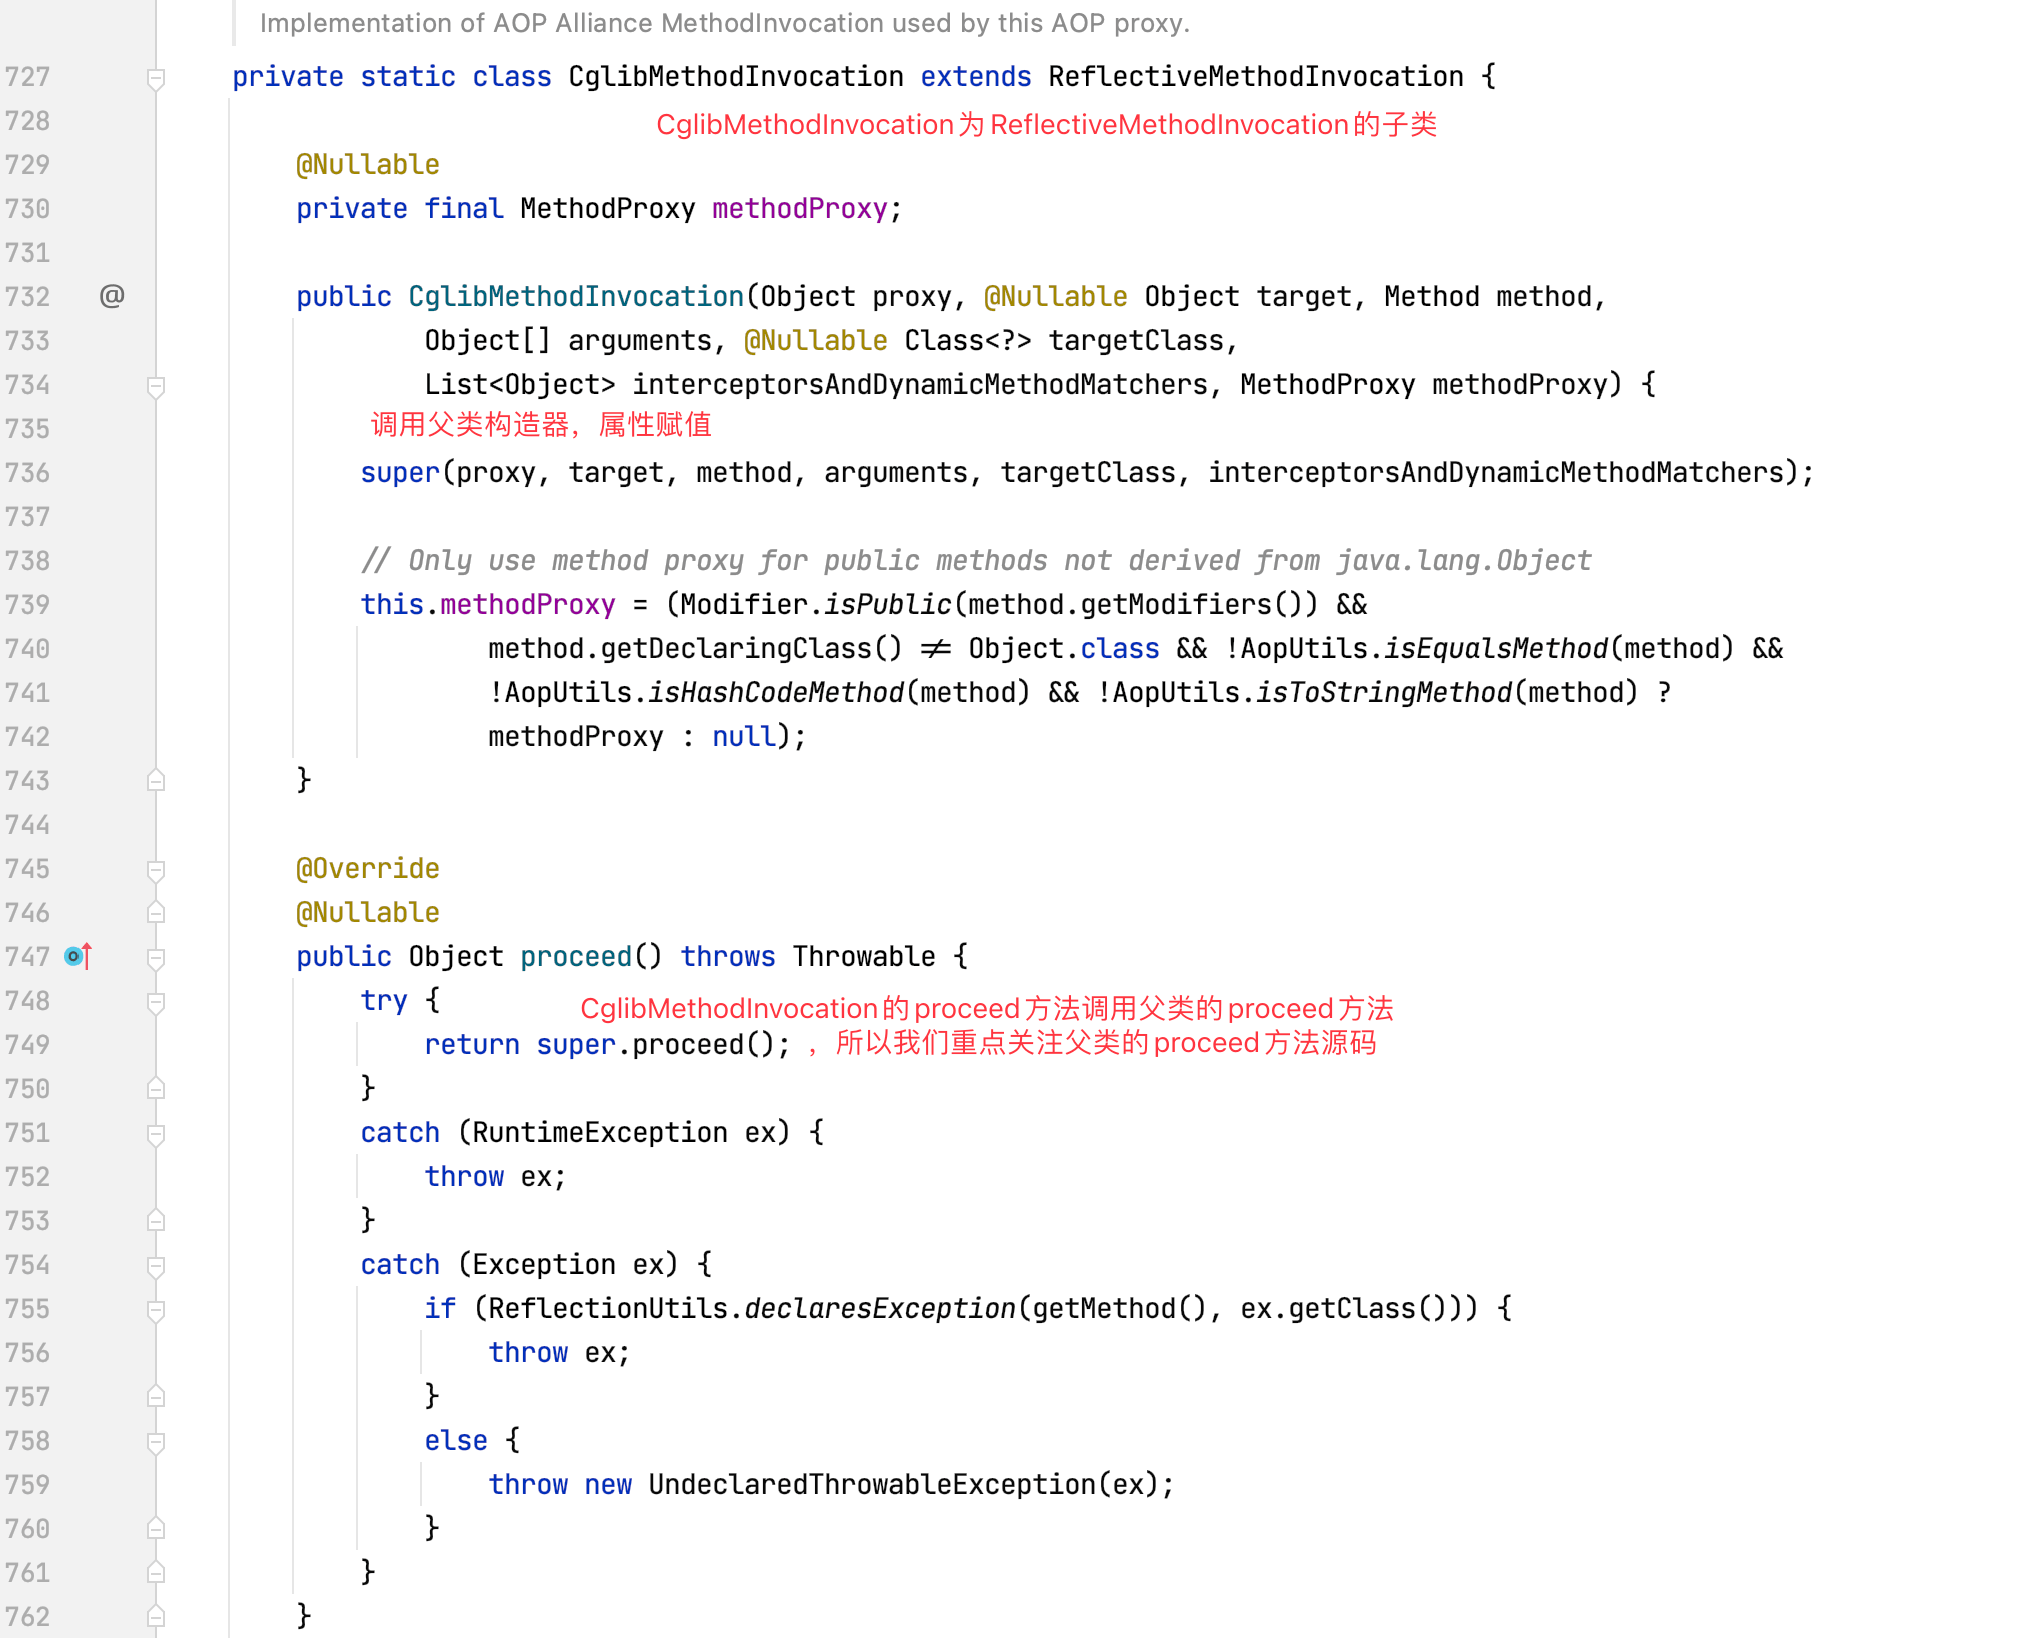
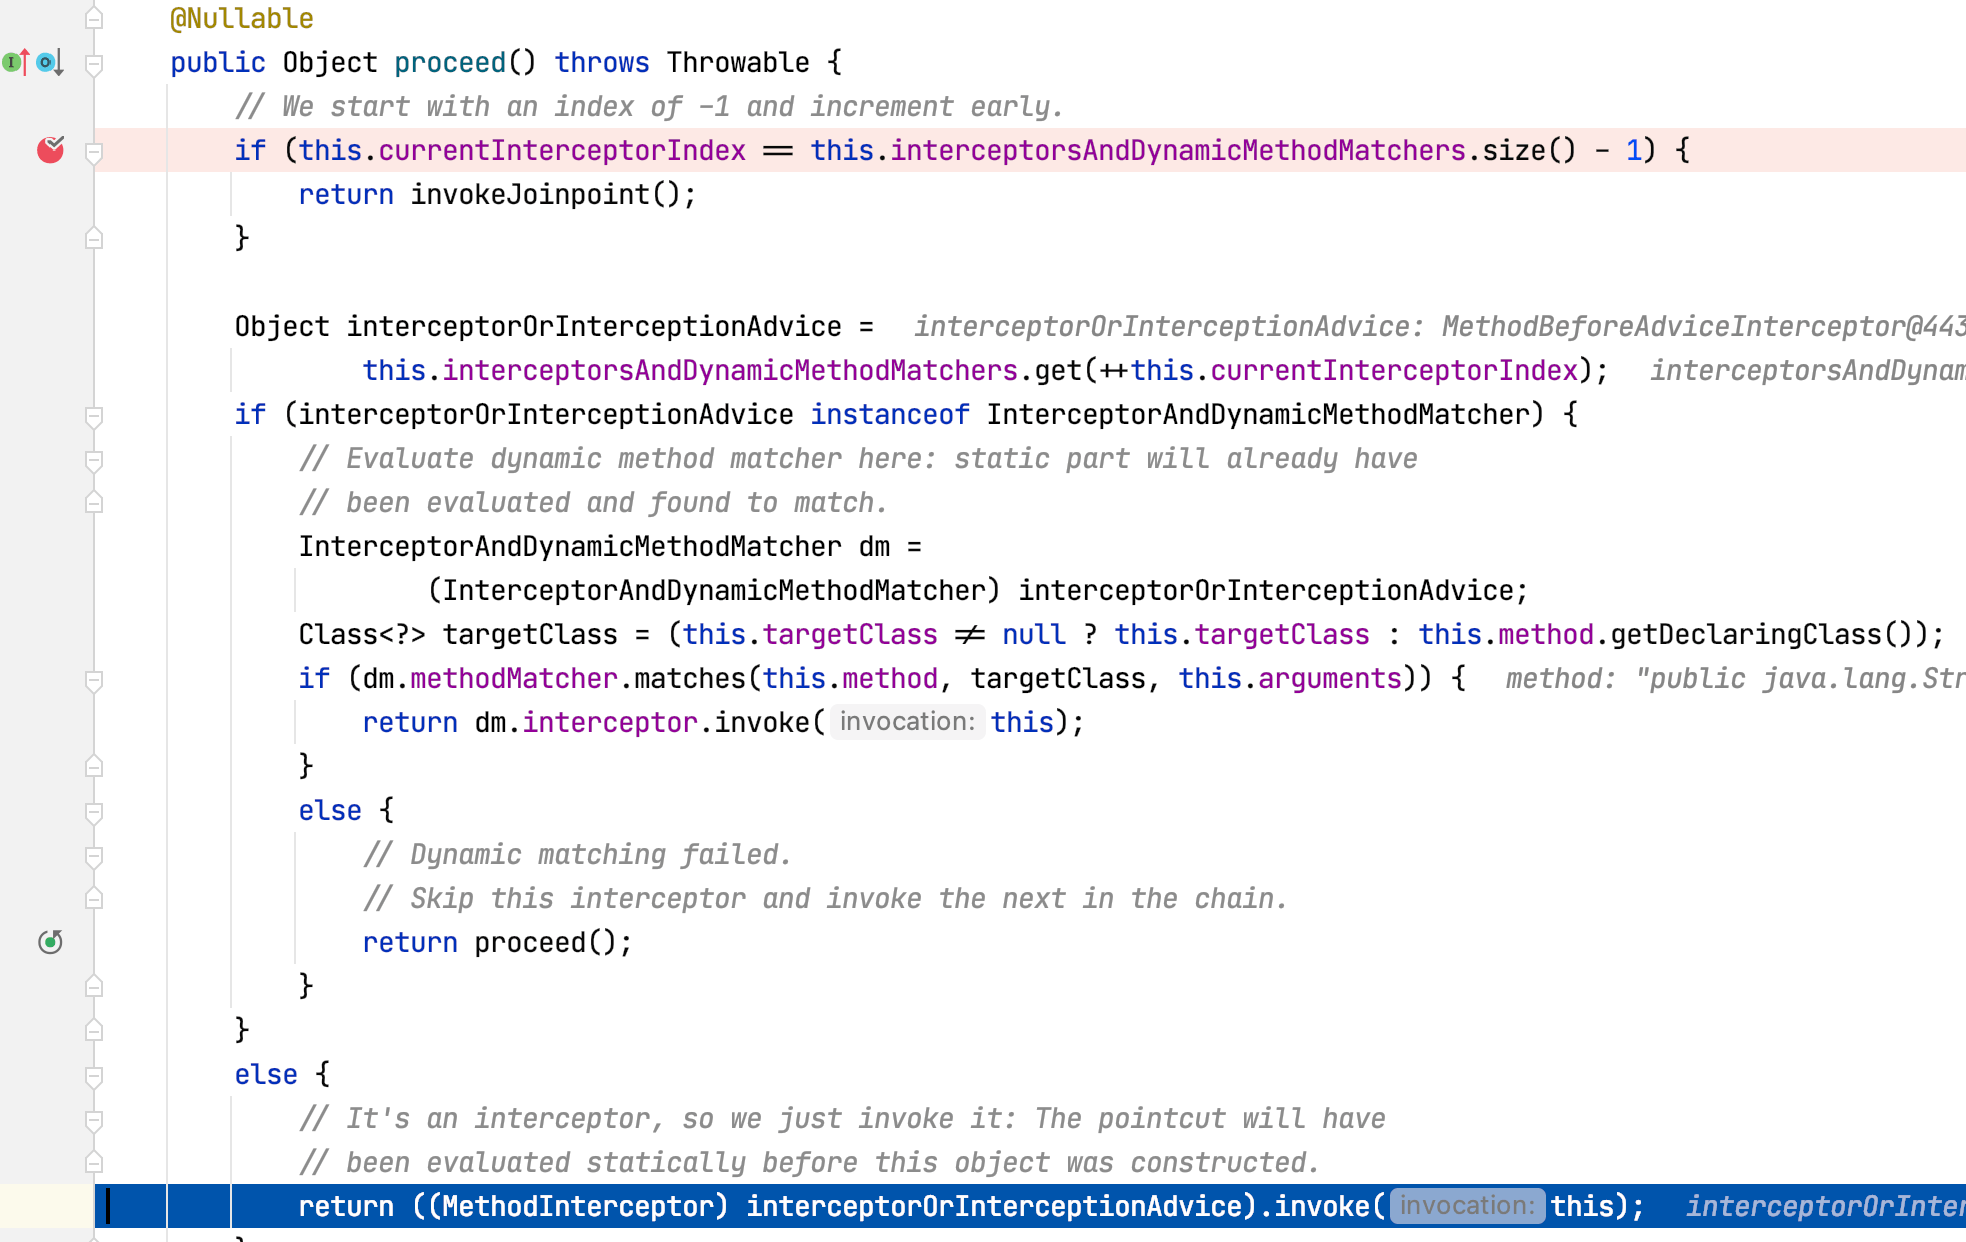
查看CglibMethodInvocation父类ReflectiveMethodInvocation proceed方法源码:
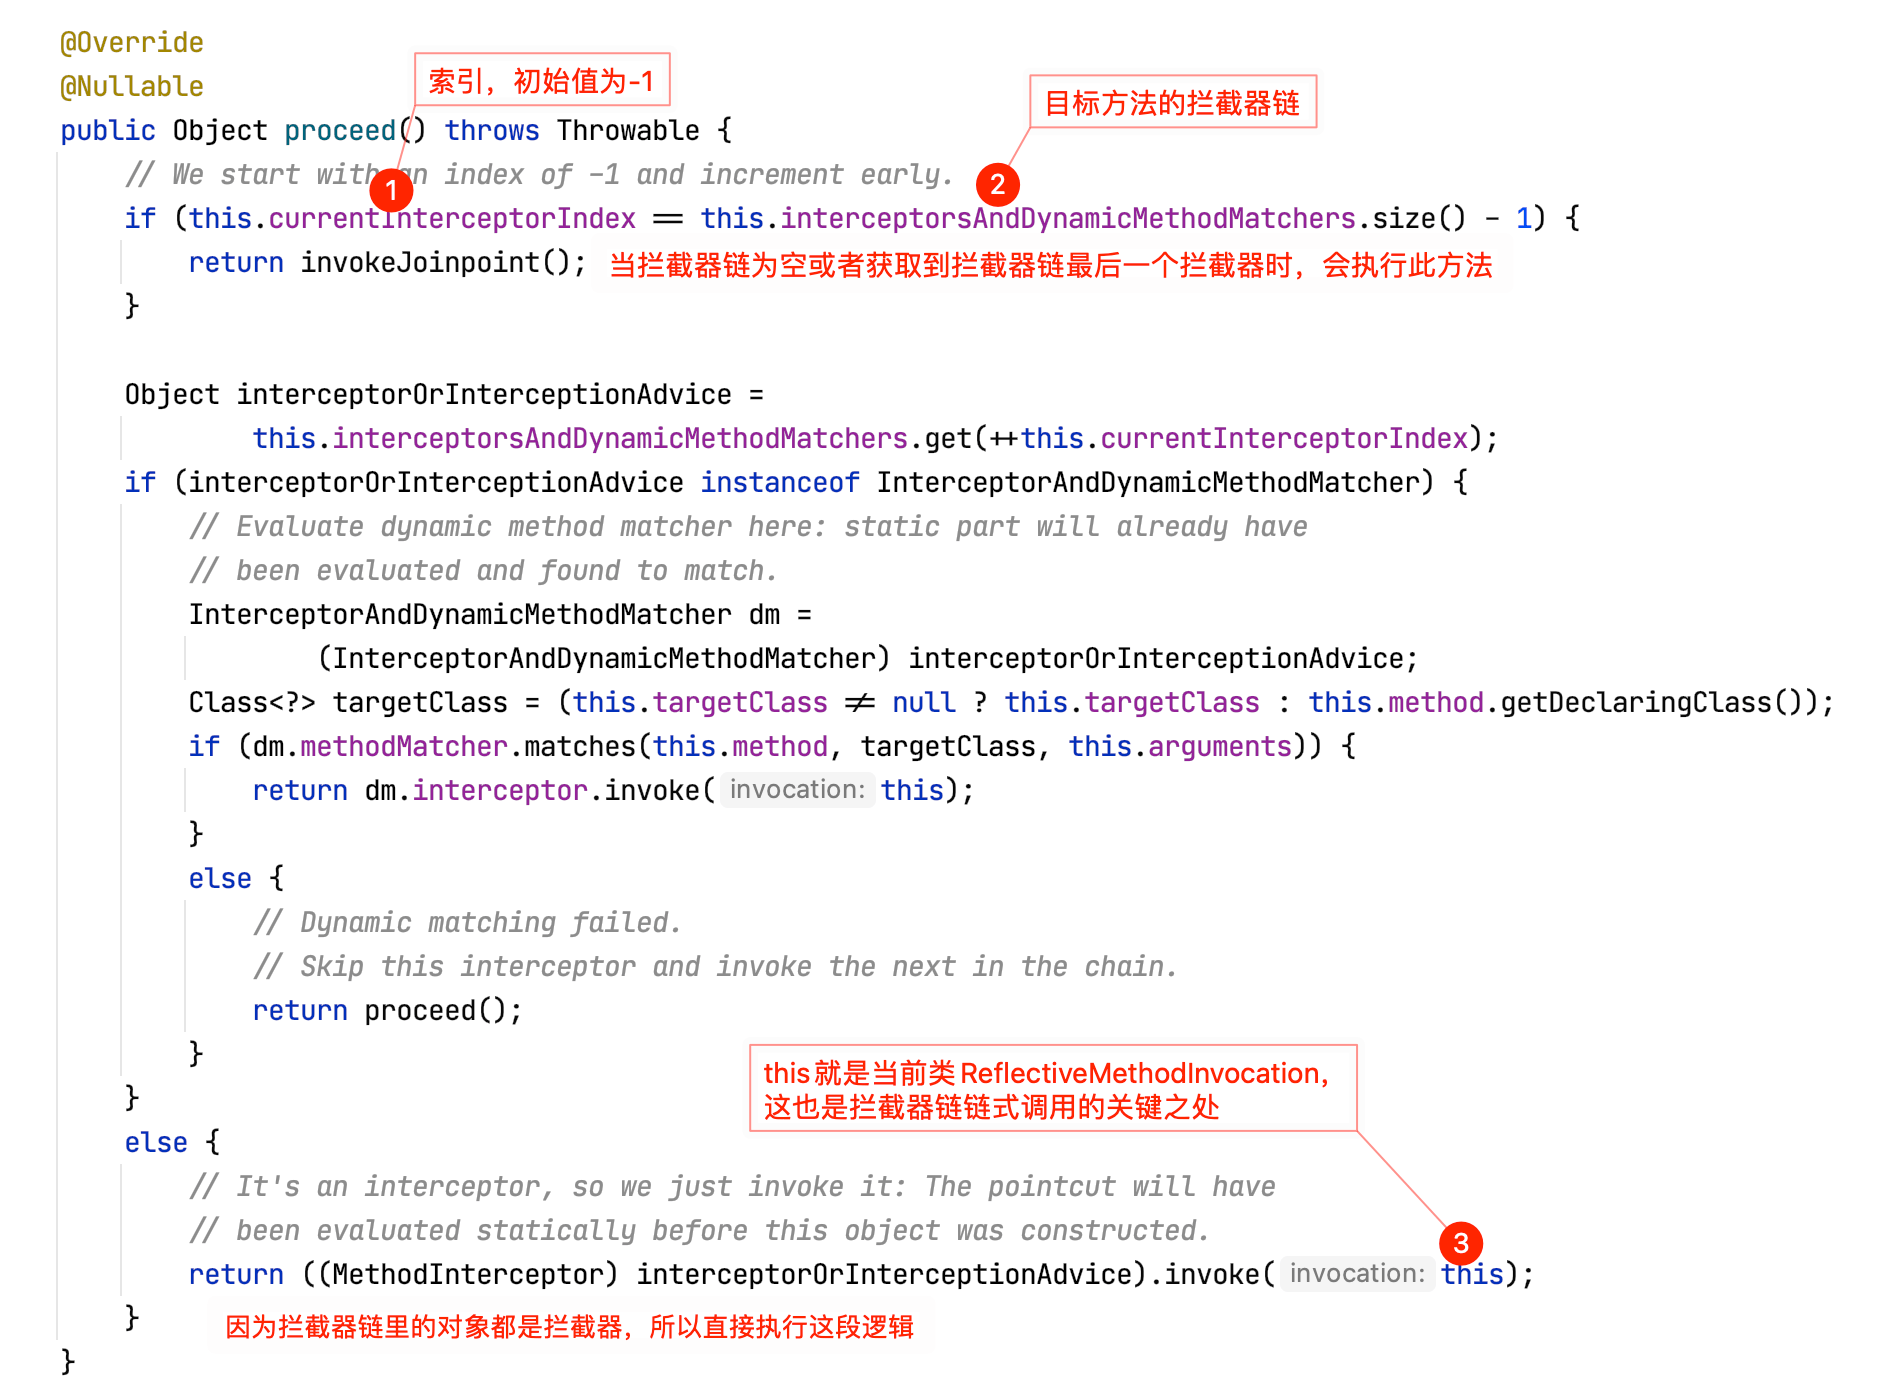
清除掉之前打的断点,在该方法上第一行打个端点,重新以debug方式启动Boot应用:
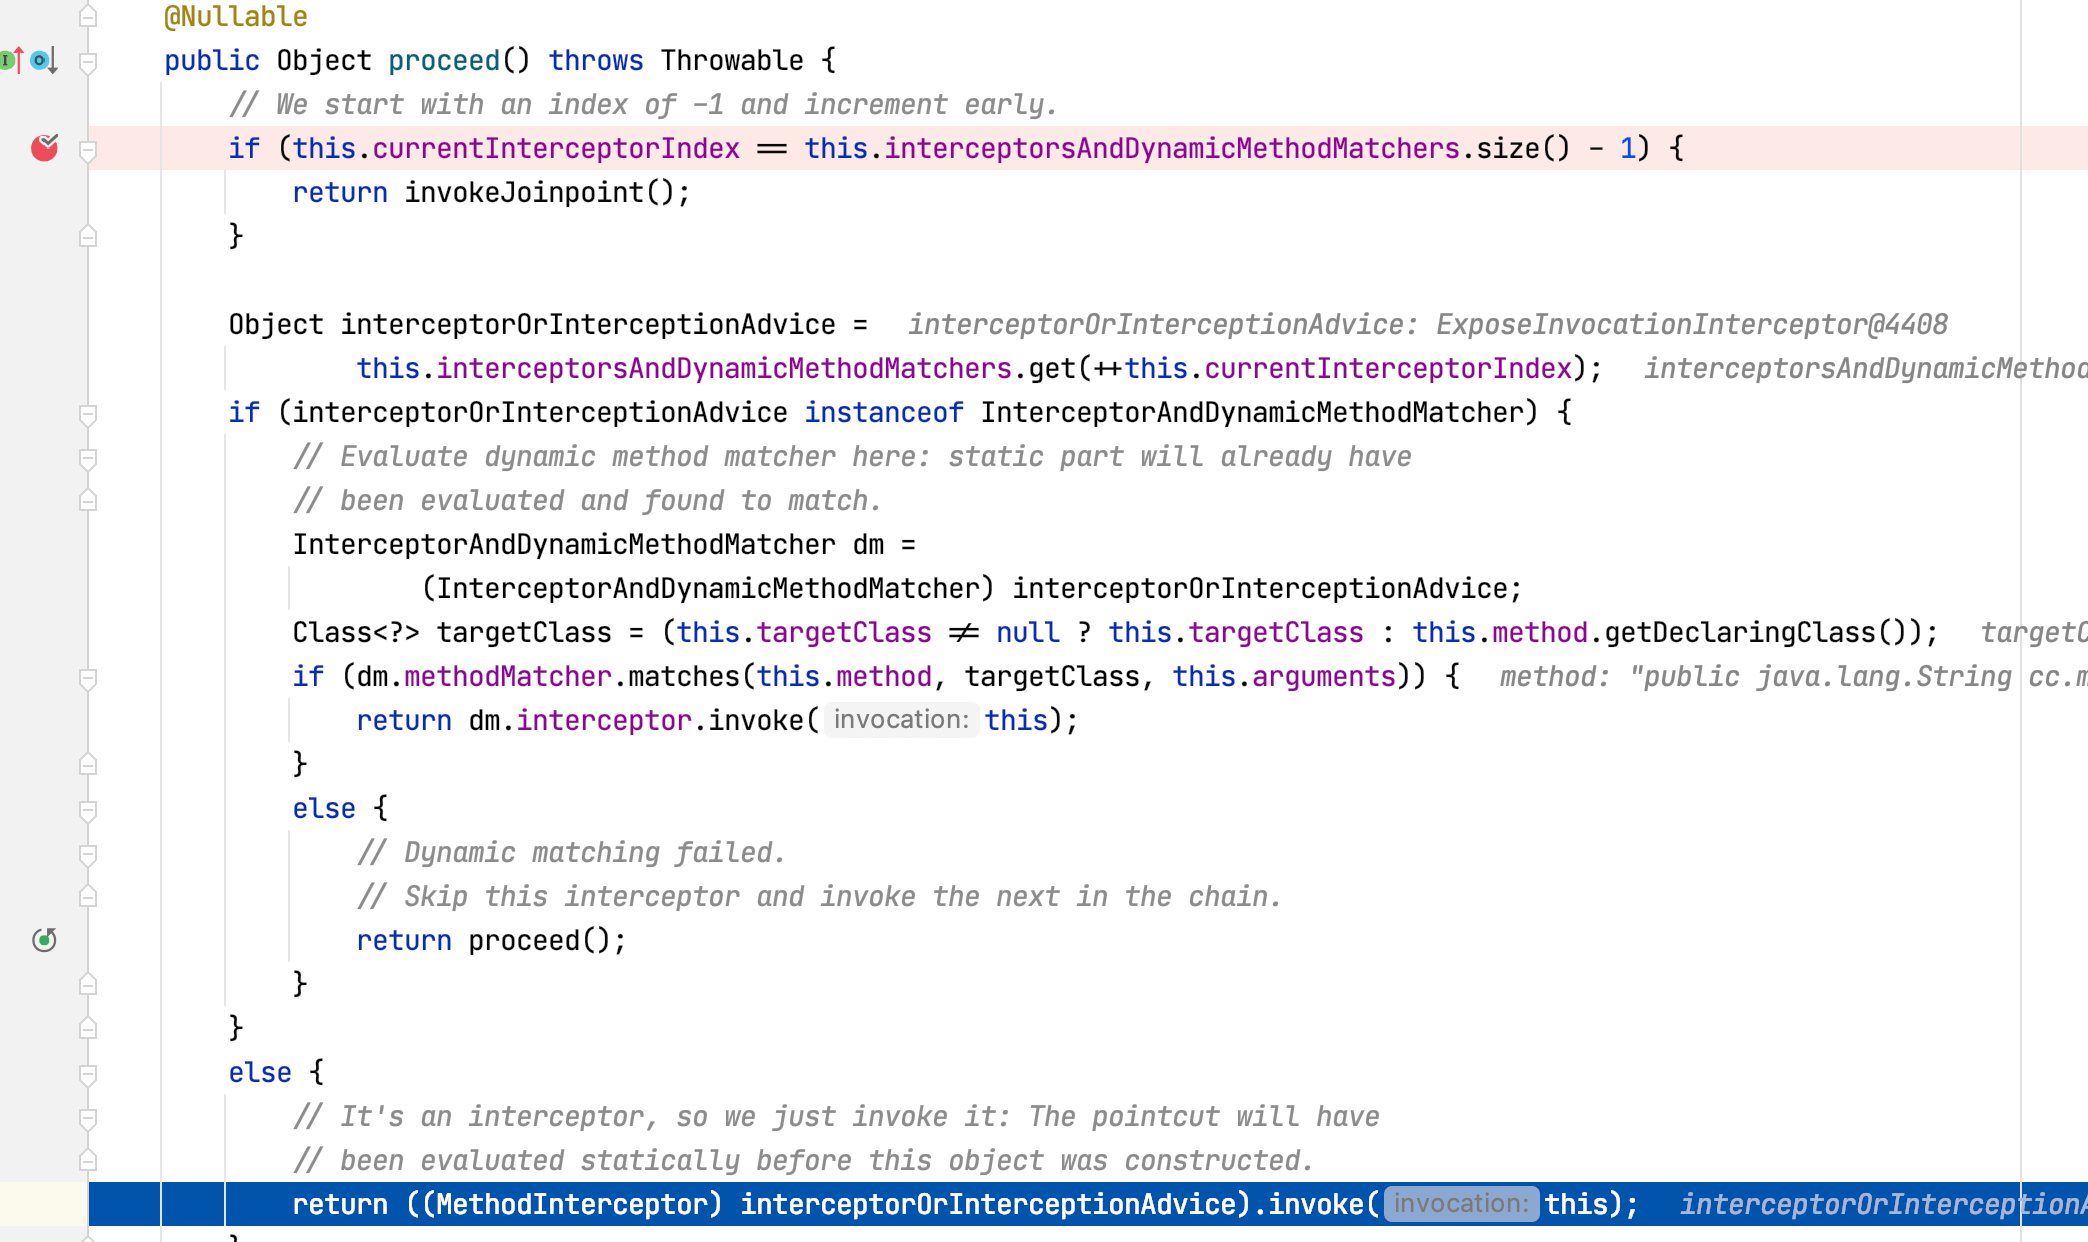
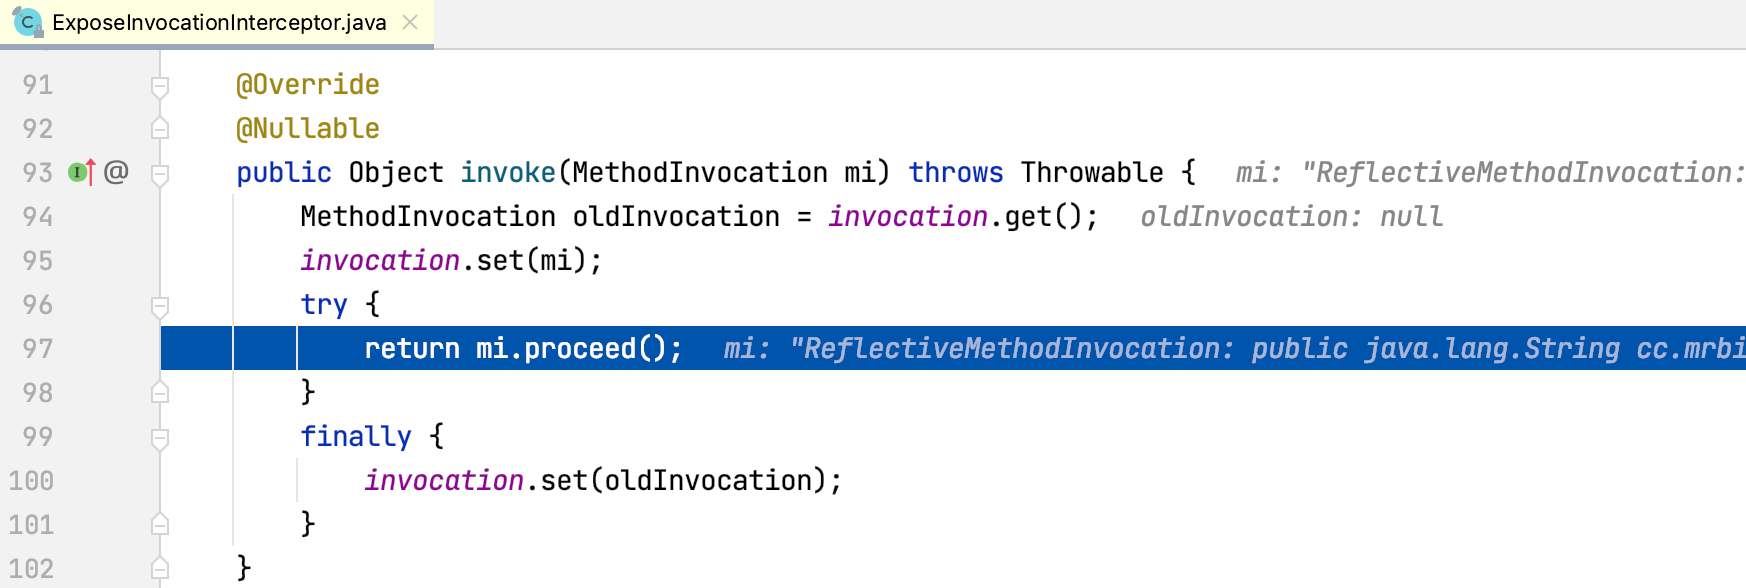
程序第一次进该方法时currentInterceptorIndex值为-1,this.interceptorsAndDynamicMethodMatchers.get(++this.currentInterceptorIndex)取出拦截器链第一个拦截器ExposeInvocationInterceptor,方法最后调用该拦截器的invoke方法,Step Into进入该方法:
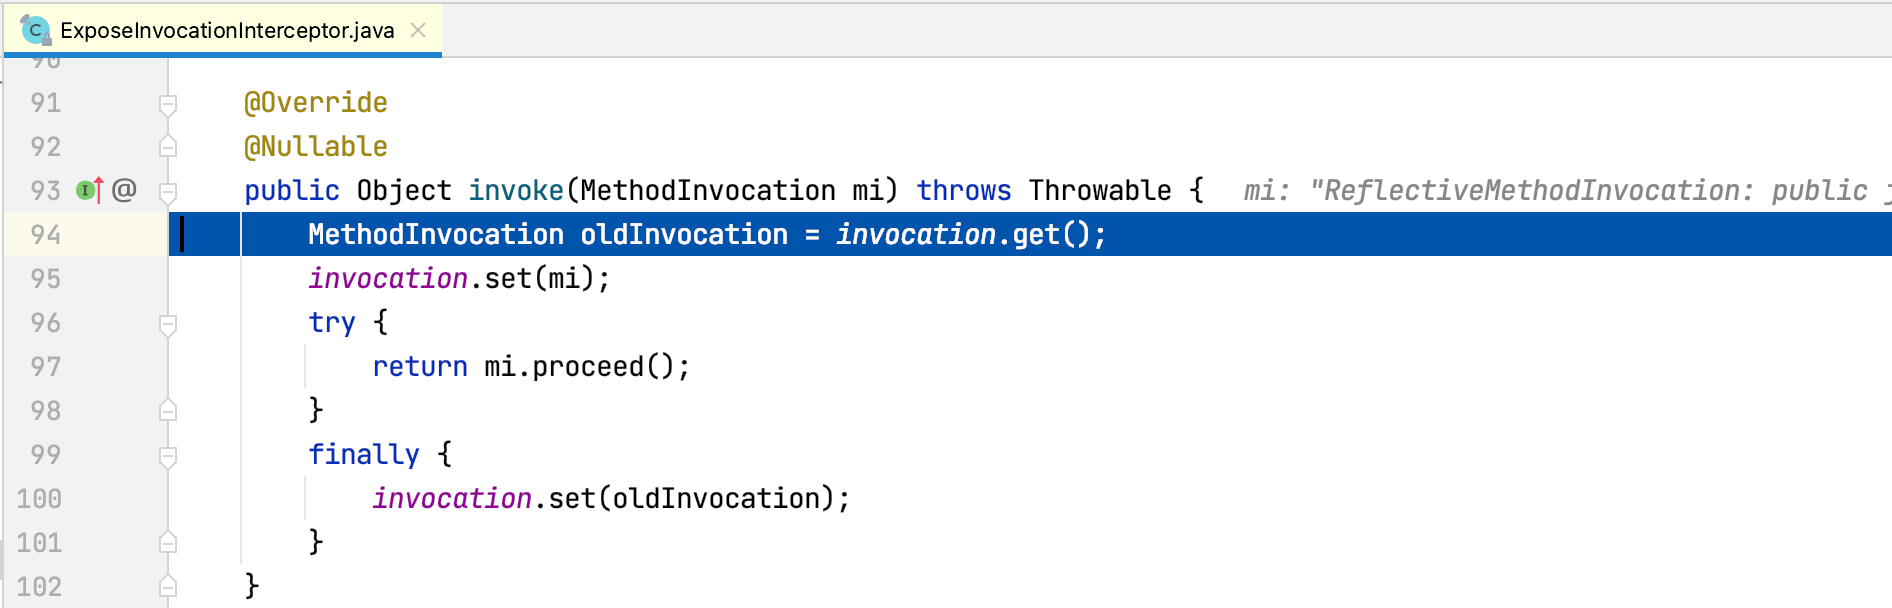
mi就是我们传入的ReflectiveMethodInvocation对象,程序执行到mi.proceed方法时,Step Into进入该方法:
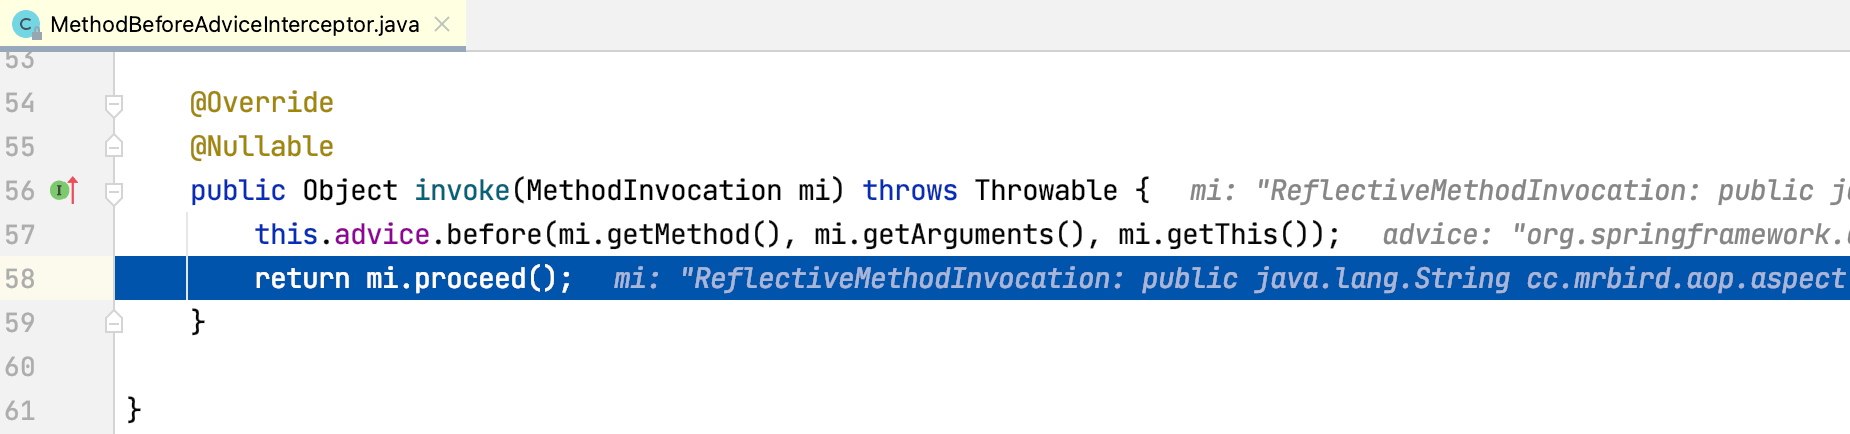
可以看到,此时程序第二次执行ReflectiveMethodInvocation的poceed方法,currentInterceptorIndex值为0,this.interceptorsAndDynamicMethodMatchers.get(++this.currentInterceptorIndex)取出拦截器链第二个拦截器MethodBeforeAdviceInterceptor,方法最后调用该拦截器的invoke方法,Step Into进入该方法:
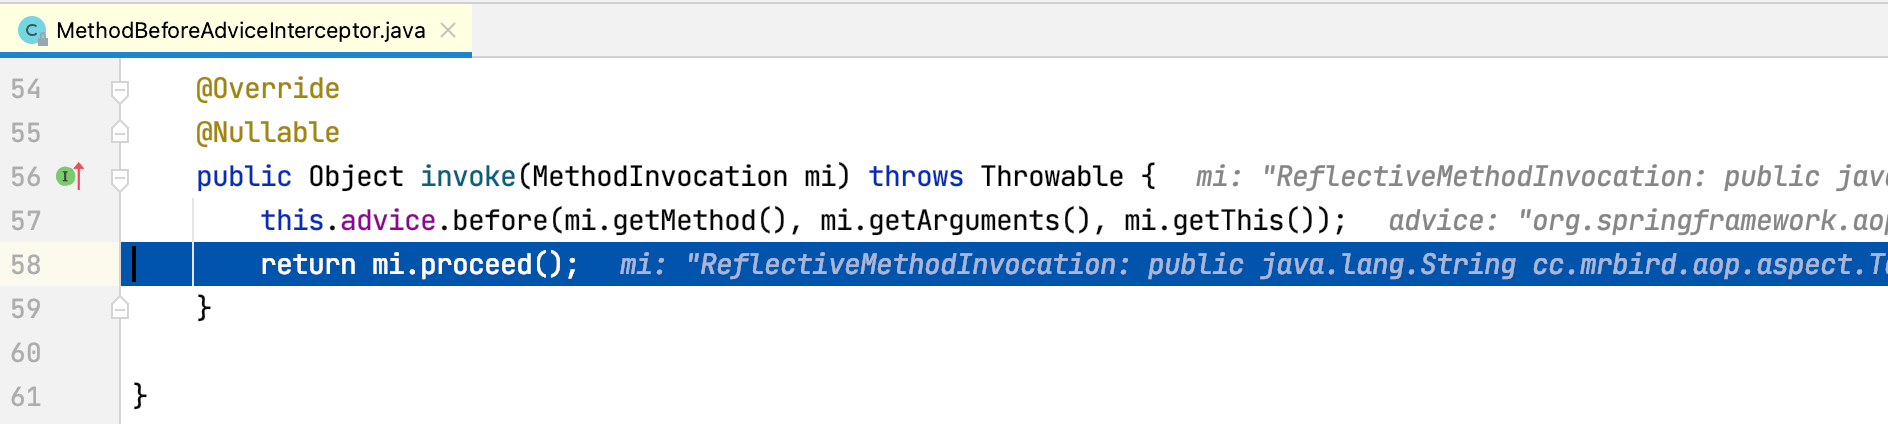
可以看到MethodBeforeAdviceInterceptor的invoke方法第一行调用了通知方法before,此时控制台打印内容为:
1 | onBefore:test方法开始执行,参数:[hello] |
接着又通过mi.proceed再次调用ReflectiveMethodInvocation的poceed方法,Step Into进入该方法:

此时程序第三次执行ReflectiveMethodInvocation的poceed方法,currentInterceptorIndex值为1,this.interceptorsAndDynamicMethodMatchers.get(++this.currentInterceptorIndex)取出拦截器链第三个拦截器AspectJAfterAdvice,方法最后调用该拦截器的invoke方法,Step Into进入该方法:
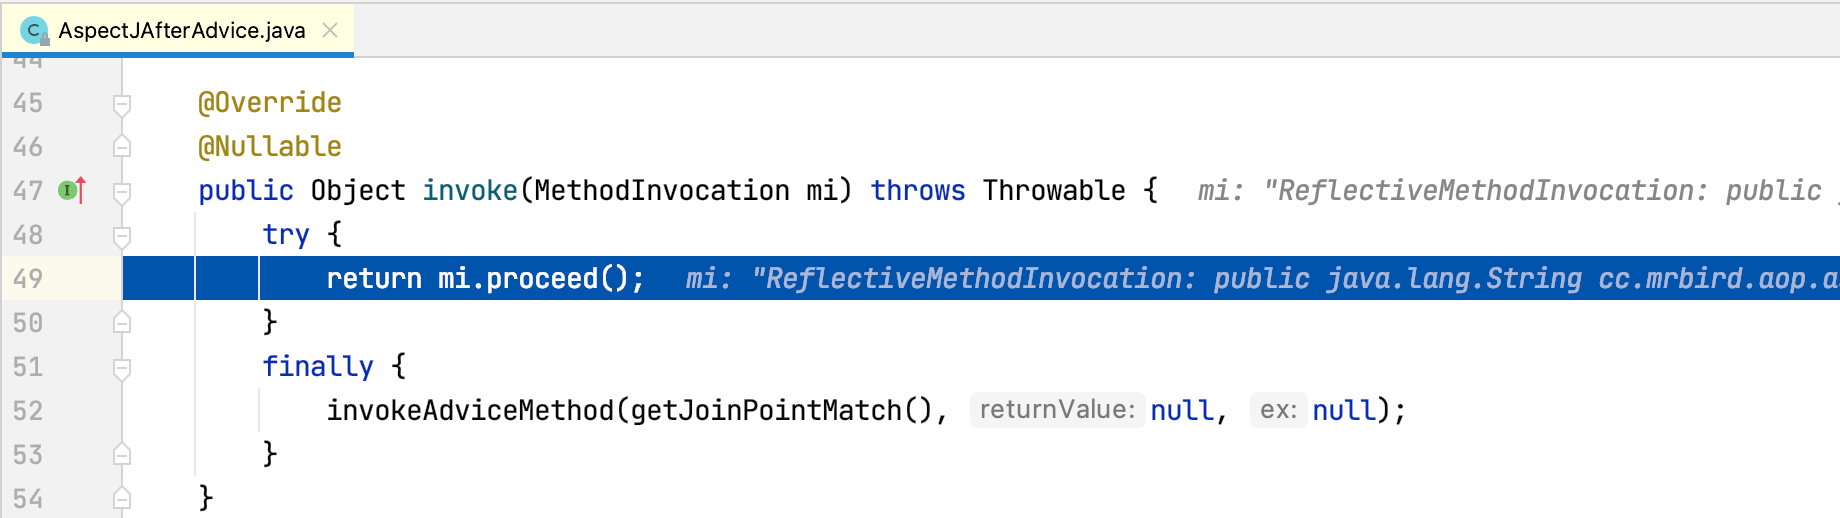
可以看到AspectJAfterAdvice的invoke方法内通过mi.proceed再次调用ReflectiveMethodInvocation的poceed方法,Step Into进入该方法:
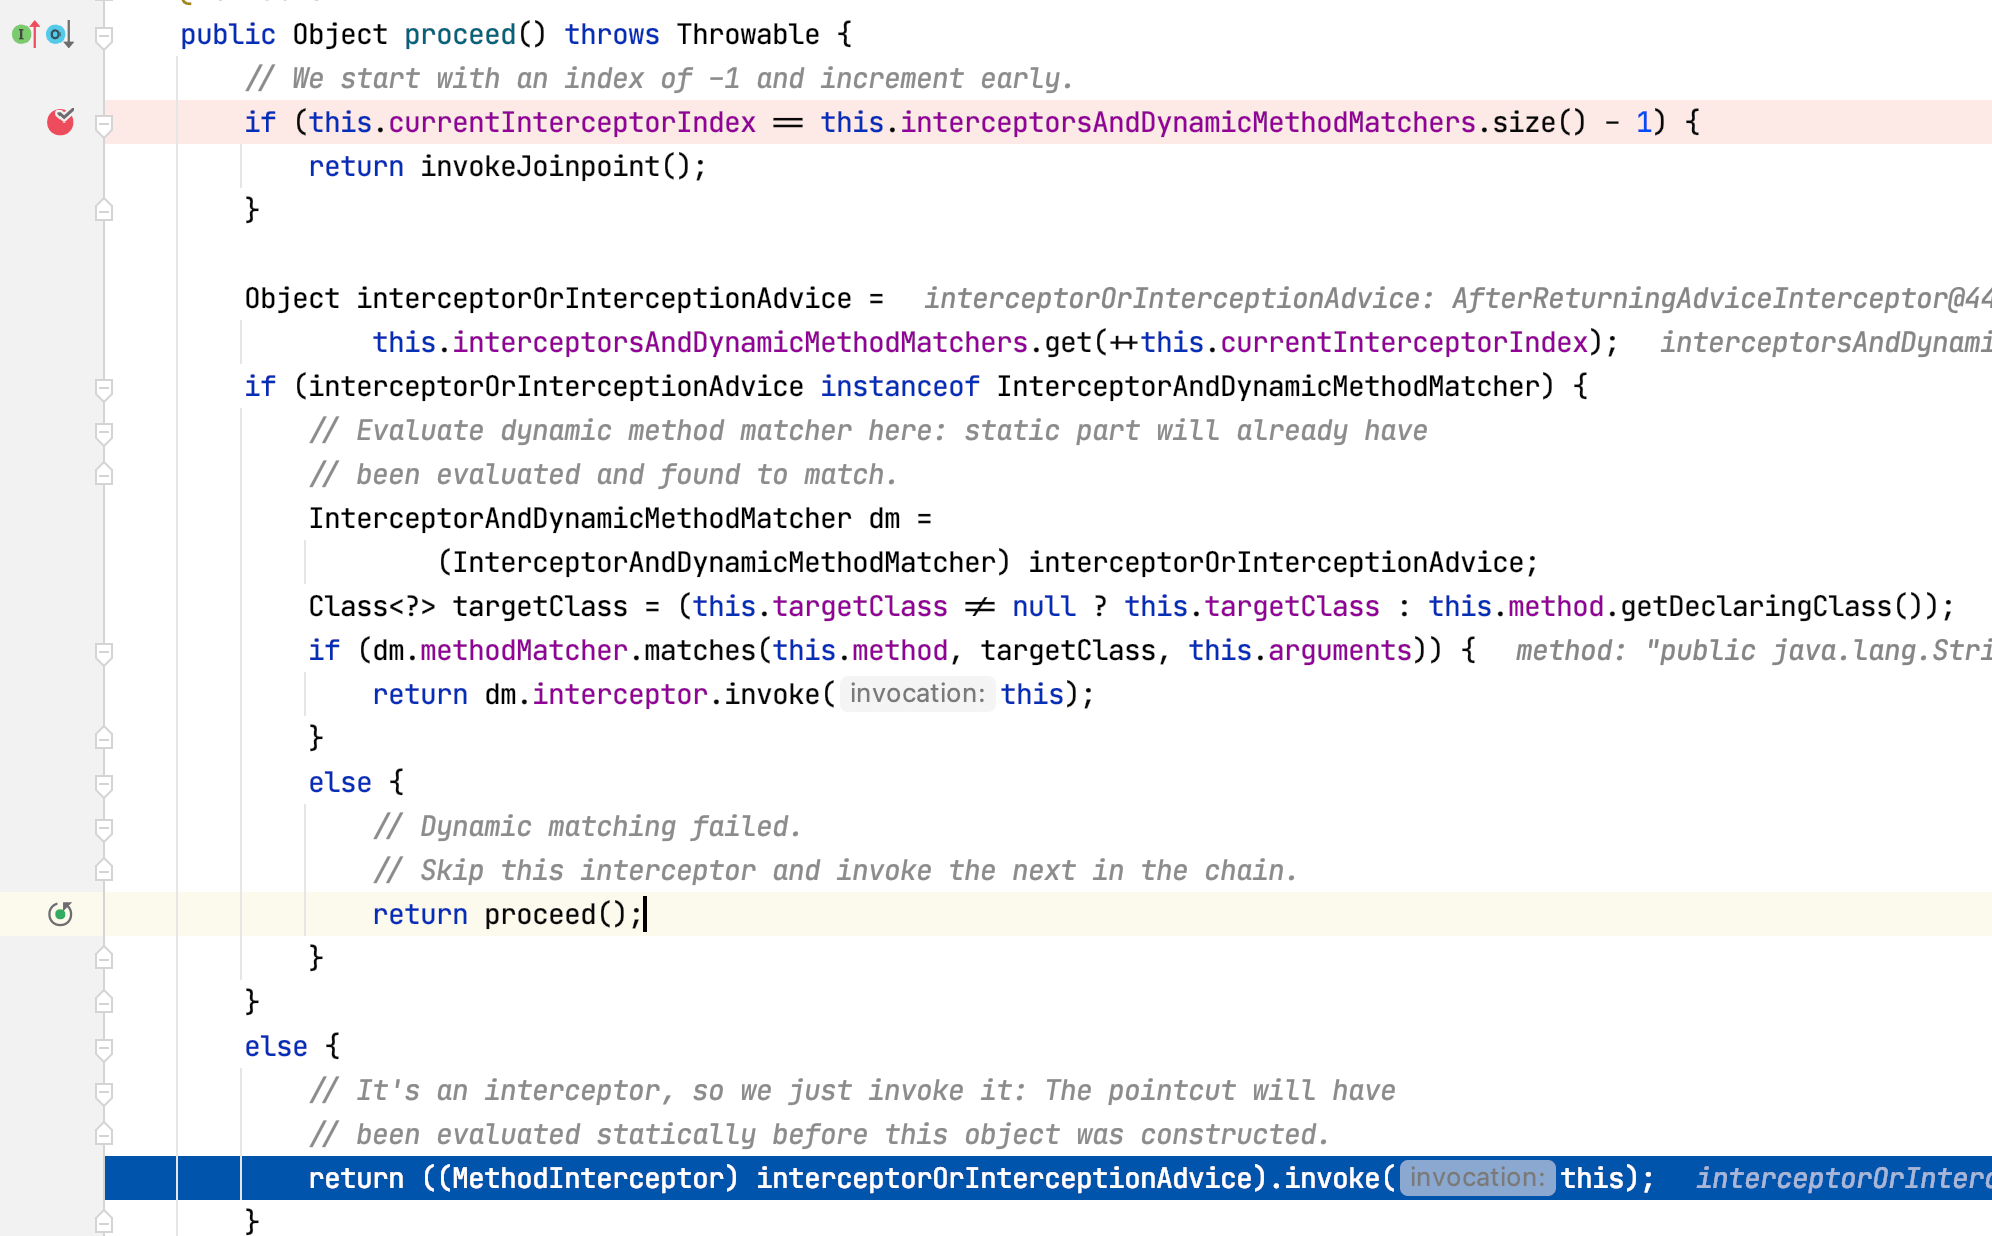
此时程序第四次执行ReflectiveMethodInvocation的poceed方法,currentInterceptorIndex值为2,this.interceptorsAndDynamicMethodMatchers.get(++this.currentInterceptorIndex)取出拦截器链第四个拦截器AfterReturningAdviceInterceptor,方法最后调用该拦截器的invoke方法,Step Into进入该方法:
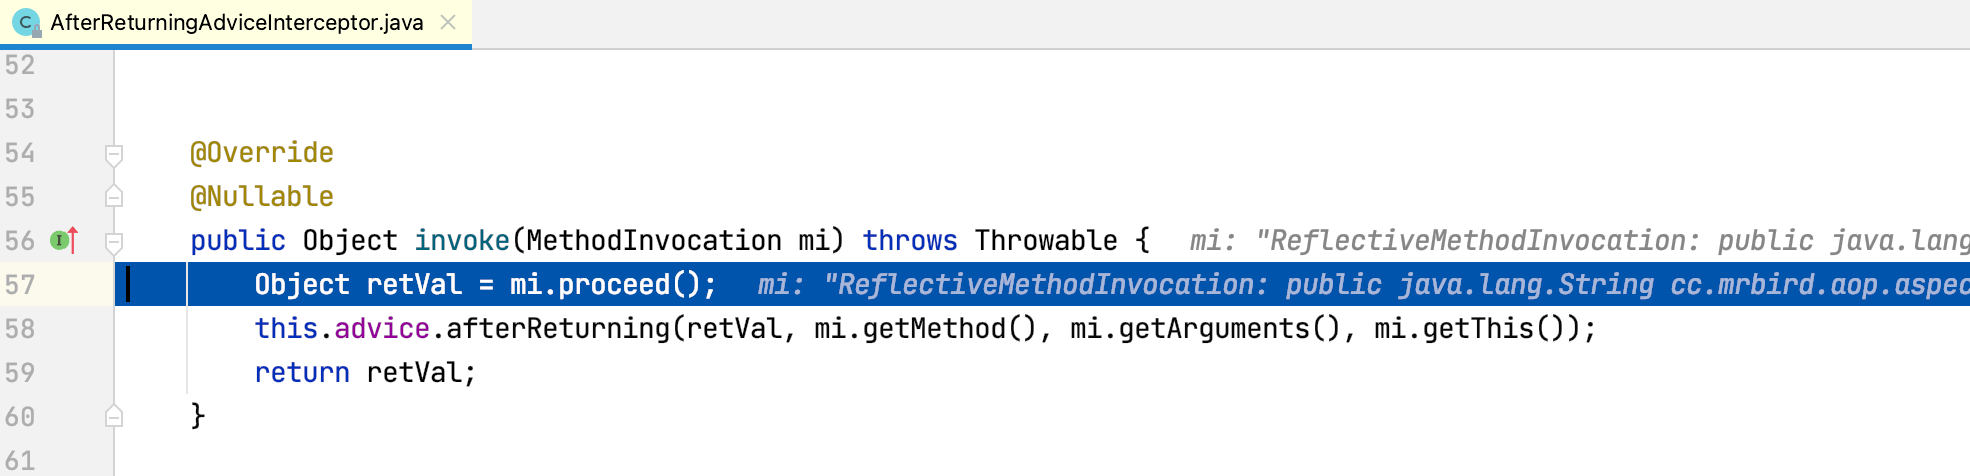
可以看到AfterReturningAdviceInterceptor的invoke方法内通过mi.proceed再次调用ReflectiveMethodInvocation的poceed方法,Step Into进入该方法:
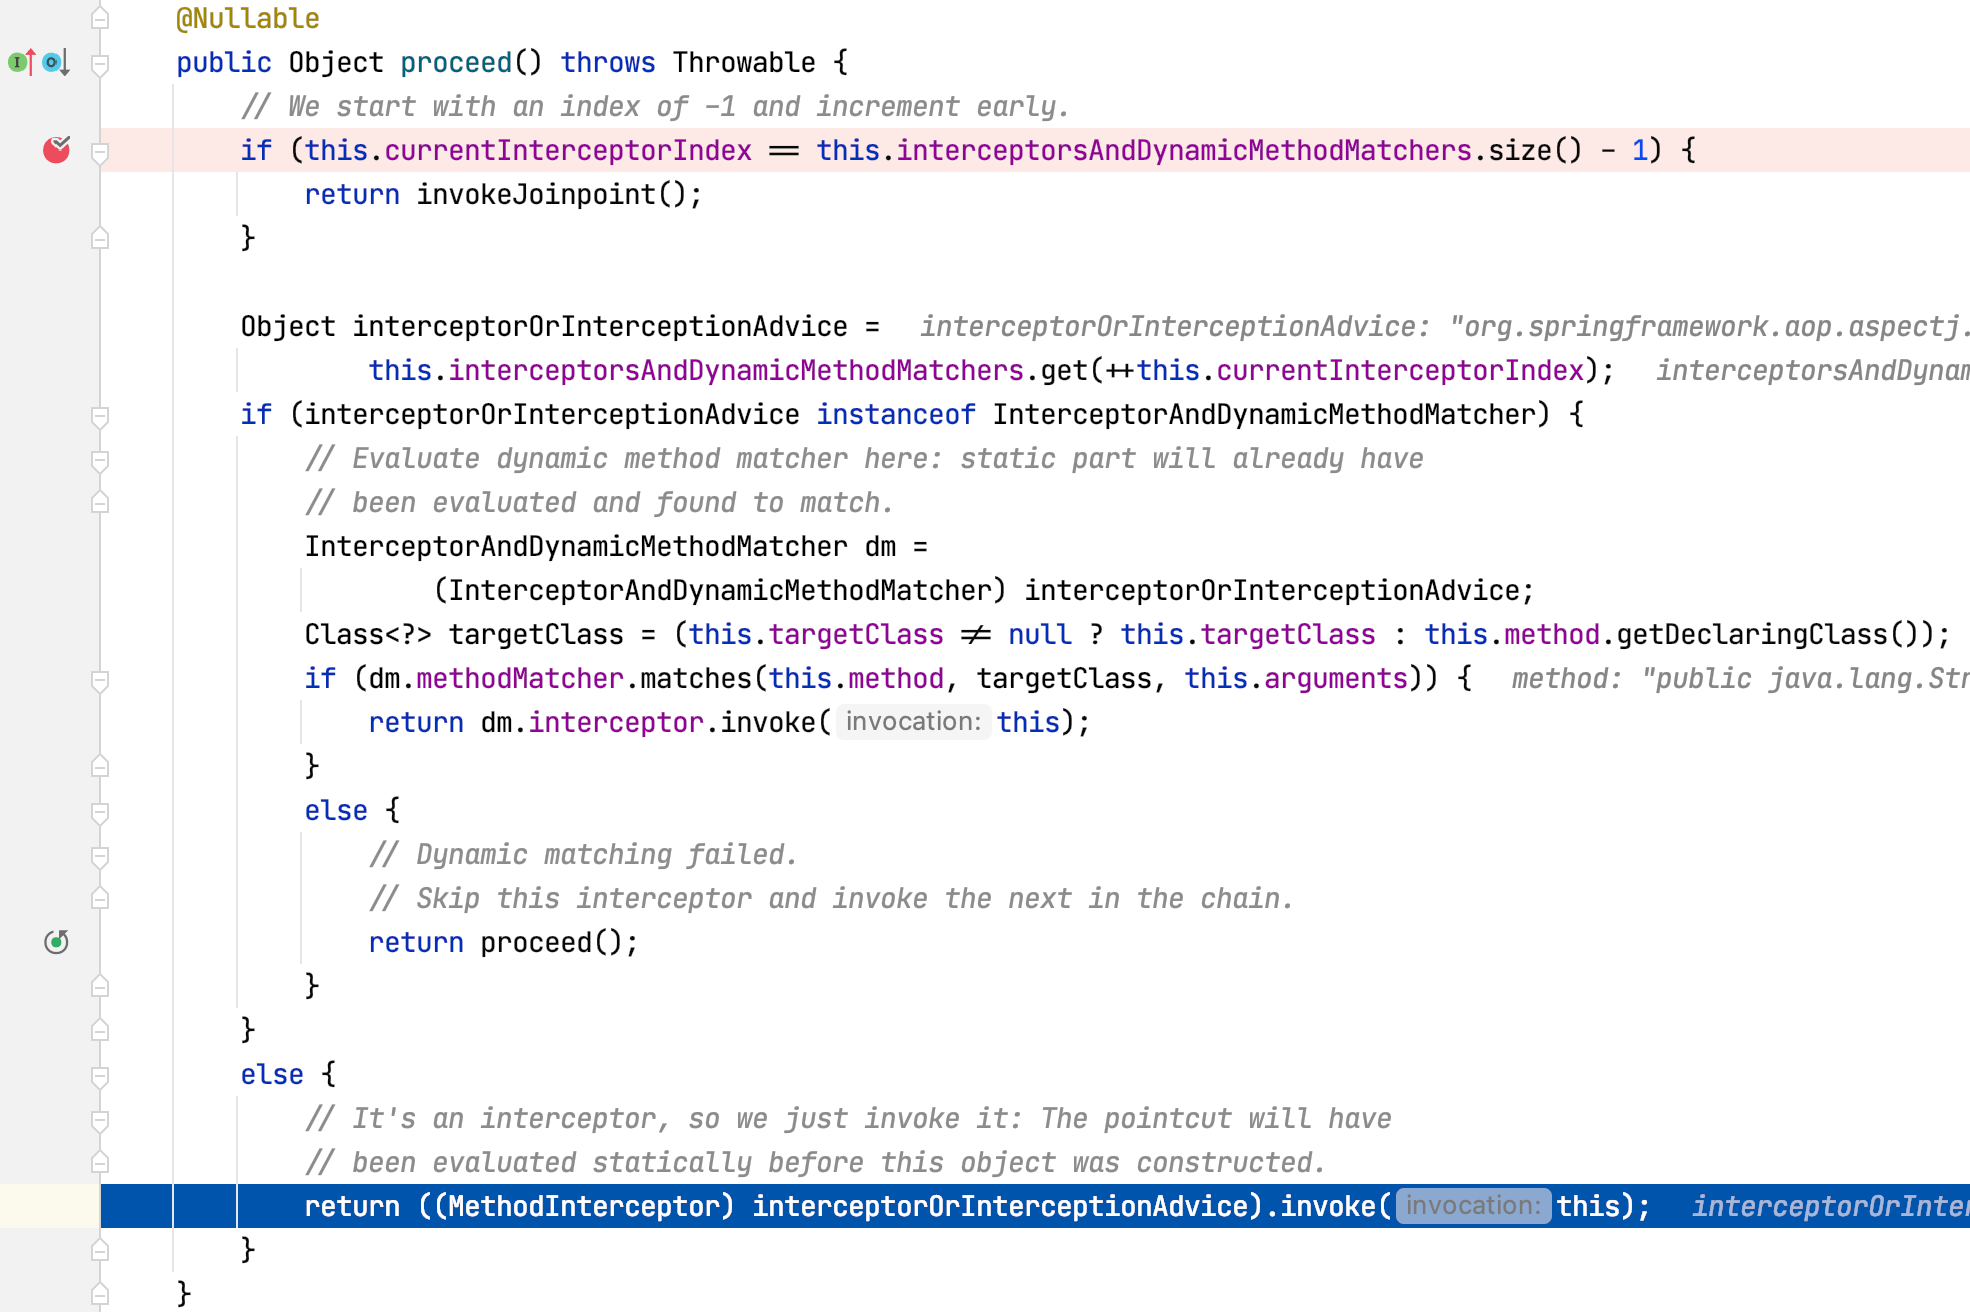
此时程序第五次执行ReflectiveMethodInvocation的poceed方法,currentInterceptorIndex值为3,this.interceptorsAndDynamicMethodMatchers.get(++this.currentInterceptorIndex)取出拦截器链第五个拦截器AspectJAfterThrowingAdvice,方法最后调用该拦截器的invoke方法,Step Into进入该方法:
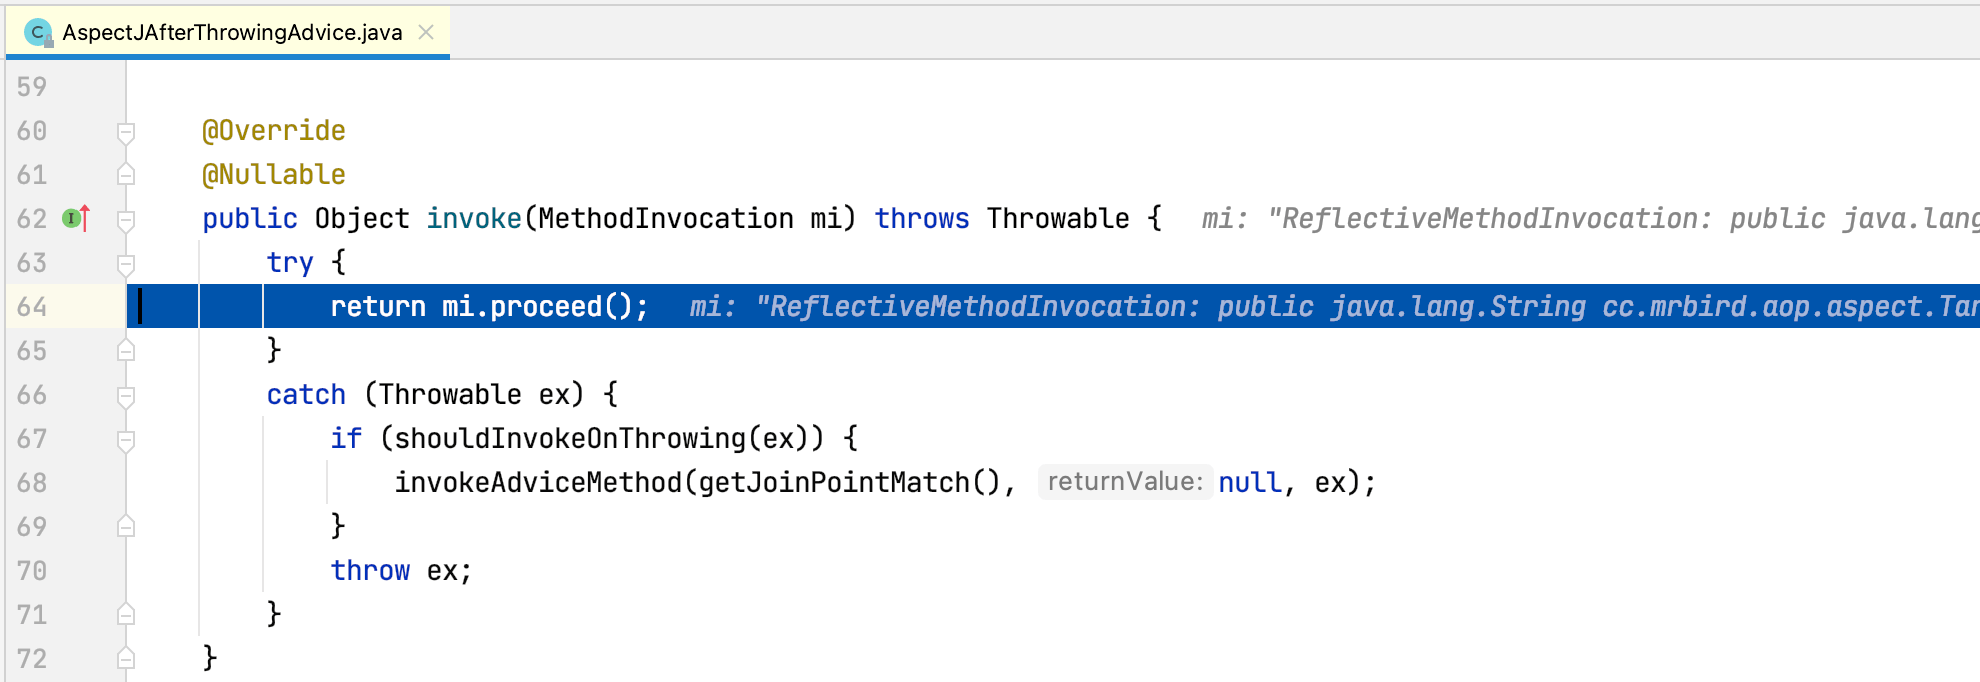
可以看到AspectJAfterThrowingAdvice的invoke方法内通过mi.proceed再次调用ReflectiveMethodInvocation的poceed方法,Step Into进入该方法:

此时程序第六次执行ReflectiveMethodInvocation的poceed方法,currentInterceptorIndex值为4,而拦截器链的长度为5,4==5-1成立,所以执行invokeJoinpoint()方法,该方法内部通过反射调用了目标方法(这里为TargetClass的test方法),执行后,控制台打印内容如下:
1 | onBefore:test方法开始执行,参数:[hello] |
随着invokeJoinpoint()方法执行结束返回出栈,程序回到AspectJAfterThrowingAdvice的invoke方法:
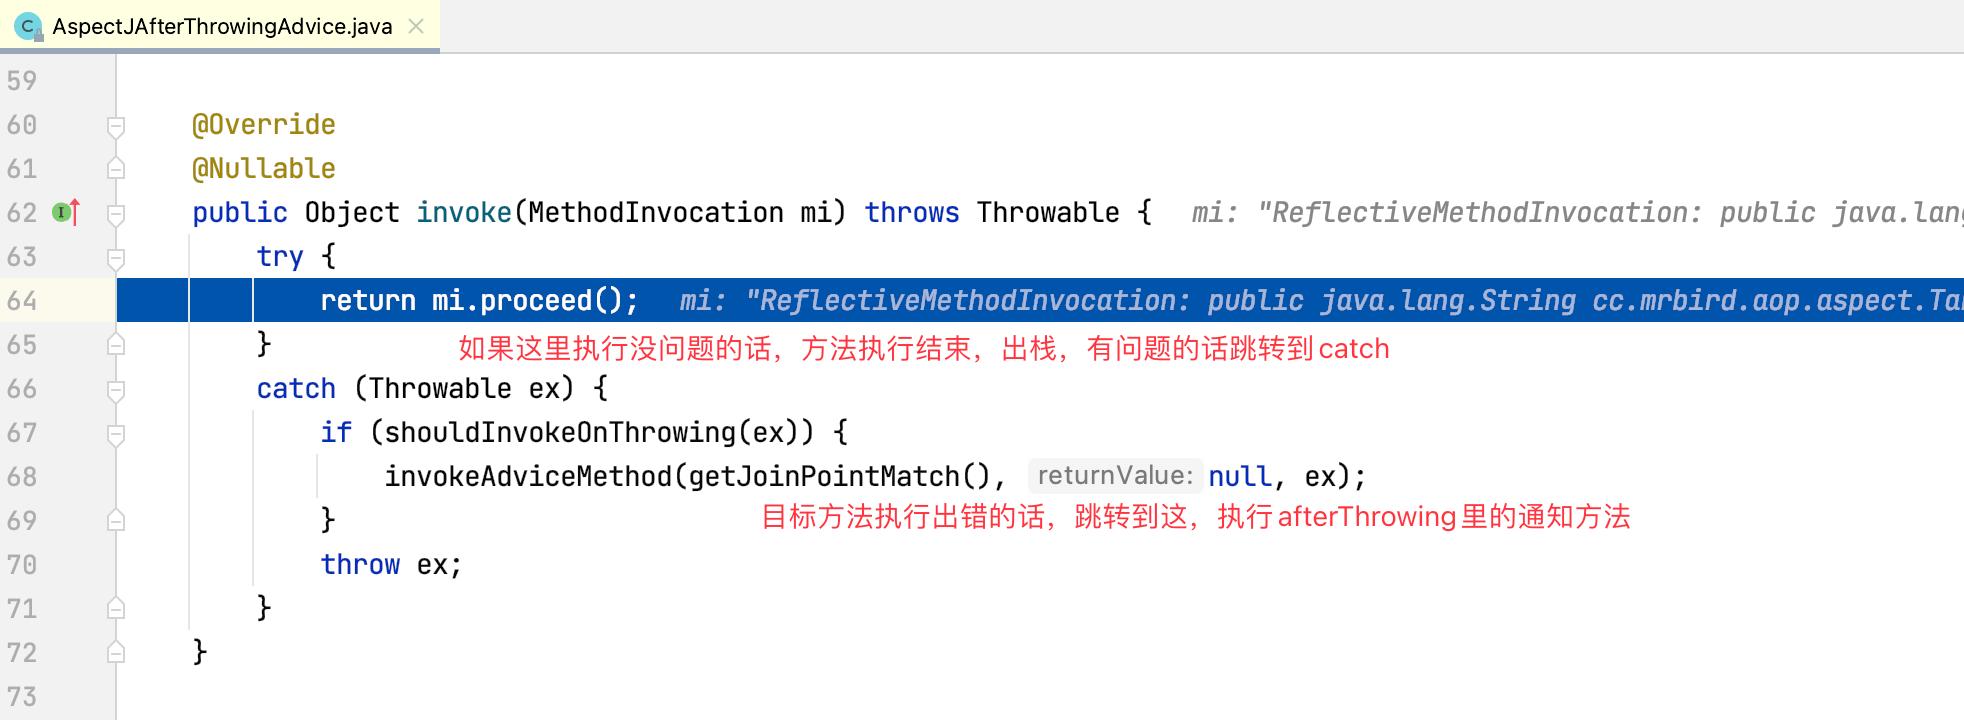
就这个例子来说,目标方法test并没有抛出异常,所以AspectJAfterThrowingAdvice的invoke方法执行结束出栈,程序回到AfterReturningAdviceInteceptor的invoke方法:

this.advice.afterReturning执行afterReturning通知方法,控制台打印内容如下:
1 | onBefore:test方法开始执行,参数:[hello] |
AfterReturningAdviceInteceptor的invoke方法执行结束出栈,程序回到AspectJAfterAdvice的invoke方法:
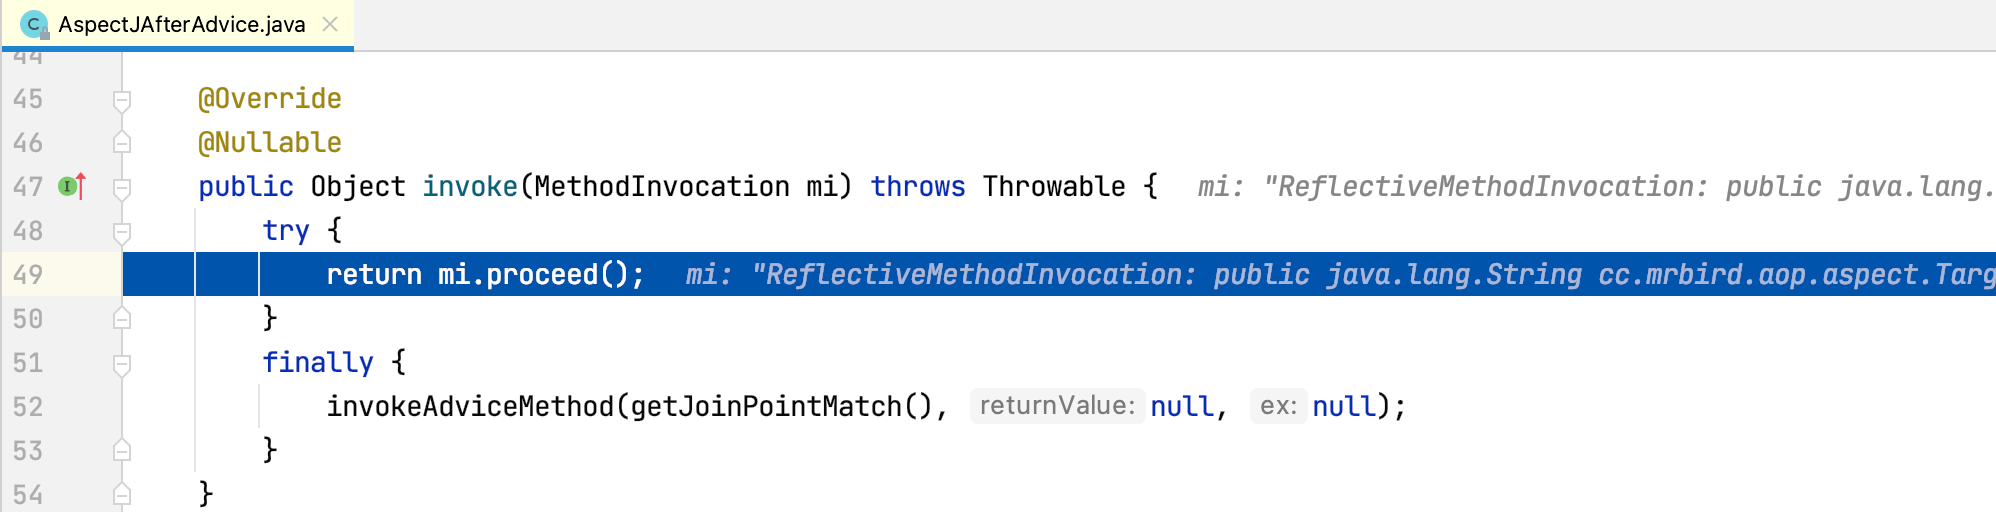
AspectJAfterAdvice的invoke方法最终执行finally after逻辑,控制台打印内容如下:
1 | onBefore:test方法开始执行,参数:[hello] |
AspectJAfterAdvice的invoke方法执行结束出栈,程序回到MethodBeforeAdviceInterceptor的invoke方法:
MethodBeforeAdviceInterceptor的invoke方法正常执行结束,出栈,程序回到ExposeInvocationInterceptor的invoke方法:
ExposeInvocationInterceptor的invoke方法执行结束出栈,程序回到CglibAopProxy的intercept方法:
CglibAopProxy的intercept方法执行结束出栈后,整个AOP的拦截器链调用也随之结束了:

我们已经成功在目标方法的各个执行时期织入了通知方法。上述过程伴随着不断的入栈出栈操作,不懂您看懂没🤨。
下面用一张图总结拦截器链调用过程:
尚硅谷AOP源码解析学习笔记

