在前面几节中,我们获取到的令牌都是基于Spring Security OAuth2默认配置生成的,Spring Security允许我们自定义令牌配置,比如不同的client_id对应不同的令牌,令牌的有效时间,令牌的存储策略等;我们也可以使用JWT来替换默认的令牌。
自定义令牌配置
我们让认证服务器AuthorizationServerConfig继承AuthorizationServerConfigurerAdapter,并重写它的configure(ClientDetailsServiceConfigurer clients)方法:
1 |
|
认证服务器在继承了AuthorizationServerConfigurerAdapter适配器后,需要重写configure(AuthorizationServerEndpointsConfigurer endpoints)方法,指定 AuthenticationManager和UserDetailService。
创建一个新的配置类SecurityConfig,在里面注册我们需要的AuthenticationManagerBean:
1 |
|
此外,重写configure(ClientDetailsServiceConfigurer clients)方法主要配置了:
定义两个client_id,及客户端可以通过不同的client_id来获取不同的令牌;
client_id为test1的令牌有效时间为3600秒,client_id为test2的令牌有效时间为7200秒;
client_id为test1的refresh_token(下面会介绍到)有效时间为864000秒,即10天,也就是说在这10天内都可以通过refresh_token来换取新的令牌;
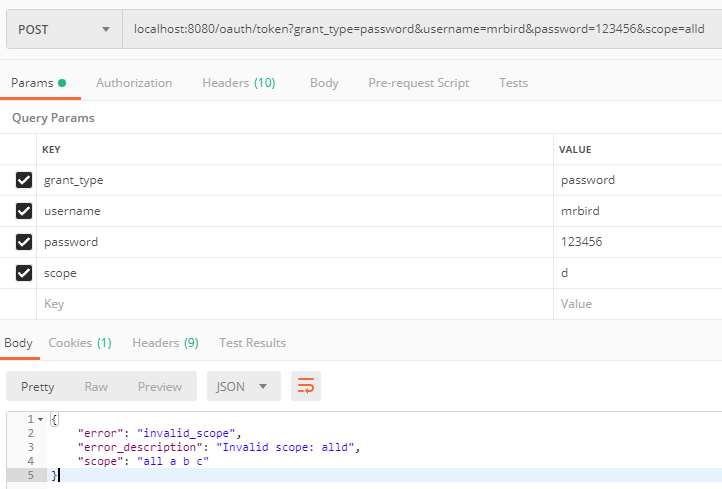
在获取client_id为test1的令牌的时候,scope只能指定为all,a,b或c中的某个值,否则将获取失败;
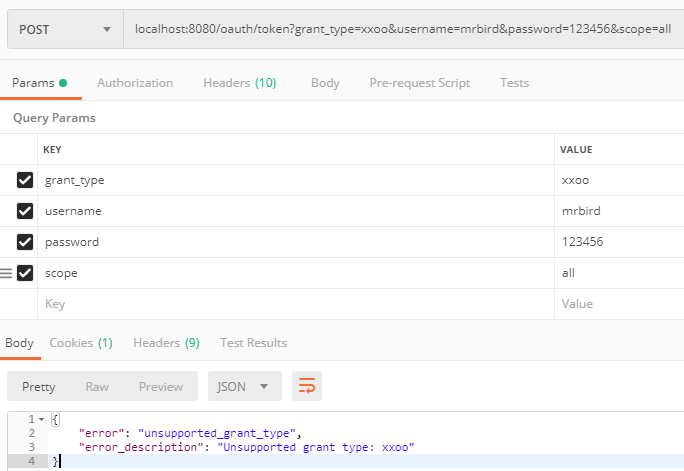
只能通过密码模式(password)来获取client_id为test1的令牌,而test2则无限制。
启动项目,演示几个效果。启动项目后使用密码模式获取test1的令牌:
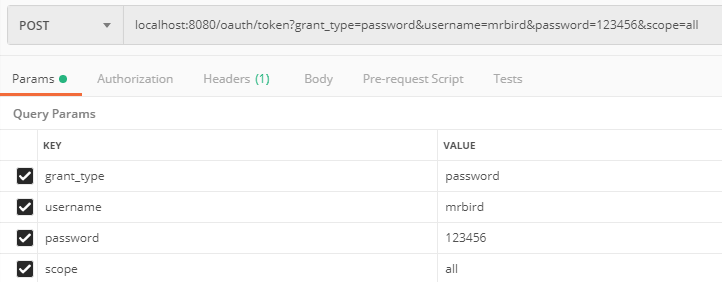
和前面介绍的那样,头部需要传入test1:test1111经过base64加密后的值: 
点击发送后,意外的返回了错误!
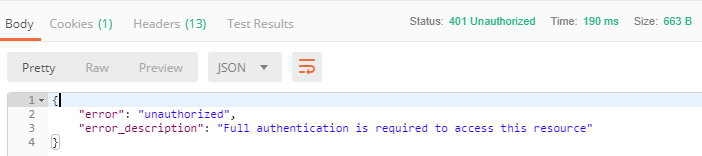
控制台输出了 Encoded password does not look like BCrypt 的告警。
查阅资料后发现,在新版本的spring-cloud-starter-oauth2指定client_secret的时候需要进行加密处理:
1 |
|
在前面自定义登录认证获取令牌一节中,我们在MyAuthenticationSucessHandler判断了client_secret的值是否正确。由于我们这里client_secret加密了,所以判断逻辑需要调整为下面这样:
1 | ... |
言归正传,修改后重启项目,重新使用密码模式获取令牌:
1 | { |
可以看到expires_in的时间是我们定义的3600秒。
将scope指定为d看看会有什么结果:
由于我们定义了只能通过密码模式来获取client_id为test1的令牌,所以我们看看将grant_type改为xxoo会有什么结果:
默认令牌是存储在内存中的,我们可以将它保存到第三方存储中,比如Redis。
创建TokenStoreConfig:
1 |
|
然后在认证服务器里指定该令牌存储策略。重写configure(AuthorizationServerEndpointsConfigurer endpoints)方法:
1 |
|
重启项目获取令牌后,查看Redis中是否存储了令牌相关信息:
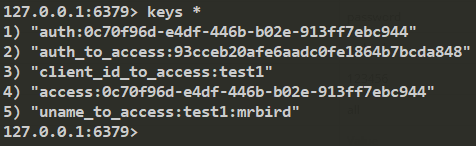
可以看到,令牌信息已经存储到Redis里了。
使用JWT替换默认令牌
使用JWT替换默认的令牌(默认令牌使用UUID生成)只需要指定TokenStore为JwtTokenStore即可。
创建一个JWTokenConfig配置类:
1 |
|
签名密钥为test_key。在配置类里配置好JwtTokenStore后,我们在认证服务器里指定它:
1 |
|
重启服务获取令牌,系统将返回如下格式令牌:
1 | { |
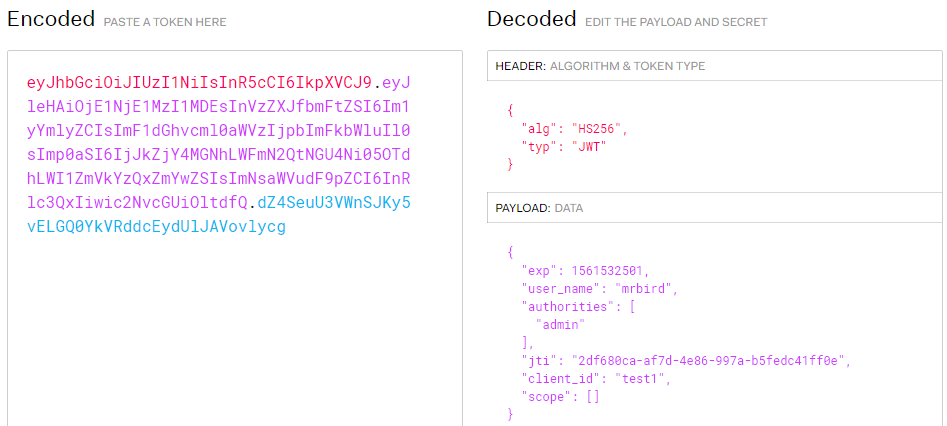
将access_token中的内容复制到https://jwt.io/网站解析下:
使用这个token访问/index可以成功获取到信息,这里就不演示了。
拓展JWT
上面的Token解析得到的PAYLOAD内容为:
1 | { |
如果想在JWT中添加一些额外的信息,我们需要实现TokenEnhancer(Token增强器):
1 | public class JWTokenEnhancer implements TokenEnhancer { |
我们在Token中添加了message: hello world信息。然后在JWTokenConfig里注册该Bean:
1 |
|
最后在认证服务器里配置该增强器:
1 |
|
重启项目,再次获取令牌,系统返回:
1 | { |
可以看到,在返回的JSON内容里已经多了我们添加的message信息,此外将access_token复制到jwt.io网站解析,内容如下:
1 | { |
解析后的JWT也包含了我们添加的message信息。
Java中解析JWT
要在Java代码中解析JWT,需要添加如下依赖:
1 | <dependency> |
修改/index:
1 | ("index") |
signkey需要和JwtAccessTokenConverter中指定的签名密钥一致。重启项目,获取令牌后访问/index,输出内容如下:
1 | { |
刷新令牌
令牌过期后我们可以使用refresh_token来从系统中换取一个新的可用令牌。但是从前面的例子可以看到,在认证成功后返回的JSON信息里并没有包含refresh_token,要让系统返回refresh_token,需要在认证服务器自定义配置里添加如下配置:
1 |
|
授权方式需要加上refresh_token,除了四种标准的OAuth2获取令牌方式外,Spring Security OAuth2内部把refresh_token当作一种拓展的获取令牌方式。
通过上面的配置,使用test1这个client_id获取令牌时将返回refresh_token,refresh_token的有效期为10天,即10天之内都可以用它换取新的可用令牌。
重启项目,认证成功后,系统返回如:
1 | { |
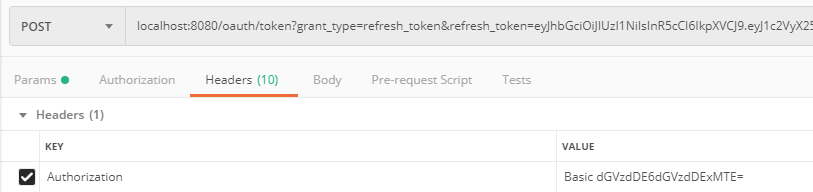
假设现在access_token过期了,我们用refresh_token去换取新的令牌。使用postman发送如下请求:
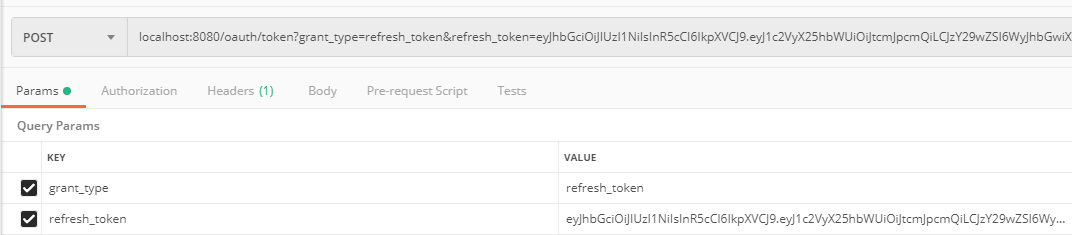
1 | { |
postman请求及源码链接:https://github.com/wuyouzhuguli/SpringAll/tree/master/65.Spring-Security-OAuth2-Config

