Spring Boot整合WebSocket

本节简单介绍下如何在Spring Boot引入WebSocket,实现简单的客户端与服务端建立长连接并互发送文本消息。

框架搭建

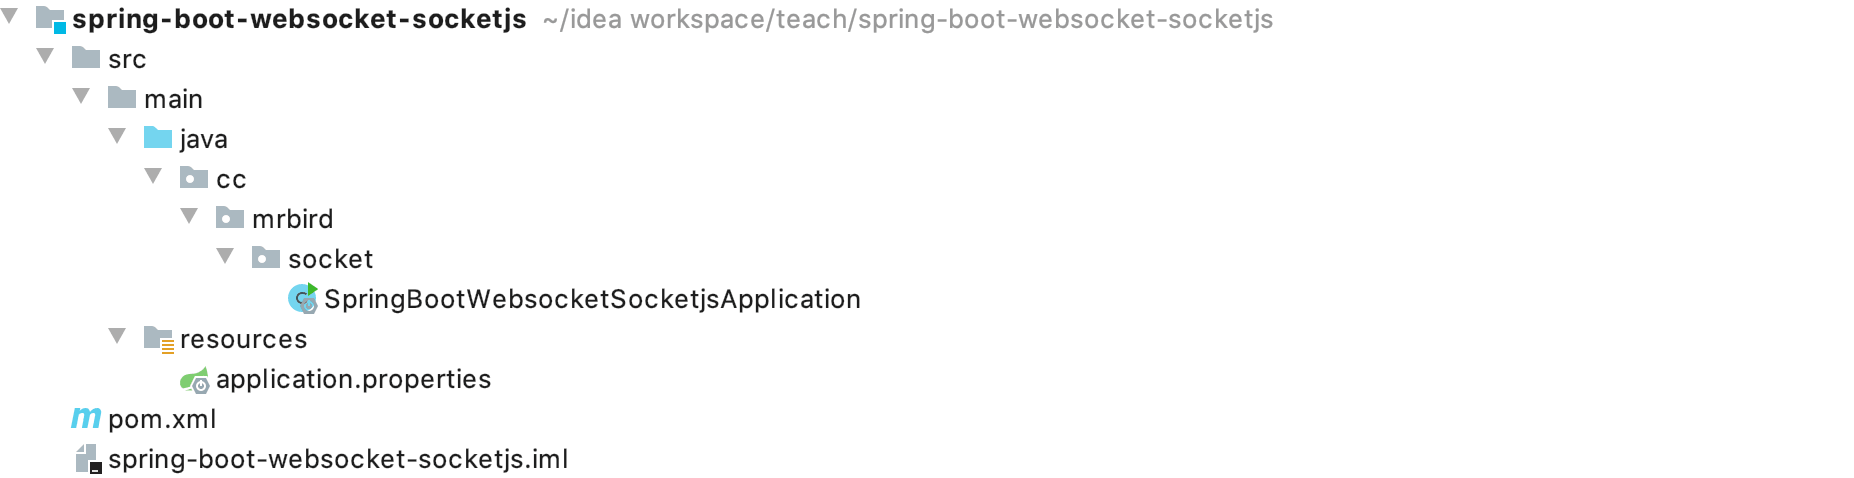
新建一个Spring Boot项目,artifactId为spring-boot-websocket-socketjs,项目结构如下图所示:

QQ20200316-183958@2x

项目的pom内容如下:

1
2
3
4
5
6
7
8
9
10
11
12
13
14
15
16
17
18
19
20
21
22
23
24
25
26
27
28
29
30
31
32
33
34
35
36
37
38
39
40
<?xml version="1.0" encoding="UTF-8"?>
<project xmlns="http://maven.apache.org/POM/4.0.0" xmlns:xsi="http://www.w3.org/2001/XMLSchema-instance"
xsi:schemaLocation="http://maven.apache.org/POM/4.0.0 https://maven.apache.org/xsd/maven-4.0.0.xsd">
<modelVersion>4.0.0</modelVersion>
<parent>
<groupId>org.springframework.boot</groupId>
<artifactId>spring-boot-starter-parent</artifactId>
<version>2.2.5.RELEASE</version>
<relativePath/> <!-- lookup parent from repository -->
</parent>
<groupId>cc.mrbird</groupId>
<artifactId>spring-boot-websocket-socketjs</artifactId>
<version>0.0.1-SNAPSHOT</version>
<name>spring-boot-websocket-socketjs</name>
<description>Demo project for Spring Boot</description>

<properties>
<java.version>1.8</java.version>
</properties>

<dependencies>
<dependency>
<groupId>org.springframework.boot</groupId>
<artifactId>spring-boot-starter-web</artifactId>
</dependency>
<dependency>
<groupId>org.springframework.boot</groupId>
<artifactId>spring-boot-starter-websocket</artifactId>
</dependency>
</dependencies>

<build>
<plugins>
<plugin>
<groupId>org.springframework.boot</groupId>
<artifactId>spring-boot-maven-plugin</artifactId>
</plugin>
</plugins>
</build>
</project>

引入了spring-boot-starter-websocket和spring-boot-starter-web依赖。

构建服务端

在cc.mrbird.socket目录下新建handler包,然后在该包下新建MyStringWebSocketHandler继承TextWebSocketHandler

1
2
3
4
5
6
7
8
9
10
11
12
13
14
15
16
17
18
19
20
21
22
23
24
25
26
27
28
29
30
31
32
33
34
35
36
37
38
39
40
41
42
43
@Component
public class MyStringWebSocketHandler extends TextWebSocketHandler {

private Logger log = LoggerFactory.getLogger(this.getClass());

@Override
public void afterConnectionEstablished(WebSocketSession session) {
log.info("和客户端建立连接");
}

@Override
public void handleTransportError(WebSocketSession session, Throwable exception) throws Exception {
session.close(CloseStatus.SERVER_ERROR);
log.error("连接异常", exception);
}

@Override
public void afterConnectionClosed(WebSocketSession session, CloseStatus status) throws Exception {
super.afterConnectionClosed(session, status);
log.info("和客户端断开连接");
}

@Override
protected void handleTextMessage(WebSocketSession session, TextMessage message) throws Exception {
// 获取到客户端发送过来的消息
String receiveMessage = message.getPayload();
log.info(receiveMessage);
// 发送消息给客户端
session.sendMessage(new TextMessage(fakeAi(receiveMessage)));
// 关闭连接
// session.close(CloseStatus.NORMAL);
}

private static String fakeAi(String input) {
if (input == null || "".equals(input)) {
return "你说什么?没听清︎";
}
return input.replace('你', '我')
.replace("吗", "")
.replace('?', '!')
.replace('?', '!');
}
}

该类重写了父类AbstractWebSocketHandler的四个方法:

QQ20200316-185332@2x

  • afterConnectionEstablished,和客户端链接成功的时候触发该方法;

  • handleTransportError,和客户端连接失败的时候触发该方法;

  • afterConnectionClosed,和客户端断开连接的时候触发该方法;

  • handleTextMessage,和客户端建立连接后,处理客户端发送的请求。

WebSocketSession对象代表每个客户端会话,包含许多实用方法:
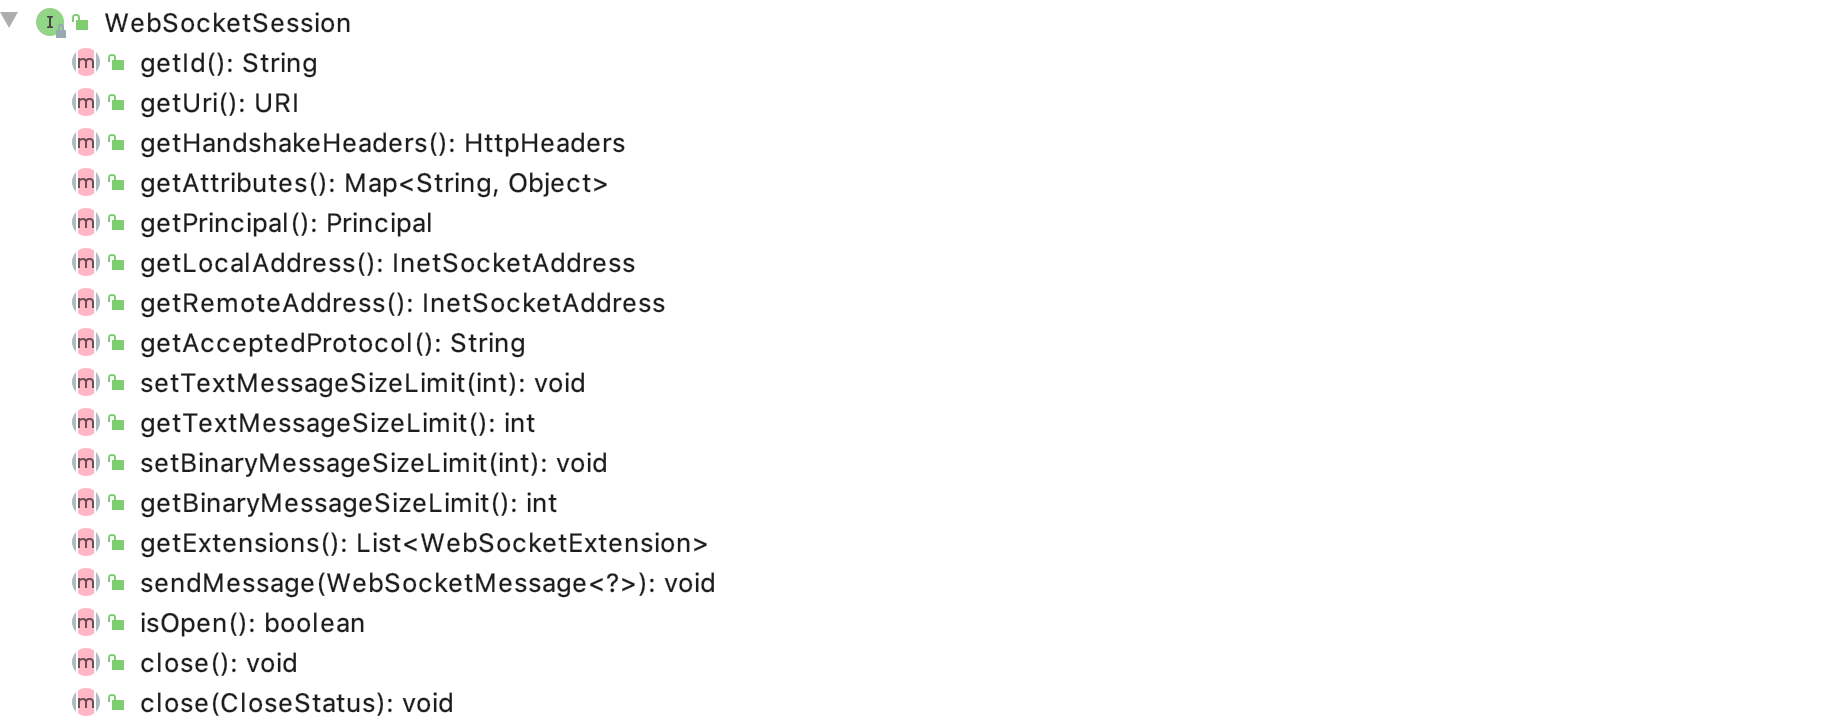
QQ20200316-185851@2x

方法见名知意,就不赘述了。

此外,因为我们的目的是实现和客户端的通信,并且内容为文本内容,所以我们继承的是TextWebSocketHandler;如果传输的是二进制内容,则可以继承BinaryWebSocketHandler,更多信息可以自行查看WebSocketHandler的子类。

接着在cc.mrbird.socket目录下新建configure包,然后在该包下新建WebSocketServerConfigure配置类:

1
2
3
4
5
6
7
8
9
10
11
12
@Configuration
@EnableWebSocket
public class WebSocketServerConfigure implements WebSocketConfigurer {

@Autowired
private MyStringWebSocketHandler myStringWebSocketHandler;

@Override
public void registerWebSocketHandlers(WebSocketHandlerRegistry registry) {
registry.addHandler(myStringWebSocketHandler, "/connect").withSockJS();
}
}

@EnableWebSocket用于开启WebSocket相关功能,我们注入了上面创建的MyStringWebSocketHandler,并将其注册到了WebSocketHandlerRegistry

上面代码的含义是,当客户端通过/connecturl和服务端连接通信时,使用MyStringWebSocketHandler处理会话。withSockJS的含义是,通信的客户端是通过SockJS实现的,下面会介绍到。

构建客户端

SockJS是一个JS插件,用于构建WebSocket,兼容性好。

在resources目录下新建static包,然后在该包下新建client.html:

1
2
3
4
5
6
7
8
9
10
11
12
13
14
15
16
17
18
19
20
21
22
23
24
25
26
27
28
29
30
31
32
33
34
35
36
37
38
39
40
41
42
43
44
45
46
47
48
49
50
51
52
53
54
55
56
57
58
59
60
61
62
63
64
65
66
67
68
69
70
71
72
73
74
75
76
77
78
79
80
81
82
83
84
85
86
87
88
89
90
91
92
93
94
95
96
97
98
99
100
101
102
103
104
105
106
<!DOCTYPE html>
<html lang="en">
<head>
<meta charset="UTF-8">
<title>WebSocket客户端</title>
<script src="https://cdn.bootcss.com/sockjs-client/0.3.4/sockjs.min.js"></script>
<link href="https://cdn.bootcss.com/twitter-bootstrap/4.4.1/css/bootstrap.min.css" rel="stylesheet">
</head>
<body>
<style>
.jumbotron {
width: 100%;
}

#text {
height: 3rem;
font-size: 1rem;
line-height: 3rem;
margin: 1rem;
}

.btn {
margin-right: 5px;
}

#connect {
margin-left: 1rem;
}

#log {
margin: 1rem 0 0 1rem;
}

</style>
<div class="container">
<div class="row">
<div class="jumbotron">
<input type="text" placeholder="请输入你想传输的内容" id="text" class="col-lg-12"/>
<input type="button" value="连接" class="btn btn-info" id="connect" onclick="connect()"/>
<input type="button" value="发送" class="btn btn-success" id="sent" disabled="disabled" onclick="sent()"/>
<input type="button" value="断开" class="btn btn-danger" id="disconnect" disabled="disabled"
onclick="disconnect()"/>

<div id="log">
<p>聊天记录:</p>
</div>
</div>
</div>
</div>
<script type="text/javascript">
let text = document.querySelector('#text');
let connectBtn = document.querySelector("#connect");
let sentBtn = document.querySelector("#sent");
let disconnectBtn = document.querySelector("#disconnect");
let logDiv = document.querySelector("#log");

let ws = null;

function connect() {
let targetUri = "/connect";
ws = new SockJS(targetUri);
ws.onopen = function () {
setConnected(true);
log('和服务端连接成功!');
};
ws.onmessage = function (event) {
log('服务端说:' + event.data);
};
ws.onclose = function () {
setConnected(false);
log('和服务端断开连接!')
}
}

function sent() {
if (ws != null) {
ws.send(text.value);
log('客户端说:' + text.value);
} else {
log('请先建立连接!')
}
}

function disconnect() {
if (ws != null) {
ws.close();
ws = null;
}
setConnected(false);
}

function log(value) {
let content = document.createElement('p');
content.innerHTML = value;
logDiv.appendChild(content);
text.value = '';
}

function setConnected(connected) {
connectBtn.disabled = connected;
disconnectBtn.disabled = !connected;
sentBtn.disabled = !connected;
}
</script>
</body>
</html>

html,css那些都不重要,重要的是我们引入了SockJS库。在connect()方法中,我们通过new SockJS(/connect)和上面的服务端建立了Socket通信。SockJS对象包含几个常用的实用方法:

  • onopen,和服务端讲了连接后的回调方法;

  • onmessage,服务端返回消息时的回调方法;

  • onclose,和服务端断开连接的回调方法;

  • send,发送消息给服务端;

  • close,断开和服务端的连接。

上面的JS较为简单,其他逻辑自己看看吧。
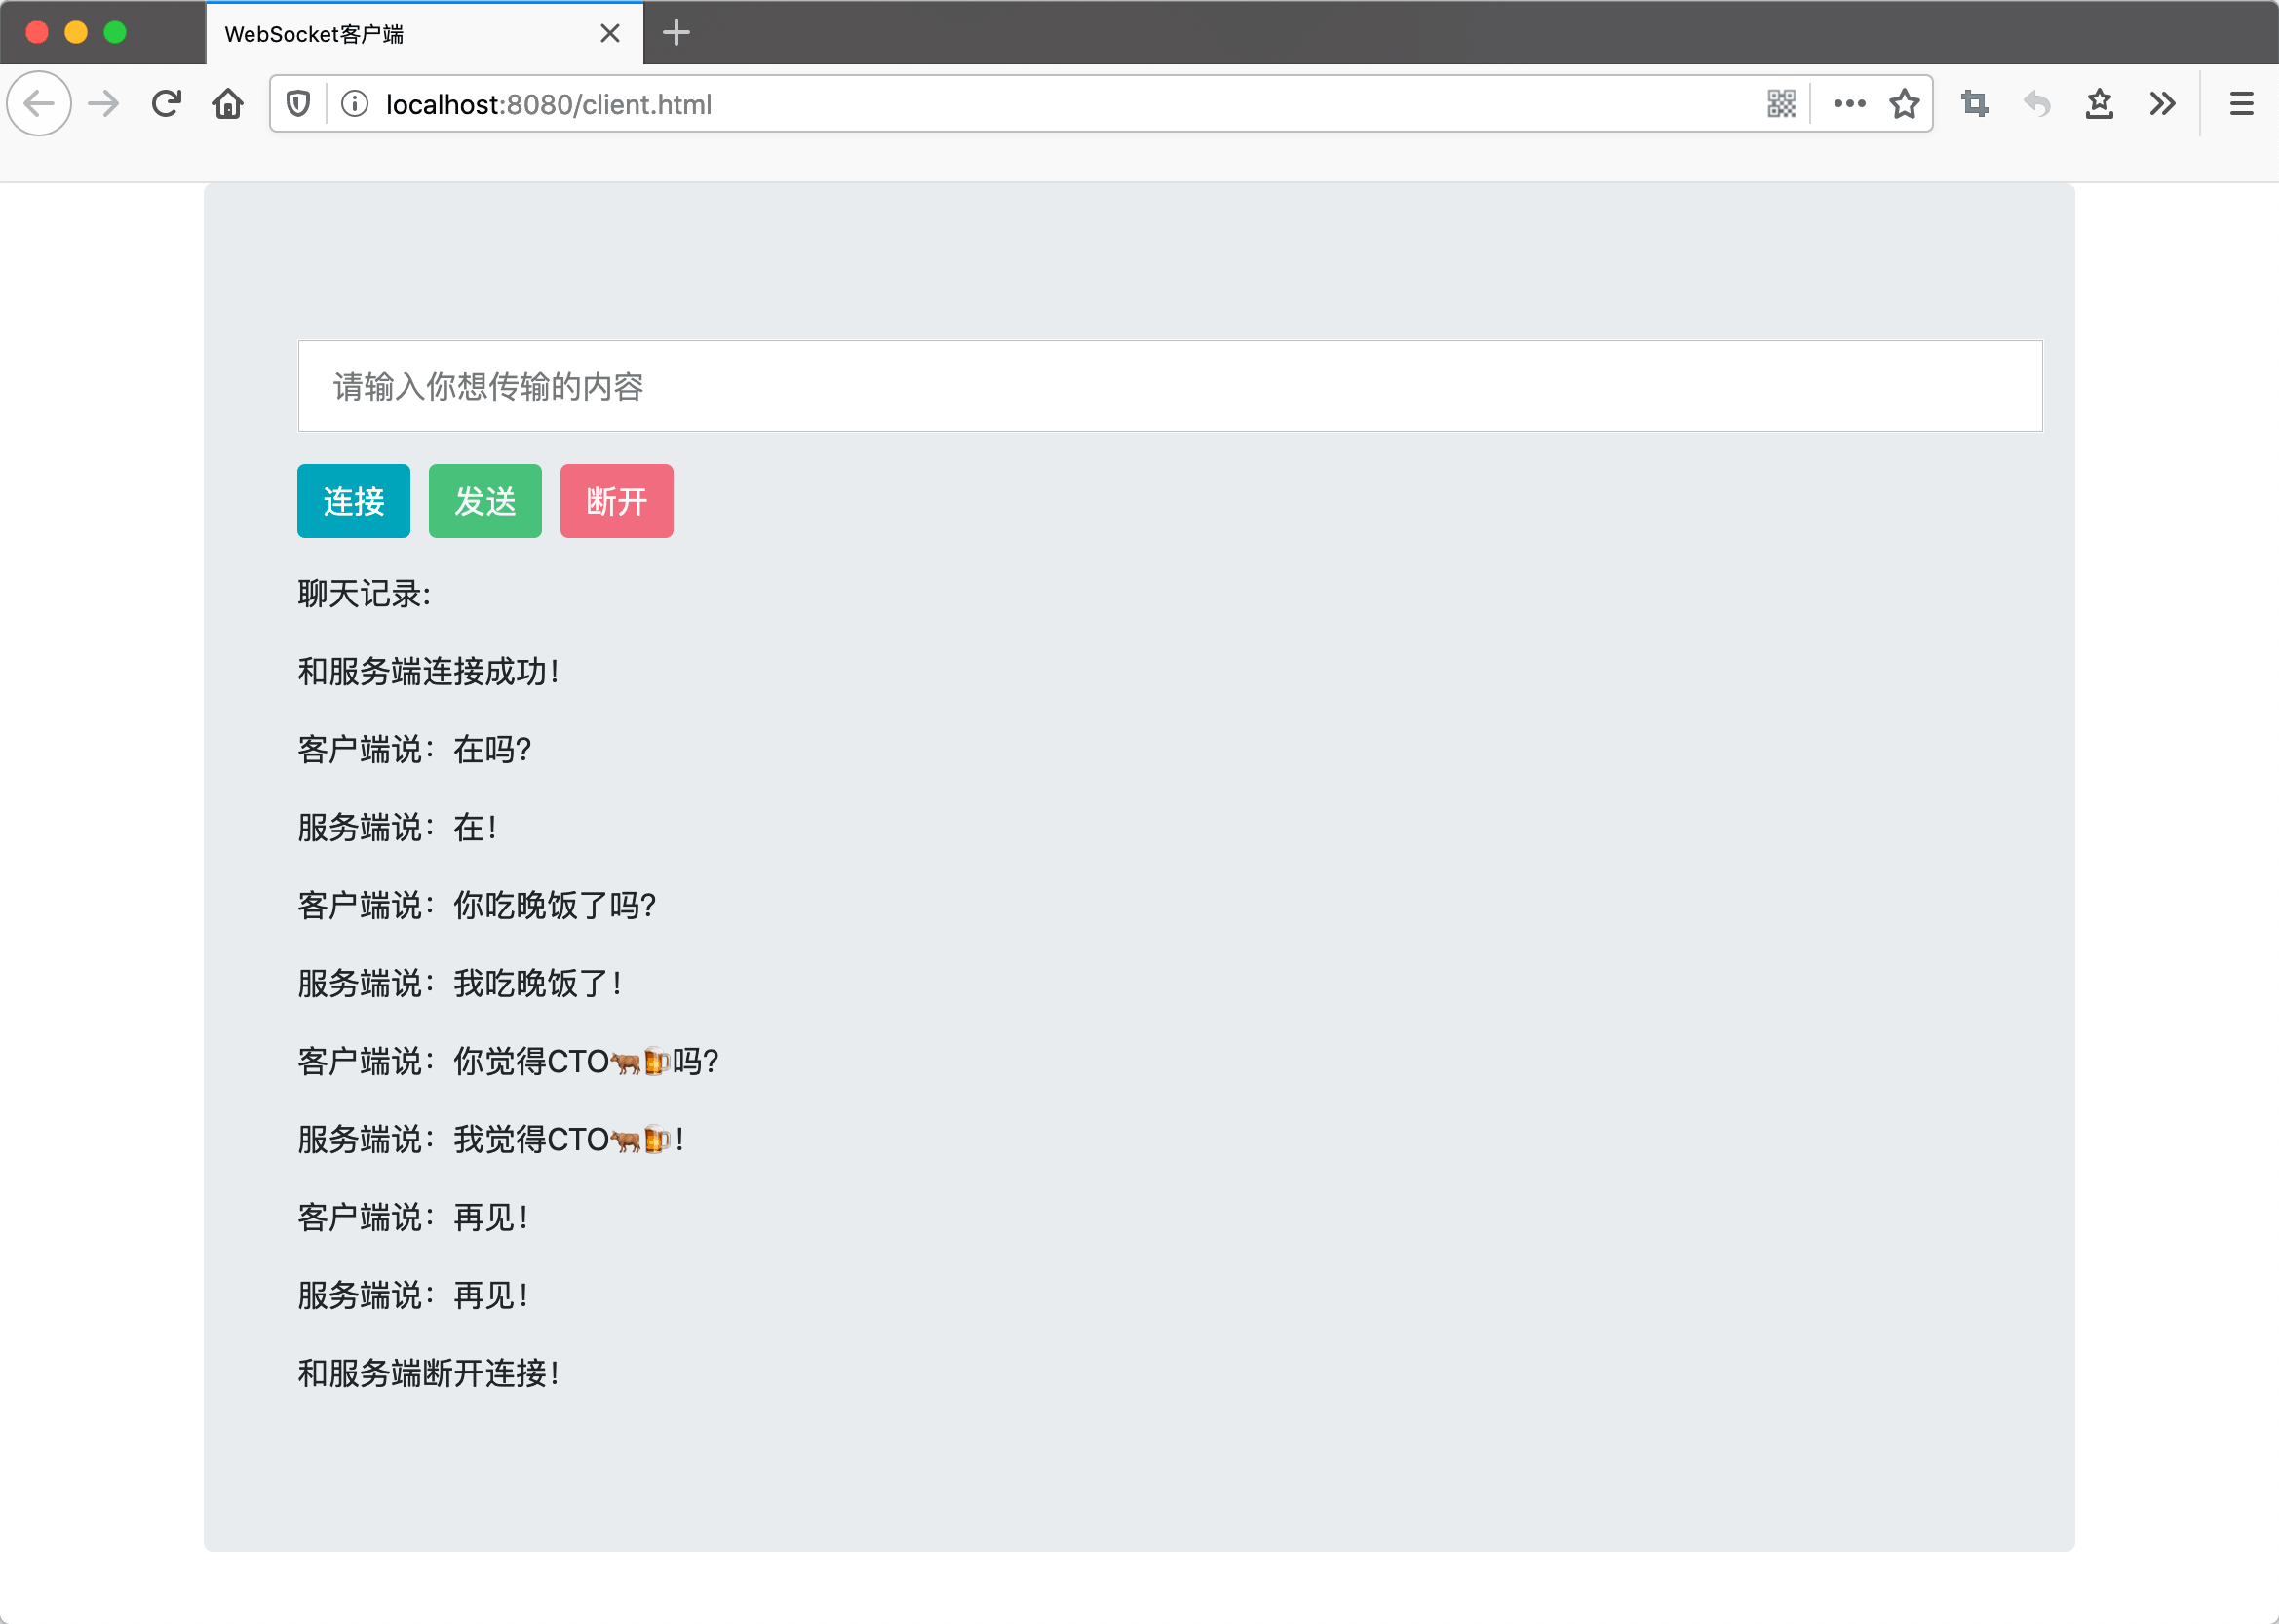
通信测试

启动项目,浏览器访问:http://localhost:8080/client.html

QQ20200316-191957@2x

源码连接:https://github.com/wuyouzhuguli/SpringAll/tree/master/76.spring-boot-websocket-socketjs

请作者喝瓶肥宅水🥤

0