在Spring Boot中集成Shiro进行用户的认证过程主要可以归纳为以下三点:
1、定义一个ShiroConfig,然后配置SecurityManager Bean,SecurityManager为Shiro的安全管理器,管理着所有Subject;
2、在ShiroConfig中配置ShiroFilterFactoryBean,其为Shiro过滤器工厂类,依赖于SecurityManager;
3、自定义Realm实现,Realm包含doGetAuthorizationInfo()和doGetAuthenticationInfo()方法,因为本文只涉及用户认证,所以只实现doGetAuthenticationInfo()方法。
引入依赖
首先可根据文章《开启Spring Boot》搭建一个Spring Boot Web程序,然后引入Shiro、MyBatis、数据库和thymeleaf依赖:
1 | <!-- MyBatis --> |
ShiroConfig
定义一个Shiro配置类,名称为ShiroConfig:
1 |
|
需要注意的是filterChain基于短路机制,即最先匹配原则,如:
1 | /user/**=anon |
其中anon、authc等为Shiro为我们实现的过滤器,具体如下表所示:
| Filter Name | Class | Description |
|---|---|---|
| anon | org.apache.shiro.web.filter.authc.AnonymousFilter | 匿名拦截器,即不需要登录即可访问;一般用于静态资源过滤;示例/static/**=anon |
| authc | org.apache.shiro.web.filter.authc.FormAuthenticationFilter | 基于表单的拦截器;如/**=authc,如果没有登录会跳到相应的登录页面登录 |
| authcBasic | org.apache.shiro.web.filter.authc.BasicHttpAuthenticationFilter | Basic HTTP身份验证拦截器 |
| logout | org.apache.shiro.web.filter.authc.LogoutFilter | 退出拦截器,主要属性:redirectUrl:退出成功后重定向的地址(/),示例/logout=logout |
| noSessionCreation | org.apache.shiro.web.filter.session.NoSessionCreationFilter | 不创建会话拦截器,调用subject.getSession(false)不会有什么问题,但是如果subject.getSession(true)将抛出DisabledSessionException异常 |
| perms | org.apache.shiro.web.filter.authz.PermissionsAuthorizationFilter | 权限授权拦截器,验证用户是否拥有所有权限;属性和roles一样;示例/user/**=perms["user:create"] |
| port | org.apache.shiro.web.filter.authz.PortFilter | 端口拦截器,主要属性port(80):可以通过的端口;示例/test= port[80],如果用户访问该页面是非80,将自动将请求端口改为80并重定向到该80端口,其他路径/参数等都一样 |
| rest | org.apache.shiro.web.filter.authz.HttpMethodPermissionFilter | rest风格拦截器,自动根据请求方法构建权限字符串;示例/users=rest[user],会自动拼出user:read,user:create,user:update,user:delete权限字符串进行权限匹配(所有都得匹配,isPermittedAll) |
| roles | org.apache.shiro.web.filter.authz.RolesAuthorizationFilter | 角色授权拦截器,验证用户是否拥有所有角色;示例/admin/**=roles[admin] |
| ssl | org.apache.shiro.web.filter.authz.SslFilter | SSL拦截器,只有请求协议是https才能通过;否则自动跳转会https端口443;其他和port拦截器一样; |
| user | org.apache.shiro.web.filter.authc.UserFilter | 用户拦截器,用户已经身份验证/记住我登录的都可;示例/**=user |
配置完ShiroConfig后,接下来对Realm进行实现,然后注入到SecurityManager中。
Realm
自定义Realm实现只需继承AuthorizingRealm类,然后实现doGetAuthorizationInfo()和doGetAuthenticationInfo()方法即可。这两个方法名乍看有点像,authorization发音[ˌɔ:θəraɪˈzeɪʃn],为授权,批准的意思,即获取用户的角色和权限等信息;authentication发音[ɔ:ˌθentɪ’keɪʃn],认证,身份验证的意思,即登录时验证用户的合法性,比如验证用户名和密码。
1 | public class ShiroRealm extends AuthorizingRealm { |
因为本节只讲述用户认证,所以doGetAuthorizationInfo()方法先不进行实现。
其中UnknownAccountException等异常为Shiro自带异常,Shiro具有丰富的运行时AuthenticationException层次结构,可以准确指出尝试失败的原因。你可以包装在一个try/catch块,并捕捉任何你希望的异常,并作出相应的反应。例如:
1 | try { |
虽然我们可以准确的获取异常信息,并根据这些信息给用户提示具体错误,但最安全的做法是在登录失败时仅向用户显示通用错误提示信息,例如“用户名或密码错误”。这样可以防止数据库被恶意扫描。
在Realm中UserMapper为Dao层,标准的做法应该还有Service层,但这里为了方便就不再定义Service层了。接下来编写和数据库打交道的Dao层。
数据层
首先创建一张用户表,用于存储用户的基本信息(基于Oracle 11g):
1 | -- ---------------------------- |
数据源的配置这里就不贴出来了,具体可参考源码,或者参考https://mrbird.cc/Spring-Boot%E4%B8%AD%E4%BD%BF%E7%94%A8Mybatis.html。
库表对应的实体类:
1 | public class User implements Serializable{ |
定义接口UserMapper:
1 |
|
xml实现:
1 |
|
数据层准备完了,接下来编写login.html和index.html页面。
页面准备
编写登录页面login.html:
1 |
|
主页index.html:
1 |
|
页面准备完毕,接下来编写LoginController。
Controller
LoginController代码如下:
1 |
|
登录成功后,根据之前在ShiroConfig中的配置shiroFilterFactoryBean.setSuccessUrl("/index"),页面会自动访问/index路径。
测试
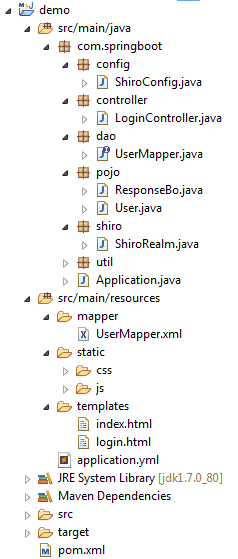
最终项目目录如下图所示:
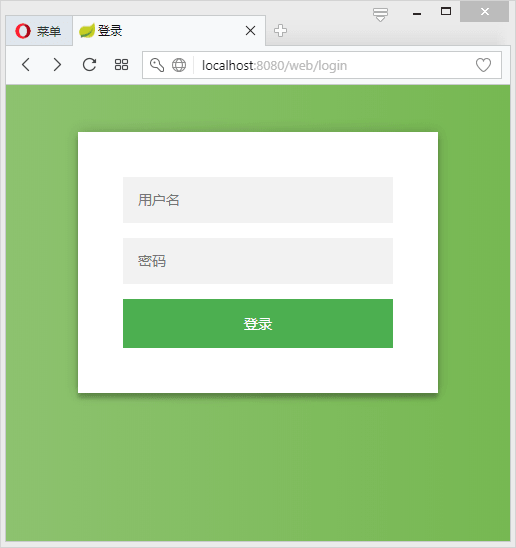
启动项目,分别访问:
可发现页面都被重定向到http://localhost:8080/web/login:
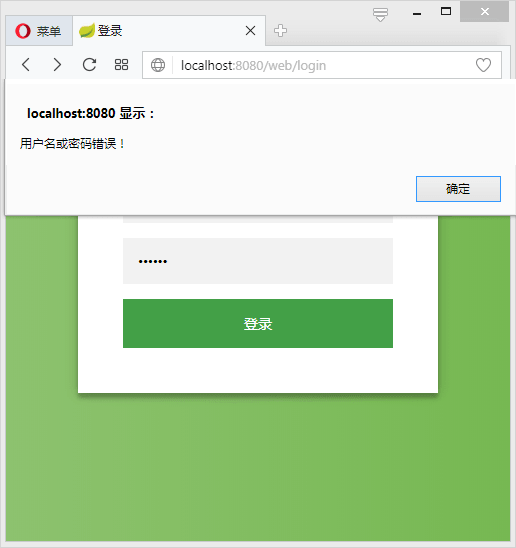
当输入错误的用户信息时:
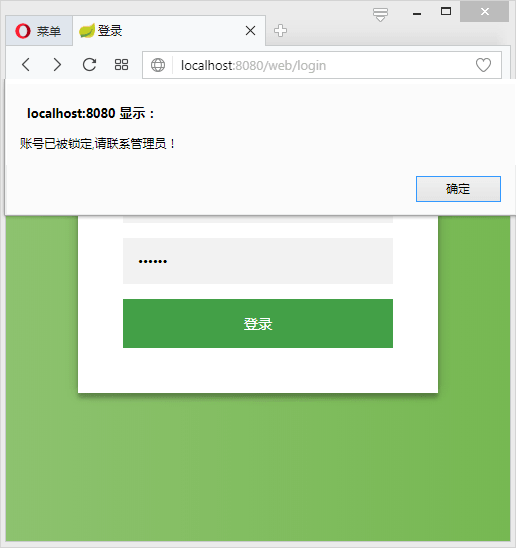
用test的账户登录(test账户的status为0,已被锁定):
当输入正确的用户名密码时候:
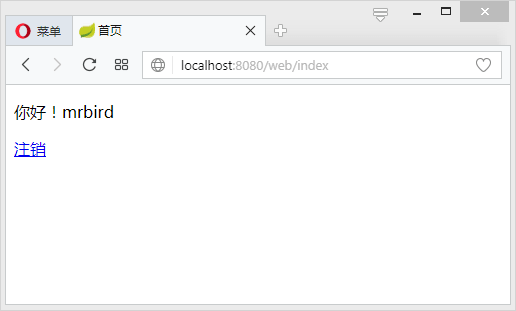
点击注销连接,根据ShiroConfig的配置filterChainDefinitionMap.put("/logout", "logout"),Shiro会自动帮我们注销用户信息,并重定向到/路径。
Spring Boot集成Shiro进行用户认证到此就结束了,源码参见https://github.com/wuyouzhuguli/Spring-Boot-Demos/tree/master/11.Spring-Boot-Shiro-Authentication

