Spring Boot整合Swagger2构建RESTful API

Swagger是一款可以快速生成符合RESTful风格API并进行在线调试的插件。本文将介绍如何在Spring Boot中整合Swagger。

在此之前,我们先聊聊什么是REST。REST实际上为Representational State Transfer的缩写,翻译为“表现层状态转化” 。如果一个架构符合REST 原则,就称它为RESTful架构。

实际上,“表现层状态转化”省略了主语,完整的说应该是“资源表现层状态转化”。什么是资源(Resource)?资源指的是网络中信息的表现形式,比如一段文本,一首歌,一个视频文件等等;什么是表现层(Reresentational)?表现层即资源的展现在你面前的形式,比如文本可以是JSON格式的,也可以是XML形式的,甚至为二进制形式的。图片可以是gif,也可以是PNG;什么是状态转换(State Transfer)?用户可使用URL通过HTTP协议来获取各种资源,HTTP协议包含了一些操作资源的方法,比如:GET 用来获取资源, POST 用来新建资源 , PUT 用来更新资源, DELETE 用来删除资源, PATCH 用来更新资源的部分属性。通过这些HTTP协议的方法来操作资源的过程即为状态转换。

下面对比下传统URL请求和RESTful风格请求的区别:

描述传统请求方法RESTful请求方法
查询/user/query?name=mrbirdGET/user?name=mrbirdGET
详情/user/getInfo?id=1GET/user/1GET
创建/user/create?name=mrbirdPOST/userPOST
修改/user/update?name=mrbird&id=1POST/user/1PUT
删除/user/delete?id=1GET/user/1DELETE

从上面这张表,我们大致可以总结下传统请求和RESTful请求的几个区别:

  1. 传统请求通过URL来描述行为,如create,delete等;RESTful请求通过URL来描述资源。

  2. RESTful请求通过HTTP请求的方法来描述行为,比如DELETE,POST,PUT等,并且使用HTTP状态码来表示不同的结果。

  3. RESTful请求通过JSON来交换数据。

RESTful只是一种风格,并不是一种强制性的标准。

引入Swagger依赖

本文使用的Swagger版本为2.6.1:

1
2
3
4
5
6
7
8
9
10
<dependency>
<groupId>io.springfox</groupId>
<artifactId>springfox-swagger2</artifactId>
<version>2.6.1</version>
</dependency>
<dependency>
<groupId>io.springfox</groupId>
<artifactId>springfox-swagger-ui</artifactId>
<version>2.6.1</version>
</dependency>

配置SwaggerConfig

使用JavaConfig的形式配置Swagger:

1
2
3
4
5
6
7
8
9
10
11
12
13
14
15
16
17
18
19
20
21
22
23
24
25
26
27
28
29
30
31
32
import org.springframework.context.annotation.Bean;
import org.springframework.context.annotation.Configuration;

import springfox.documentation.builders.ApiInfoBuilder;
import springfox.documentation.builders.PathSelectors;
import springfox.documentation.builders.RequestHandlerSelectors;
import springfox.documentation.service.ApiInfo;
import springfox.documentation.service.Contact;
import springfox.documentation.spi.DocumentationType;
import springfox.documentation.spring.web.plugins.Docket;
import springfox.documentation.swagger2.annotations.EnableSwagger2;

@Configuration
@EnableSwagger2
public class SwaggerConfig {
@Bean
public Docket buildDocket() {
return new Docket(DocumentationType.SWAGGER_2)
.apiInfo(buildApiInf())
.select()
.apis(RequestHandlerSelectors.basePackage("com.example.demo.controller"))
.paths(PathSelectors.any())
.build();
}
private ApiInfo buildApiInf() {
return new ApiInfoBuilder()
.title("系统RESTful API文档")
.contact(new Contact("mrbird", "https://mrbird.cc", "852252810@qq.com"))
.version("1.0")
.build();
}
}

在配置类中添加@EnableSwagger2注解来启用Swagger2,apis()定义了扫描的包路径。配置较为简单,其他不做过多说明。

Swagger常用注解

  • @Api:修饰整个类,描述Controller的作用;

  • @ApiOperation:描述一个类的一个方法,或者说一个接口;

  • @ApiParam:单个参数描述;

  • @ApiModel:用对象来接收参数;

  • @ApiProperty:用对象接收参数时,描述对象的一个字段;

  • @ApiResponse:HTTP响应其中1个描述;

  • @ApiResponses:HTTP响应整体描述;

  • @ApiIgnore:使用该注解忽略这个API;

  • @ApiError :发生错误返回的信息;

  • @ApiImplicitParam:一个请求参数;

  • @ApiImplicitParams:多个请求参数。

编写RESTful API接口

Spring Boot中包含了一些注解,对应于HTTP协议中的方法:

  • @GetMapping对应HTTP中的GET方法;

  • @PostMapping对应HTTP中的POST方法;

  • @PutMapping对应HTTP中的PUT方法;

  • @DeleteMapping对应HTTP中的DELETE方法;

  • @PatchMapping对应HTTP中的PATCH方法。

我们使用这些注解来编写一个RESTful测试Controller:

1
2
3
4
5
6
7
8
9
10
11
12
13
14
15
16
17
18
19
20
21
22
23
24
25
26
27
28
29
30
31
32
33
34
35
36
37
38
39
40
41
42
43
44
45
46
47
48
49
50
51
52
53
54
55
56
57
58
59
60
61
62
63
64
65
66
67
68
69
70
71
72
73
74
75
76
77
78
79
80
81
82
83
84
85
86
87
88
89
90
91
92
import java.util.ArrayList;
import java.util.HashMap;
import java.util.List;
import java.util.Map;

import org.springframework.stereotype.Controller;
import org.springframework.web.bind.annotation.DeleteMapping;
import org.springframework.web.bind.annotation.GetMapping;
import org.springframework.web.bind.annotation.PathVariable;
import org.springframework.web.bind.annotation.PostMapping;
import org.springframework.web.bind.annotation.PutMapping;
import org.springframework.web.bind.annotation.RequestBody;
import org.springframework.web.bind.annotation.RequestMapping;
import org.springframework.web.bind.annotation.ResponseBody;

import com.example.demo.domain.User;

import io.swagger.annotations.Api;
import io.swagger.annotations.ApiImplicitParam;
import io.swagger.annotations.ApiImplicitParams;
import io.swagger.annotations.ApiOperation;
import springfox.documentation.annotations.ApiIgnore;

@Api(value = "用户Controller")
@Controller
@RequestMapping("user")
public class UserController {

@ApiIgnore
@GetMapping("hello")
public @ResponseBody String hello() {
return "hello";
}

@ApiOperation(value = "获取用户信息", notes = "根据用户id获取用户信息")
@ApiImplicitParam(name = "id", value = "用户id", required = true, dataType = "Long", paramType = "path")
@GetMapping("/{id}")
public @ResponseBody User getUserById(@PathVariable(value = "id") Long id) {
User user = new User();
user.setId(id);
user.setName("mrbird");
user.setAge(25);
return user;
}

@ApiOperation(value = "获取用户列表", notes = "获取用户列表")
@GetMapping("/list")
public @ResponseBody List<User> getUserList() {
List<User> list = new ArrayList<>();
User user1 = new User();
user1.setId(1l);
user1.setName("mrbird");
user1.setAge(25);
list.add(user1);
User user2 = new User();
user2.setId(2l);
user2.setName("scott");
user2.setAge(29);
list.add(user2);
return list;
}

@ApiOperation(value = "新增用户", notes = "根据用户实体创建用户")
@ApiImplicitParam(name = "user", value = "用户实体", required = true, dataType = "User")
@PostMapping("/add")
public @ResponseBody Map<String, Object> addUser(@RequestBody User user) {
Map<String, Object> map = new HashMap<>();
map.put("result", "success");
return map;
}

@ApiOperation(value = "删除用户", notes = "根据用户id删除用户")
@ApiImplicitParam(name = "id", value = "用户id", required = true, dataType = "Long", paramType = "path")
@DeleteMapping("/{id}")
public @ResponseBody Map<String, Object> deleteUser(@PathVariable(value = "id") Long id) {
Map<String, Object> map = new HashMap<>();
map.put("result", "success");
return map;
}

@ApiOperation(value = "更新用户", notes = "根据用户id更新用户")
@ApiImplicitParams({
@ApiImplicitParam(name = "id", value = "用户id", required = true, dataType = "Long", paramType = "path"),
@ApiImplicitParam(name = "user", value = "用户实体", required = true, dataType = "User") })
@PutMapping("/{id}")
public @ResponseBody Map<String, Object> updateUser(@PathVariable(value = "id") Long id, @RequestBody User user) {
Map<String, Object> map = new HashMap<>();
map.put("result", "success");
return map;
}

}

对于不需要生成API的方法或者类,只需要在上面添加@ApiIgnore注解即可。

启动&测试

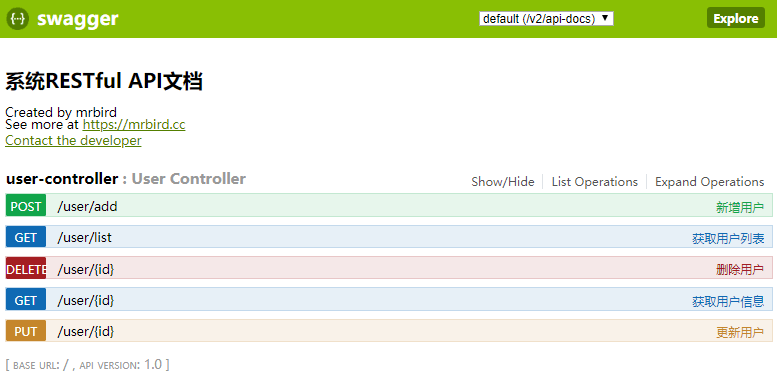
启动项目,访问http://localhost:8080/swagger-ui.html即可看到Swagger给我们生成的API页面:

QQ截图20180503181941.png

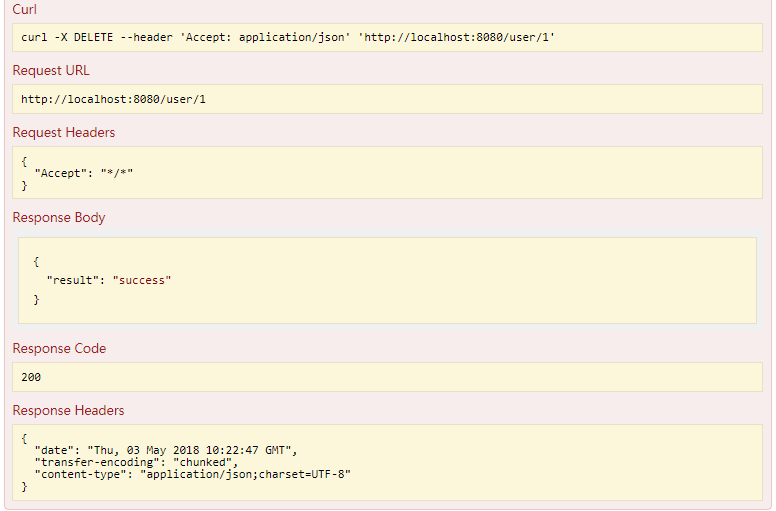
点击接口下的“Try it out”Swagger会用curl命令发送请求,并且返回响应信息,如下所示:

QQ截图20180503182415.png

源码链接:https://github.com/wuyouzhuguli/Spring-Boot-Demos/tree/master/20.Spring-Boot-Swagger2

请作者喝瓶肥宅水🥤

0