在Shiro中加入缓存可以使权限相关操作尽可能快,避免频繁访问数据库获取权限信息,因为对于一个用户来说,其权限在短时间内基本是不会变化的。Shiro提供了Cache的抽象,其并没有直接提供相应的实现,因为这已经超出了一个安全框架的范围。在Shiro中可以集成常用的缓存实现,这里介绍基于Redis和Ehcache缓存的实现。
在《Spring-Boot-shiro权限控制》中,当用户访问”获取用户信息”、”新增用户”和”删除用户”的时候,后台输出了三次打印信息,如下所示:
1 | 用户mrbird获取权限-----ShiroRealm.doGetAuthorizationInfo |
说明在这三次访问中,Shiro都会从数据库中获取用户的权限信息,通过Druid数据源SQL监控后台也可以证实这一点:
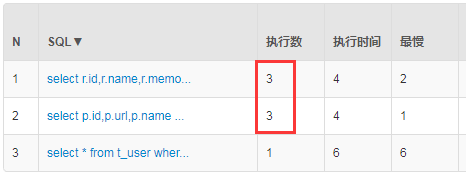
这对数据库来说是没必要的消耗。接下来使用缓存来解决这个问题。
Redis
引入Redis依赖
网络上已经有关于Shiro集成Redis的实现,我们引入即可:
1 | <!-- shiro-redis --> |
配置Redis
我们在application.yml配置文件中加入Redis配置:
1 | spring: |
接着在ShiroConfig中配置Redis:
1 | public RedisManager redisManager() { |
上面代码配置了RedisManager,并将其注入到了RedisCacheManager中,最后在SecurityManager中加入RedisCacheManager:
1 |
|
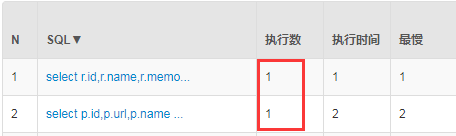
配置完毕启动项目,分别访问访问”获取用户信息”、”新增用户”和”删除用户”,可发现后台只打印一次获取权限信息:
1 | 用户mrbird获取权限-----ShiroRealm.doGetAuthorizationInfo |
查看Druid数据源SQL监控:
源码:https://github.com/wuyouzhuguli/Spring-Boot-Demos/tree/master/14.Spring-Boot-Shiro-Redis
Ehcache
Ehcache依赖
加入Ehcache相关依赖:
1 | <!-- shiro ehcache --> |
Ehcache配置
在src/main/resource/config路径下新增一个Ehcache配置——shiro-ehcache.xml:
1 |
|
ShiroConfig配置Ehcache
接着在ShiroConfig中注入Ehcache缓存:
1 |
|
将缓存对象注入到SecurityManager中:
1 |
|
配置完毕启动项目,分别访问访问”获取用户信息”、”新增用户”和”删除用户”,可发现后台只打印一次获取权限信息:
1 | 用户mrbird获取权限-----ShiroRealm.doGetAuthorizationInfo |
查看Druid数据源SQL监控:
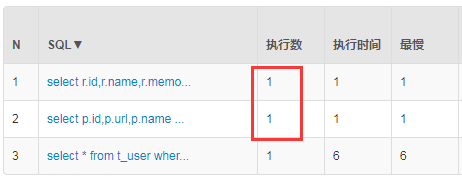
SQL只执行了一次,说明缓存成功。
源码连接:https://github.com/wuyouzhuguli/Spring-Boot-Demos/tree/master/15.Spring-Boot-Shiro-Ehcache

