回顾在Spring中配置MyBatis SqlSessionFactory的配置:
1 | <!-- mybatis 的SqlSessionFactory --> |
所以实际上在Spring Boot中配置MyBatis多数据源的关键在于创建SqlSessionFactory的时候为其分配不同的数据源。
引入依赖
先根据https://mrbird.cc/%E5%BC%80%E5%90%AFSpring-Boot.html开启一个最简单的Spring Boot应用,然后引入如下依赖:
1 | <dependency> |
多数据源配置
在Spring Boot配置文件application.yml中配置多数据源和Spring Boot JdbcTemplate配置Druid多数据源一致。
然后根据application.yml创建两个数据源配置类MysqlDatasourceConfig和OracleDatasourceConfig:
MysqlDatasourceConfig:
1 |
|
上面代码配置了一个名为mysqldatasource的数据源,对应application.yml中spring.datasource.druid.mysql前缀配置的数据库。然后创建了一个名为mysqlSqlSessionFactory的Bean,并且注入了mysqldatasource。与此同时,还分别定了两个扫描路径PACKAGE和MAPPER_LOCATION,前者为Mysql数据库对应的mapper接口地址,后者为对应的mapper xml文件路径。
@Primary标志这个Bean如果在多个同类Bean候选时,该Bean优先被考虑。多数据源配置的时候,必须要有一个主数据源,用@Primary标志该Bean。
同理,接着配置Oracle数据库对应的配置类:
OracleDatasourceConfig:
1 |
|
测试
配置完多数据源,接下来分别在com.springboot.mysqldao路径和com.springboot.oracledao路径下创建两个mapper接口:
MysqlStudentMapper:
1 | package com.springboot.mysqldao; |
OracleStudentMapper:
1 | package com.springboot.oracledao; |
接着创建mapper接口对应的实现:
在src/main/resource/mapper/mysql/路径下创建MysqlStudentMapper.xml:
1 |
|
在src/main/resource/mapper/oracle/路径下创建OracleStudentMapper.xml:
1 |
|
Service,Controller以及测试数据同Spring Boot JdbcTemplate配置Druid多数据源,这里不再赘述。
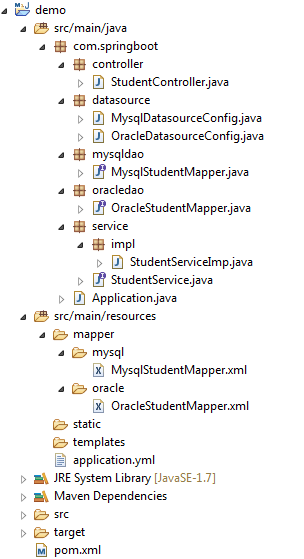
最终项目目录如下图所示:
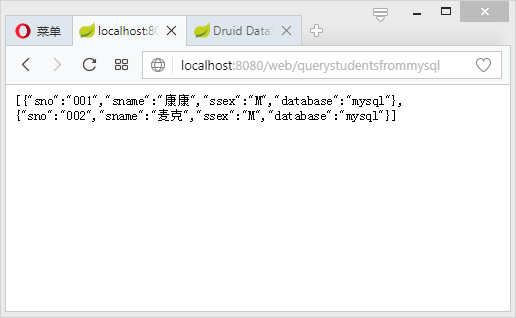
启动项目,访问:http://localhost:8080/web/querystudentsfrommysql:
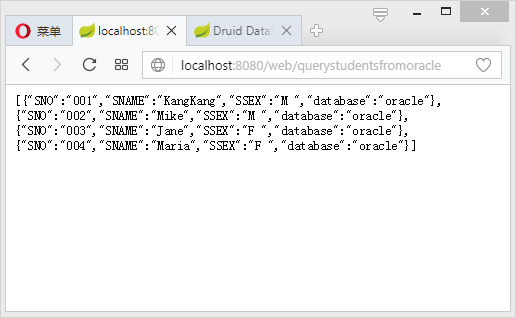
http://localhost:8080/web/querystudentsfromoracle: