搭建SpringMVC

guide

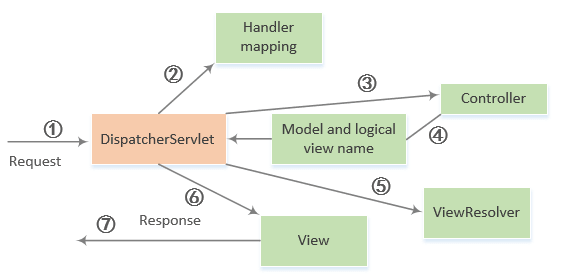
下图展示了请求在Spring MVC中的过程:

61421927-file_1487995885091_155c0.png

环境准备

使用Maven构建Spring web MVC project。

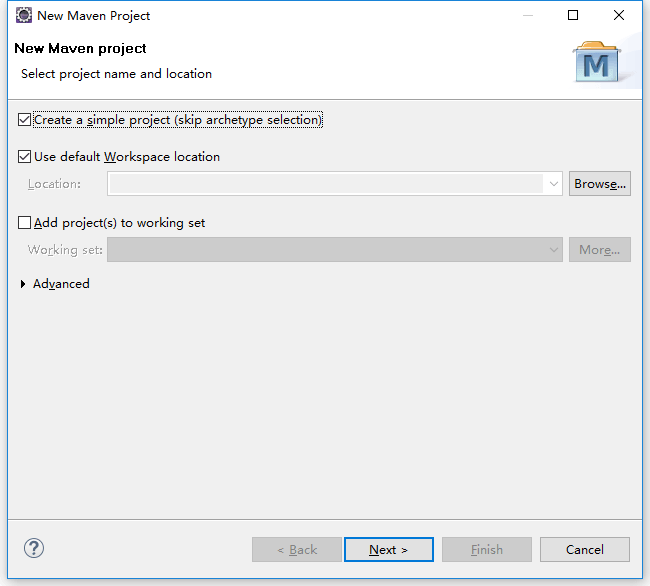
新建Maven Project(选中skip archetype selection):

54799225-file_1487995908075_78ae.png

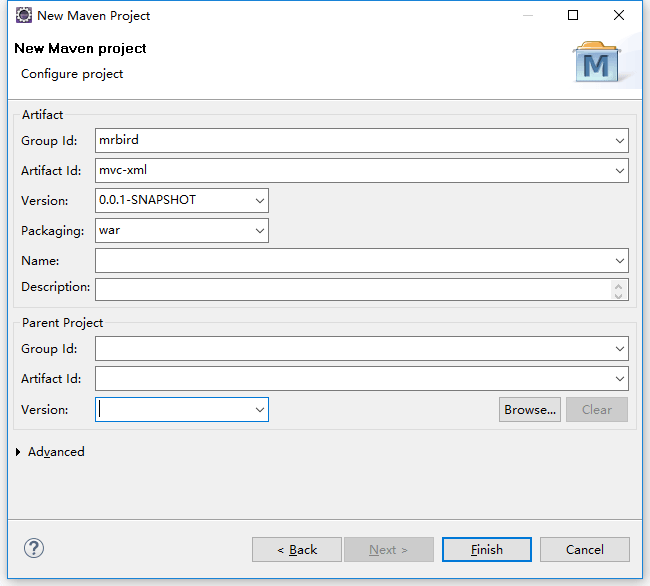
点击next,然后填写Group Id和Artifact Id,打包方式为war:

4638414-file_1487995925131_1755.png

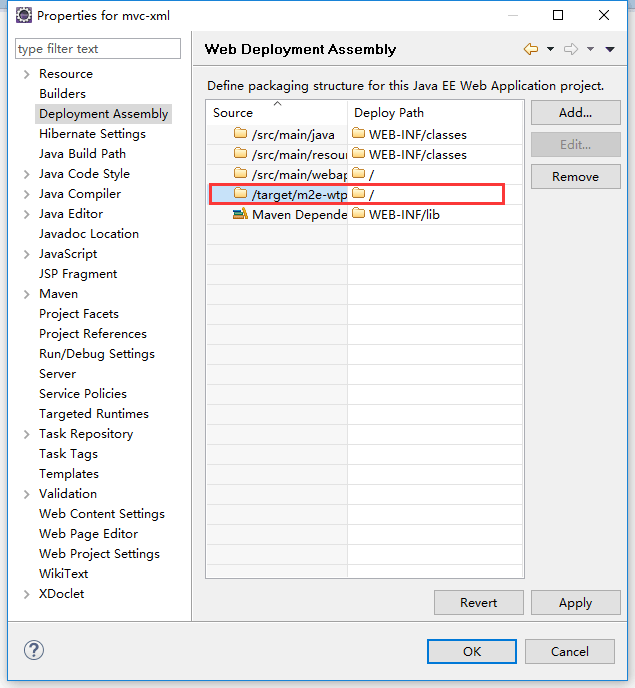
finish后,右击项目,选择properties,选中Deployment Assembly,移除选中的路径:

96972067-file_1487995947158_17c09.png

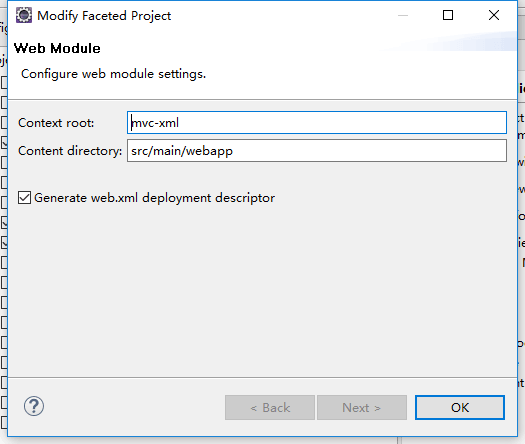
apply后选择Project Facets,勾选Dynamic Web Module,点击下方的Further configuration avaiable:

8414943-file_1487995975157_12a66.png

如下填写后确定即可:

30244108-file_1487995997301_14006.png

准备好后,在pom中引入依赖以及配置tomcat插件:

1
2
3
4
5
6
7
8
9
10
11
12
13
14
15
16
17
18
19
20
21
22
23
24
25
26
27
28
29
30
31
32
33
34
35
36
37
38
39
40
41
42
43
44
45
46
47
48
49
50
51
52
<dependencies>
<dependency>
<groupId>org.springframework</groupId>
<artifactId>spring-core</artifactId>
<version>4.3.5.RELEASE</version>
</dependency>
<dependency>
<groupId>org.springframework</groupId>
<artifactId>spring-webmvc</artifactId>
<version>4.3.5.RELEASE</version>
</dependency>
<dependency>
<groupId>org.springframework</groupId>
<artifactId>spring-context</artifactId>
<version>4.3.2.RELEASE</version>
</dependency>
<dependency>
<groupId>org.springframework</groupId>
<artifactId>spring-test</artifactId>
<version>4.3.5.RELEASE</version>
</dependency>
<dependency>
<groupId>javax.servlet</groupId>
<artifactId>javax.servlet-api</artifactId>
<version>3.1.0</version>
<scope>provided</scope>
</dependency>
<dependency>
<groupId>javax.annotation</groupId>
<artifactId>jsr250-api</artifactId>
<version>1.0</version>
</dependency>
<dependency>
<groupId>javax.inject</groupId>
<artifactId>javax.inject</artifactId>
<version>1</version>
</dependency>
</dependencies>
<build>
<plugins>
<!-- 布置到tomcat -->
<plugin>
<groupId>org.apache.tomcat.maven</groupId>
<artifactId>tomcat7-maven-plugin</artifactId>
<version>2.1</version>
<configuration>
<!--在这里定义端口号 -->
<port>8080</port>
</configuration>
</plugin>
</plugins>
</build>

XML配置搭建

web.xml中配置DispatcherServlet:

1
2
3
4
5
6
7
8
9
10
11
12
13
14
<!-- 配置dispatcherServlet -->
<servlet>
<servlet-name>mvc-xml</servlet-name>
<servlet-class>org.springframework.web.servlet.DispatcherServlet</servlet-class>
<init-param>
<param-name>contextConfigLocation</param-name>
<param-value>classpath:applicationContext.xml</param-value>
</init-param>
<load-on-startup>1</load-on-startup>
</servlet>
<servlet-mapping>
<servlet-name>mvc-xml</servlet-name>
<url-pattern>/</url-pattern>
</servlet-mapping>

配置applicationContext.xml:

1
2
3
4
5
6
7
8
9
10
11
12
13
14
15
16
17
18
19
20
21
22
23
24
<?xml version="1.0" encoding="UTF-8"?>
<beans xmlns="http://www.springframework.org/schema/beans"
xmlns:xsi="http://www.w3.org/2001/XMLSchema-instance"
xmlns:context="http://www.springframework.org/schema/context"
xmlns:mvc="http://www.springframework.org/schema/mvc"
xmlns:p="http://www.springframework.org/schema/p"
xsi:schemaLocation="
http://www.springframework.org/schema/beans
http://www.springframework.org/schema/beans/spring-beans-4.3.xsd
http://www.springframework.org/schema/context
http://www.springframework.org/schema/context/spring-context-4.3.xsd
http://www.springframework.org/schema/mvc
http://www.springframework.org/schema/mvc/spring-mvc-4.3.xsd">
<!-- 开启组件扫描 -->
<context:component-scan base-package="mrbird"/>
<!-- 启用Spring mvc -->
<mvc:annotation-driven/>
<!-- 配置viewResolver -->
<bean id="viewResolver"
class="org.springframework.web.servlet.view.InternalResourceViewResolver"
p:prefix="/WEB-INF/views/"
p:suffix=".jsp">
</bean>
</beans>

编写一个最简单的cotroller:

1
2
3
4
5
6
7
8
9
10
11
import org.springframework.stereotype.Controller;
import org.springframework.web.bind.annotation.RequestMapping;
import org.springframework.web.bind.annotation.RequestMethod;

@Controller
public class IndexController {
@RequestMapping(value="/index",method=RequestMethod.GET)
public String index(){
return "index";
}
}

编写一个最简单的页面:

1
2
3
4
5
6
7
8
9
10
11
12
13
<%@ page language="java" contentType="text/html; charset=utf-8"
pageEncoding="utf-8"%>
<!DOCTYPE html PUBLIC "-//W3C//DTD HTML 4.01 Transitional//EN"
"http://www.w3.org/TR/html4/loose.dtd">
<html>
<head>
<meta http-equiv="Content-Type" content="text/html; charset=utf-8">
<title>leanote 蚂蚁笔记</title>
</head>
<body>
<p>蚂蚁笔记,有极客范的云笔记!</p>
</body>
</html>

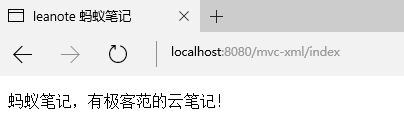
一切准备就绪,启动项目,访问http://localhost:8080/mvc-xml/index:

44103047-file_1487996019915_57b6.png

JavaConfig配置搭建

配置DispatcherServlet:

1
2
3
4
5
6
7
8
9
10
11
12
13
14
15
16
17
18
import org.springframework.web.servlet.support
.AbstractAnnotationConfigDispatcherServletInitializer;

public class WebAppInitializer
extends AbstractAnnotationConfigDispatcherServletInitializer{
@Override
protected Class<?>[] getRootConfigClasses() {
return new Class<?>[]{RootConfig.class};
}
@Override
protected Class<?>[] getServletConfigClasses() {
return new Class<?>[]{WebConfig.class};
}
@Override
protected String[] getServletMappings() {
return new String[]{"/"};
}
}

WebConfig:

1
2
3
4
5
6
7
8
9
10
11
12
13
14
15
16
17
18
19
20
21
@Configuration
//开启spring mvc
@EnableWebMvc
//开启扫描
@ComponentScan("mrbird")
public class WebConfig extends WebMvcConfigurerAdapter{
//配置viewResolver
@Bean
public ViewResolver viewResolver(){
InternalResourceViewResolver resolver = new InternalResourceViewResolver();
resolver.setPrefix("/WEB-INF/views/");
resolver.setSuffix(".jsp");
resolver.setExposeContextBeansAsAttributes(true);
return resolver;
}
@Override
public void configureDefaultServletHandling(
DefaultServletHandlerConfigurer configurer){
configurer.enable();
}
}

新的WebConfig类还扩展了WebMvcConfigurerAdapter并重写了其configureDefaultServletHandling()方法。通过调用DefaultServletHandlerConfigurer的enable()方法,我们要求DispatcherServlet将对静态资源的请求转发到Servlet容器中默认的Servlet上,而不是使用DispatcherServlet本身来处理此类请求。

RootConfig:

1
2
3
4
5
6
@Configuration
@ComponentScan(basePackages={"mrbird"},
excludeFilters={@Filter(type=FilterType.ANNOTATION,value=EnableWebMvc.class)})
public class RootConfig {

}

Controller和JSP页面同上。

请作者喝瓶肥宅水🥤

0