LinkedHashMap源码解析

HashMap元素插入是无序的,为了让遍历顺序和插入顺序一致,我们可以使用LinkedHashMap,其内部维护了一个双向链表来存储元素顺序,并且可以通过accessOrder属性控制遍顺序为插入顺序或者为访问顺序。本节将记录LinkedHashMap的内部实现原理,基于JDK1.8,并且用LinkedHashMap实现一个简单的LRU。

类结构

LinkedHashMap类层级关系图:

QQ20210225-143918@2x

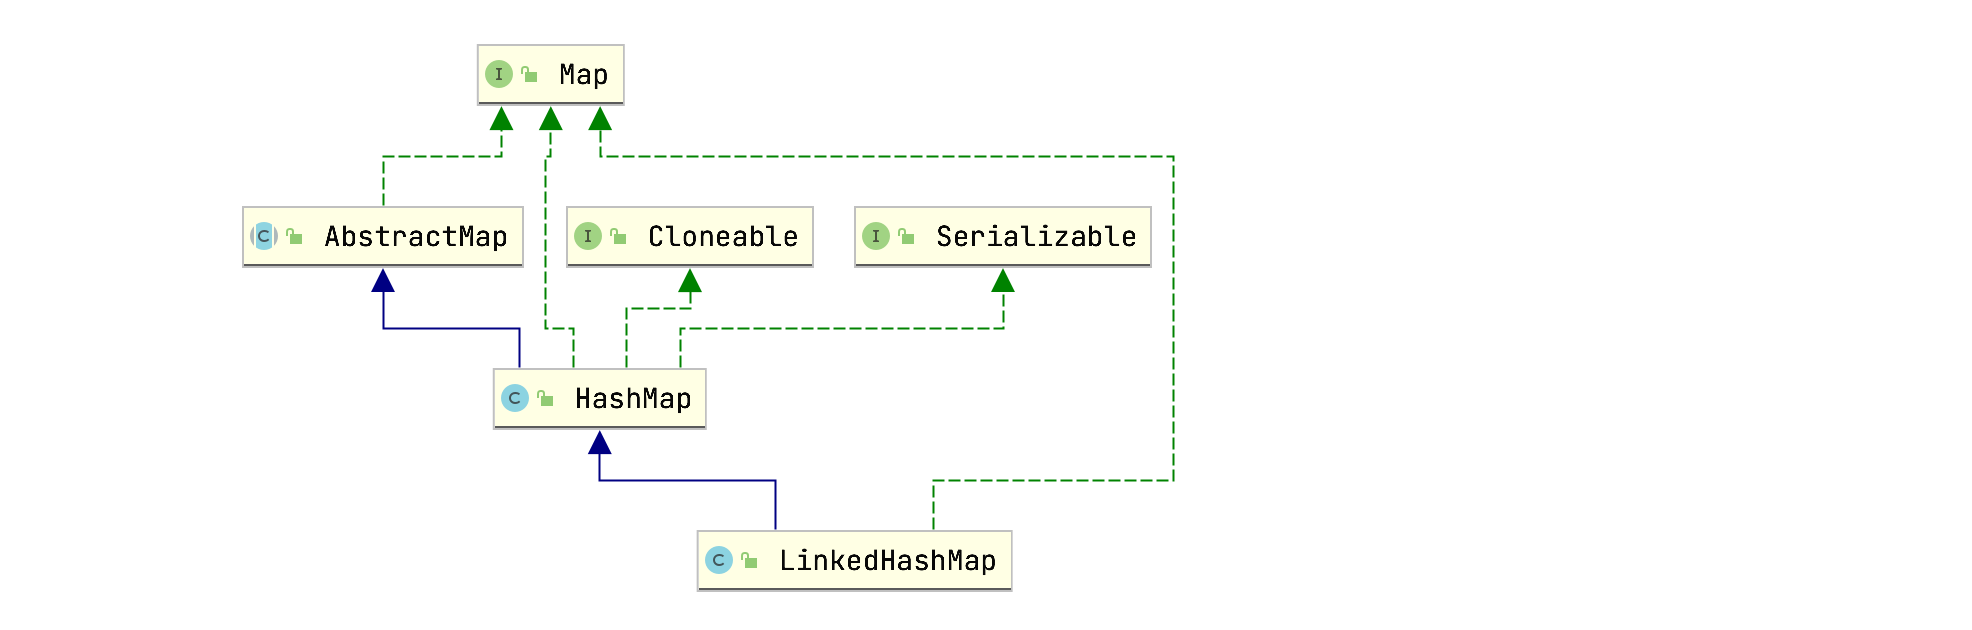
LinkedHashMap继承自HashMap,大部分方法都是直接使用HashMap的。接着查看成员变量:

1
2
3
4
5
6
7
8
// 双向链表的头部节点(最早插入的,年纪最大的节点)
transient LinkedHashMap.Entry<K,V> head;

// 双向链表的尾部节点(最新插入的,年纪最小的节点)
transient LinkedHashMap.Entry<K,V> tail;

// 用于控制访问顺序,为true时,按插入顺序;为false时,按访问顺序
final boolean accessOrder;

head和tail使用transient修饰,原因在介绍HashMap源码的时候分析过。

LinkedHashMap继承自HashMap,所以内部存储数据的方式和HashMap一样,使用数组加链表(红黑树)的结构存储数据,LinkedHashMap和HashMap相比,额外的维护了一个双向链表,用于存储节点的顺序。这个双向链表的类型为LinkedHashMap.Entry:

1
2
3
4
5
6
static class Entry<K,V> extends HashMap.Node<K,V> {
Entry<K,V> before, after;
Entry(int hash, K key, V value, Node<K,V> next) {
super(hash, key, value, next);
}
}

LinkedHashMap.Entry类层级关系图:

QQ20210225-145250@2x

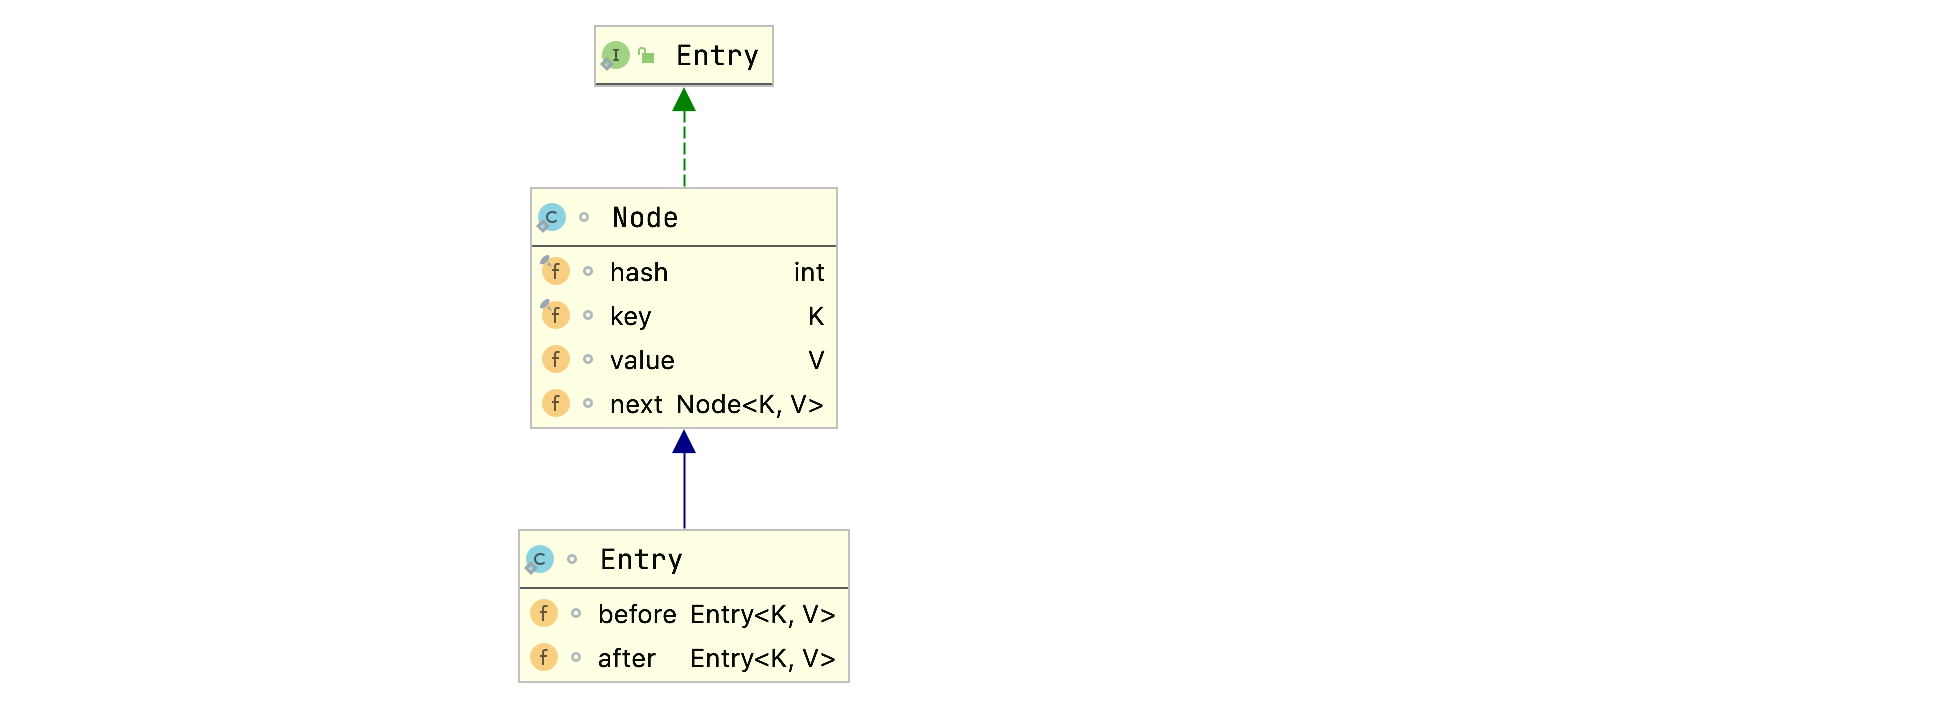
LinkedHashMap.Entry继承自HashMap的Node类,新增了before和after属性,用于维护前继和后继节点,以此形成双向链表。

构造函数

LinkedHashMap的构造函数其实没什么特别的,就是调用父类的构造器初始化HashMap的过程,只不过额外多了初始化LinkedHashMap的accessOrder属性的操作:

1
2
3
4
5
6
7
8
9
10
11
12
13
14
15
16
17
18
19
20
21
22
23
24
25
26
27
public LinkedHashMap(int initialCapacity, float loadFactor) {
super(initialCapacity, loadFactor);
accessOrder = false;
}

public LinkedHashMap(int initialCapacity) {
super(initialCapacity);
accessOrder = false;
}

public LinkedHashMap() {
super();
accessOrder = false;
}

public LinkedHashMap(Map<? extends K, ? extends V> m) {
super();
accessOrder = false;
putMapEntries(m, false);
}

public LinkedHashMap(int initialCapacity,
float loadFactor,
boolean accessOrder) {
super(initialCapacity, loadFactor);
this.accessOrder = accessOrder;
}

简单使用

在分析LinkedHashMap方法实现之前,我们先通过例子感受下LinkedHashMap的特性:

1
2
3
4
5
6
7
8
9
10
11
LinkedHashMap<String, Object> map = new LinkedHashMap<>(16, 0.75f, false);
map.put("1", "a");
map.put("6", "b");
map.put("3", "c");
System.out.println(map);

map.get("6");
System.out.println(map);

map.put("4", "d");
System.out.println(map);

输出:

1
2
3
{1=a, 6=b, 3=c}
{1=a, 6=b, 3=c}
{1=a, 6=b, 3=c, 4=d}

可以看到元素的输出顺序就是我们插入的顺序。

将accessOrder属性改为true:

1
2
3
{1=a, 6=b, 3=c}
{1=a, 3=c, 6=b}
{1=a, 3=c, 6=b, 4=d}

可以看到,一开始输出{1=a, 6=b, 3=c}。当我们通过get方法访问key为6的键值对后,程序输出{1=a, 3=c, 6=b}。也就是说,当accessOrder属性为true时,元素按访问顺序排列,即最近访问的元素会被移动到双向列表的末尾。所谓的“访问”并不是只有get方法,符合“访问”一词的操作有put、putIfAbsent、get、getOrDefault、compute、computeIfAbsent、computeIfPresent和merge方法。

下面我们通过方法源码的分析就能清楚地知道LinkedHashMap是如何控制元素访问顺序的。

方法解析

put(K key, V value)

LinkedHashMap并没有重写put(K key, V value)方法,直接使用HashMap的put(K key, V value)方法。那么问题就来了,既然LinkedHashMap没有重写put(K key, V value),那它是如何通过内部的双向链表维护元素顺序的?我们查看put(K key, V value)方法源码就能发现原因(因为put(K key, V value)源码在Java-HashMap底层实现原理一节中已经剖析过,所以下面我们只在和LinkedHashMap功能相关的代码上添加注释):

1
2
3
4
5
6
7
8
9
10
11
12
13
14
15
16
17
18
19
20
21
22
23
24
25
26
27
28
29
30
31
32
33
34
35
36
37
38
39
40
41
42
43
44
45
46
47
48
49
50
51
public V put(K key, V value) {
return putVal(hash(key), key, value, false, true);
}

final V putVal(int hash, K key, V value, boolean onlyIfAbsent,
boolean evict) {
Node<K,V>[] tab; Node<K,V> p; int n, i;
if ((tab = table) == null || (n = tab.length) == 0)
n = (tab = resize()).length;
if ((p = tab[i = (n - 1) & hash]) == null)
// 创建节点
tab[i] = newNode(hash, key, value, null);
else {
Node<K,V> e; K k;
if (p.hash == hash &&
((k = p.key) == key || (key != null && key.equals(k))))
e = p;
else if (p instanceof TreeNode)
// 方法内部包含newTreeNode的操作
e = ((TreeNode<K,V>)p).putTreeVal(this, tab, hash, key, value);
else {
for (int binCount = 0; ; ++binCount) {
if ((e = p.next) == null) {
// 创建节点
p.next = newNode(hash, key, value, null);
if (binCount >= TREEIFY_THRESHOLD - 1) // -1 for 1st
treeifyBin(tab, hash);
break;
}
if (e.hash == hash &&
((k = e.key) == key || (key != null && key.equals(k))))
break;
p = e;
}
}
if (e != null) { // existing mapping for key
V oldValue = e.value;
if (!onlyIfAbsent || oldValue == null)
e.value = value;
// 节点访问后续操作
afterNodeAccess(e);
return oldValue;
}
}
++modCount;
if (++size > threshold)
resize();
// 节点插入后续操作
afterNodeInsertion(evict);
return null;
}

newNode方法用于创建链表节点,LinkedHashMap重写了newNode方法:

1
2
3
4
5
6
7
8
9
10
11
12
13
14
15
16
17
18
19
20
21
Node<K,V> newNode(int hash, K key, V value, Node<K,V> e) {
// 创建LinkedHashMap.Entry实例
LinkedHashMap.Entry<K,V> p =
new LinkedHashMap.Entry<K,V>(hash, key, value, e);
// 将新节点放入LinkedHashMap维护的双向链表尾部
linkNodeLast(p);
return p;
}

private void linkNodeLast(LinkedHashMap.Entry<K,V> p) {
LinkedHashMap.Entry<K,V> last = tail;
tail = p;
// 如果尾节点为空,说明双向链表是空的,所以将该节点赋值给头节点,双向链表得以初始化
if (last == null)
head = p;
else {
// 否则将该节点放到双向链表的尾部
p.before = last;
last.after = p;
}
}

可以看到,对于LinkedHashMap实例,put操作内部创建的的节点类型为LinkedHashMap.Entry,除了往HashMap内部table插入数据外,还往LinkedHashMap的双向链表尾部插入了数据。

如果是往红黑树结构插入数据,那么put将调用putTreeVal方法往红黑树里插入节点,putTreeVal方法内部通过newTreeNode方法创建树节点。LinkedHashMap重写了newTreeNode方法:

1
2
3
4
5
6
7
TreeNode<K,V> newTreeNode(int hash, K key, V value, Node<K,V> next) {
// 创建TreeNode实例
TreeNode<K,V> p = new TreeNode<K,V>(hash, key, value, next);
// 将新节点放入LinkedHashMap维护的双向链表尾部
linkNodeLast(p);
return p;
}

节点类型为TreeNode,那么这个类型是在哪里定义的呢?其实TreeNode为HashMap里定义的,查看其源码:

1
2
3
4
5
6
7
8
9
10
11
12
static final class TreeNode<K,V> extends LinkedHashMap.Entry<K,V> {
TreeNode<K,V> parent; // red-black tree links
TreeNode<K,V> left;
TreeNode<K,V> right;
TreeNode<K,V> prev; // needed to unlink next upon deletion
boolean red;
TreeNode(int hash, K key, V val, Node<K,V> next) {
super(hash, key, val, next);
}

......
}

TreeNode继承自LinkedHashMap.Entry:

QQ20210225-160155@2x

所以TreeNode也包含before和after属性,即使插入的节点类型为TreeNode,依旧可以用LinkedHashMap双向链表维护节点顺序。

在put方法中,如果插入的key已经存在的话,还会执行afterNodeAccess操作,该方法在HashMap中为空方法:

1
void afterNodeAccess(Node<K,V> p) { }

afterNodeAccess方法顾名思义,就是当节点被访问后执行某些操作。LinkedHashMap重写了这个方法:

1
2
3
4
5
6
7
8
9
10
11
12
13
14
15
16
17
18
19
20
21
22
23
24
25
26
void afterNodeAccess(Node<K,V> e) { // move node to last
LinkedHashMap.Entry<K,V> last;
// 如果accessOrder属性为true,并且当前节点不是双向链表的尾节点的话执行if内逻辑
if (accessOrder && (last = tail) != e) {
// 这部分逻辑也很好理解,就是将当前节点移动到双向链表的尾部,并且改变相关节点的前继后继关系
LinkedHashMap.Entry<K,V> p =
(LinkedHashMap.Entry<K,V>)e, b = p.before, a = p.after;
p.after = null;
if (b == null)
head = a;
else
b.after = a;
if (a != null)
a.before = b;
else
last = b;
if (last == null)
head = p;
else {
p.before = last;
last.after = p;
}
tail = p;
++modCount;
}
}

所以当accessOrder为true时候,调用LinkedHashMap的put方法,插入相同key值的键值对时,该键值对会被移动到尾部:

1
2
3
4
5
6
7
LinkedHashMap<String, Object> map = new LinkedHashMap<>(16, 0.75f, true);
map.put("1", "a");
map.put("6", "b");
map.put("3", "c");
System.out.println(map);
map.put("6", "b");
System.out.println(map);

程序输出:

1
2
{1=a, 6=b, 3=c}
{1=a, 3=c, 6=b}

在put方法尾部,还调用了afterNodeInsertion方法,方法顾名思义,用于插入节点后执行某些操作,该方法在HashMap中也是空方法:

1
void afterNodeInsertion(boolean evict) { }

LinkedHashMap重写了该方法:

1
2
3
4
5
6
7
8
9
10
11
12
13
14
15
16
// 这里evict为true
void afterNodeInsertion(boolean evict) { // possibly remove eldest
LinkedHashMap.Entry<K,V> first;
// 如果头部节点不为空并且removeEldestEntry返回true的话
if (evict && (first = head) != null && removeEldestEntry(first)) {
// 获取头部节点的key
K key = first.key;
// 调用父类HashMap的removeNode方法,删除节点
removeNode(hash(key), key, null, false, true);
}
}

protected boolean removeEldestEntry(Map.Entry<K,V> eldest) {
// 在LinkedHashMap中,该方法永远返回false
return false;
}

基于这个特性,我们可以通过继承LinkedHashMap的方式重写removeEldestEntry方法,以此实现LRU,下面再做实现。

你可能会问,removeNode删除的是HashMap的table中的节点,那么用于维护节点顺序的双向链表不是也应该删除头部节点吗?为什么上面代码没有看到这部分操作?其实当你查看removeNode方法的源码就能看到这部分操作了:

1
2
3
4
5
6
7
8
9
10
11
12
13
14
15
16
17
18
19
20
21
22
23
24
25
26
27
28
29
30
31
32
33
34
35
36
37
38
39
40
41
final Node<K,V> removeNode(int hash, Object key, Object value,
boolean matchValue, boolean movable) {
Node<K,V>[] tab; Node<K,V> p; int n, index;
if ((tab = table) != null && (n = tab.length) > 0 &&
(p = tab[index = (n - 1) & hash]) != null) {
Node<K,V> node = null, e; K k; V v;
if (p.hash == hash &&
((k = p.key) == key || (key != null && key.equals(k))))
node = p;
else if ((e = p.next) != null) {
if (p instanceof TreeNode)
node = ((TreeNode<K,V>)p).getTreeNode(hash, key);
else {
do {
if (e.hash == hash &&
((k = e.key) == key ||
(key != null && key.equals(k)))) {
node = e;
break;
}
p = e;
} while ((e = e.next) != null);
}
}
if (node != null && (!matchValue || (v = node.value) == value ||
(value != null && value.equals(v)))) {
if (node instanceof TreeNode)
((TreeNode<K,V>)node).removeTreeNode(this, tab, movable);
else if (node == p)
tab[index] = node.next;
else
p.next = node.next;
++modCount;
--size;
// 节点删除后,执行后续操作
afterNodeRemoval(node);
return node;
}
}
return null;
}

afterNodeRemoval方法顾名思义,用于节点删除后执行后续操作。该方法在HashMap中为空方法:

1
void afterNodeRemoval(Node<K,V> p) { }

LinkedHashMap重写了该方法:

1
2
3
4
5
6
7
8
9
10
11
12
13
14
// 改变节点的前继后继引用
void afterNodeRemoval(Node<K,V> e) { // unlink
LinkedHashMap.Entry<K,V> p =
(LinkedHashMap.Entry<K,V>)e, b = p.before, a = p.after;
p.before = p.after = null;
if (b == null)
head = a;
else
b.after = a;
if (a == null)
tail = b;
else
a.before = b;
}

通过该方法,我们就从LinkedHashMap的双向链表中删除了头部结点。

其实通过put方法我们就已经搞清楚了LinkedHashMap内部是如何通过双向链表维护键值对顺序的,但为了让文章更饱满一点,下面继续分析几个方法源码。

get(Object key)

LinkedHashMap重写了HashMap的get方法:

1
2
3
4
5
6
7
8
9
public V get(Object key) {
Node<K,V> e;
if ((e = getNode(hash(key), key)) == null)
return null;
// 多了这一步操作,当accessOrder属性为true时,将key对应的键值对节点移动到双向列表的尾部
if (accessOrder)
afterNodeAccess(e);
return e.value;
}

remove(Object key)

LinkedHashMap没有重写remove方法,查看HashMap的remove方法:

1
2
3
4
5
6
7
public V remove(Object key) {
Node<K,V> e;
// 调用removeNode删除节点,removeNode方法内部调用了afterNodeRemoval方法,上面介绍put
// 方法时分析过了,所以不再赘述
return (e = removeNode(hash(key), key, null, false, true)) == null ?
null : e.value;
}

迭代器

既然LinkedHashMap内部通过双向链表维护键值对顺序的话,那么我们可以猜测遍历LinkedHashMap实际就是遍历LinkedHashMap维护的双向链表:

查看LinkedHashMap类entrySet方法的实现:

1
2
3
4
5
6
7
8
9
10
11
12
13
14
15
16
17
18
19
20
21
22
23
24
25
26
27
28
29
30
31
32
33
34
35
36
37
38
39
40
41
42
43
44
45
46
47
48
49
50
51
52
53
54
public Set<Map.Entry<K,V>> entrySet() {
Set<Map.Entry<K,V>> es;
// 创建LinkedEntrySet
return (es = entrySet) == null ? (entrySet = new LinkedEntrySet()) : es;
}

final class LinkedEntrySet extends AbstractSet<Map.Entry<K,V>> {
public final int size() { return size; }
public final void clear() { LinkedHashMap.this.clear(); }
public final Iterator<Map.Entry<K,V>> iterator() {
// 迭代器类型为LinkedEntryIterator
return new LinkedEntryIterator();
}
......
}

// LinkedEntryIterator继承自LinkedHashIterator
final class LinkedEntryIterator extends LinkedHashIterator
implements Iterator<Map.Entry<K,V>> {
// next方法内部调用LinkedHashIterator的nextNode方法
public final Map.Entry<K,V> next() { return nextNode(); }
}

abstract class LinkedHashIterator {
LinkedHashMap.Entry<K,V> next;
LinkedHashMap.Entry<K,V> current;
int expectedModCount;

LinkedHashIterator() {
// 初始化时,将双向链表的头部节点赋值给next,说明遍历LinkedHashMap是从
// LinkedHashMap的双向链表头部开始的
next = head;
// 同样也有快速失败的特性
expectedModCount = modCount;
current = null;
}

public final boolean hasNext() {
return next != null;
}

final LinkedHashMap.Entry<K,V> nextNode() {
LinkedHashMap.Entry<K,V> e = next;
if (modCount != expectedModCount)
throw new ConcurrentModificationException();
if (e == null)
throw new NoSuchElementException();
current = e;
// 不断获取当前节点的after节点,遍历
next = e.after;
return e;
}
......
}

上述代码符合我们的猜测。

LRU简单实现

LRU(Least Recently Used)指的是最近最少使用,是一种缓存淘汰算法,哪个最近不怎么用了就淘汰掉。

我们知道LinkedHashMap内的removeEldestEntry方法固定返回false,并不会执行元素删除操作,所以我们可以通过继承LinkedHashMap,重写removeEldestEntry方法来实现LRU。

假如我们现在有如下需求:

用LinkedHashMap实现缓存,缓存最多只能存储5个元素,当元素个数超过5的时候,删除(淘汰)那些最近最少使用的数据,仅保存热点数据。

新建LRUCache类,继承LinkedHashMap:

1
2
3
4
5
6
7
8
9
10
11
12
13
14
15
16
17
18
19
20
21
22
23
24
25
26
27
28
29
30
31
public class LRUCache<K, V> extends LinkedHashMap<K, V> {

/**
* 缓存允许的最大容量
*/
private final int maxSize;

public LRUCache(int initialCapacity, int maxSize) {
// accessOrder必须为true
super(initialCapacity, 0.75f, true);
this.maxSize = maxSize;
}

@Override
protected boolean removeEldestEntry(Map.Entry<K, V> eldest) {
// 当键值对个数超过最大容量时,返回true,触发删除操作
return size() > maxSize;
}

public static void main(String[] args) {
LRUCache<String, String> cache = new LRUCache<>(5, 5);
cache.put("1", "a");
cache.put("2", "b");
cache.put("3", "c");
cache.put("4", "d");
cache.put("5", "e");
cache.put("6", "f");
System.out.println(cache);
}

}

程序输出如下:

1
{2=b, 3=c, 4=d, 5=e, 6=f}

可以看到最早插入的1=a已经被删除了。

通过LinkedHashMap实现LRU还是挺常见的,比如logback框架的LRUMessageCache:

1
2
3
4
5
6
7
8
9
10
11
12
13
14
15
16
17
18
19
20
21
22
23
24
25
26
27
28
29
30
31
32
33
34
35
36
37
38
39
40
41
42
43
44
class LRUMessageCache extends LinkedHashMap<String, Integer> {

private static final long serialVersionUID = 1L;
final int cacheSize;

LRUMessageCache(int cacheSize) {
super((int) (cacheSize * (4.0f / 3)), 0.75f, true);
if (cacheSize < 1) {
throw new IllegalArgumentException("Cache size cannot be smaller than 1");
}
this.cacheSize = cacheSize;
}

int getMessageCountAndThenIncrement(String msg) {
// don't insert null elements
if (msg == null) {
return 0;
}

Integer i;
// LinkedHashMap is not LinkedHashMap. See also LBCLASSIC-255
synchronized (this) {
i = super.get(msg);
if (i == null) {
i = 0;
} else {
i = i + 1;
}
super.put(msg, i);
}
return i;
}

// called indirectly by get() or put() which are already supposed to be
// called from within a synchronized block
protected boolean removeEldestEntry(Map.Entry eldest) {
return (size() > cacheSize);
}

@Override
synchronized public void clear() {
super.clear();
}
}

请作者喝瓶肥宅水🥤

0